IBM
Page
IBM
Fourth Edition March
Contents
States of TeamConnection objects
Working with no component or release processes
Working with component and release processes
Introduction to TeamConnection Integrated Notes Databases
Part 3. Using TeamConnection Notes Integrated Databases
Part 4. Using TeamConnection to build applications
Creating and Maintaining Integrated Notes Databases
Working with MVS build scripts and builders
Installing, starting, and stopping build servers
Working with build scripts and builders
Working with parsers Creating a parser
Part 5. Using TeamConnection to package products
Appendix G. Source Code Control Users Guide
Appendix H. Supported expandable keywords
Appendix J. Sample Rexx execs, build scripts, and parsers
Readers Comments Ð Wed Like to Hear from You
Users Guide
Figures
Xii Users Guide
Xiii
Xiv Users Guide
Trademarks
Xvi Users Guide
Conventions
About this book
How this book is organized
Xvii
Tell us what you think
Part 1. Introducing TeamConnection
Users Guide
An introduction to TeamConnection
TeamConnection denitions
TeamConnections client/server architecture
TeamConnection database
Interfaces
Families
Users and host lists
Parts
Components
Check out
Check
Releases
Work areas
Drivers
Defects and features
Processes
Build
Approval
Packaging
System administrator
Family administrator
Roles people play
Build administrator
End user
Users Guide
Part 2. Developing a product using TeamConnection
Working with component and release processes
Using the GUI
Getting familiar with the TeamConnection client interfaces
Starting the GUI
Tasks window
Stopping the GUI
Performing tasks with the GUI
Using the Settings notebook
On the GUI
Using the command line interface
Online help information
Using the TeamConnection web client
Getting familiar with the TeamConnection client interfaces
Users Guide
Basics of using TeamConnection
Laying the groundwork
Authority to perform tasks
Components window
Finding objects within TeamConnection
Finding parts
Using work areas
BuildView
PartFull
Naming your work areas
Creating parts
Naming your parts
Preparing to build your parts
Working in serial or concurrent development mode
Working with parts
Dependent
Working with common parts
Getting parts from TeamConnection
Your workstations current working directory
Checking parts in to TeamConnection
Finding different versions of TeamConnection objects
Versioning releases
Versioning work areas
Versioning drivers
Designing the resolution
Working with defects and features
Analyzing defects and features
Versioning parts
Verifying the resolution of the defect or feature
Testing and verifying part changes
Resolving defects and implementing features
Reviewing the design and resource estimates
Users Guide
Release subprocesses
States of TeamConnection objects
Component subprocesses
Open state
Design state
Canceled state
Returned state
Size state
Review state
Working state
Verify state
Closed state
States of work areas
Approve state
Fix state
Integrate state
Commit state
States of drivers
Restrict state
Test state
Restrict state
Verication and test records
Users Guide
Working with no component or release processes
Working in serial development
Accepting a defect
For information about this task Go to this
Command
Creating a work area
Result
Checking out a part
Create Work Areas window
Searching for a part
Check Out Parts window
Selects Save to Task List
Part Filter window
Edit Task List window
Checking in a part
Teamc part -checkin optics.c -release robotcontrol -workarea
Verifying and testing part updates
Thus, work area 310 contains the following parts
Build Parts window
Extracting a part
Extract Parts window
Checking out the part one more time
Check Out Parts
Checking the part back
Freezing the work area
Now the work area contains the following parts
Refreshing the work area
Building the application
Refresh Work Areas window
Integrating the work area
Closing a defect
Integrate Work Areas window
Working in concurrent development
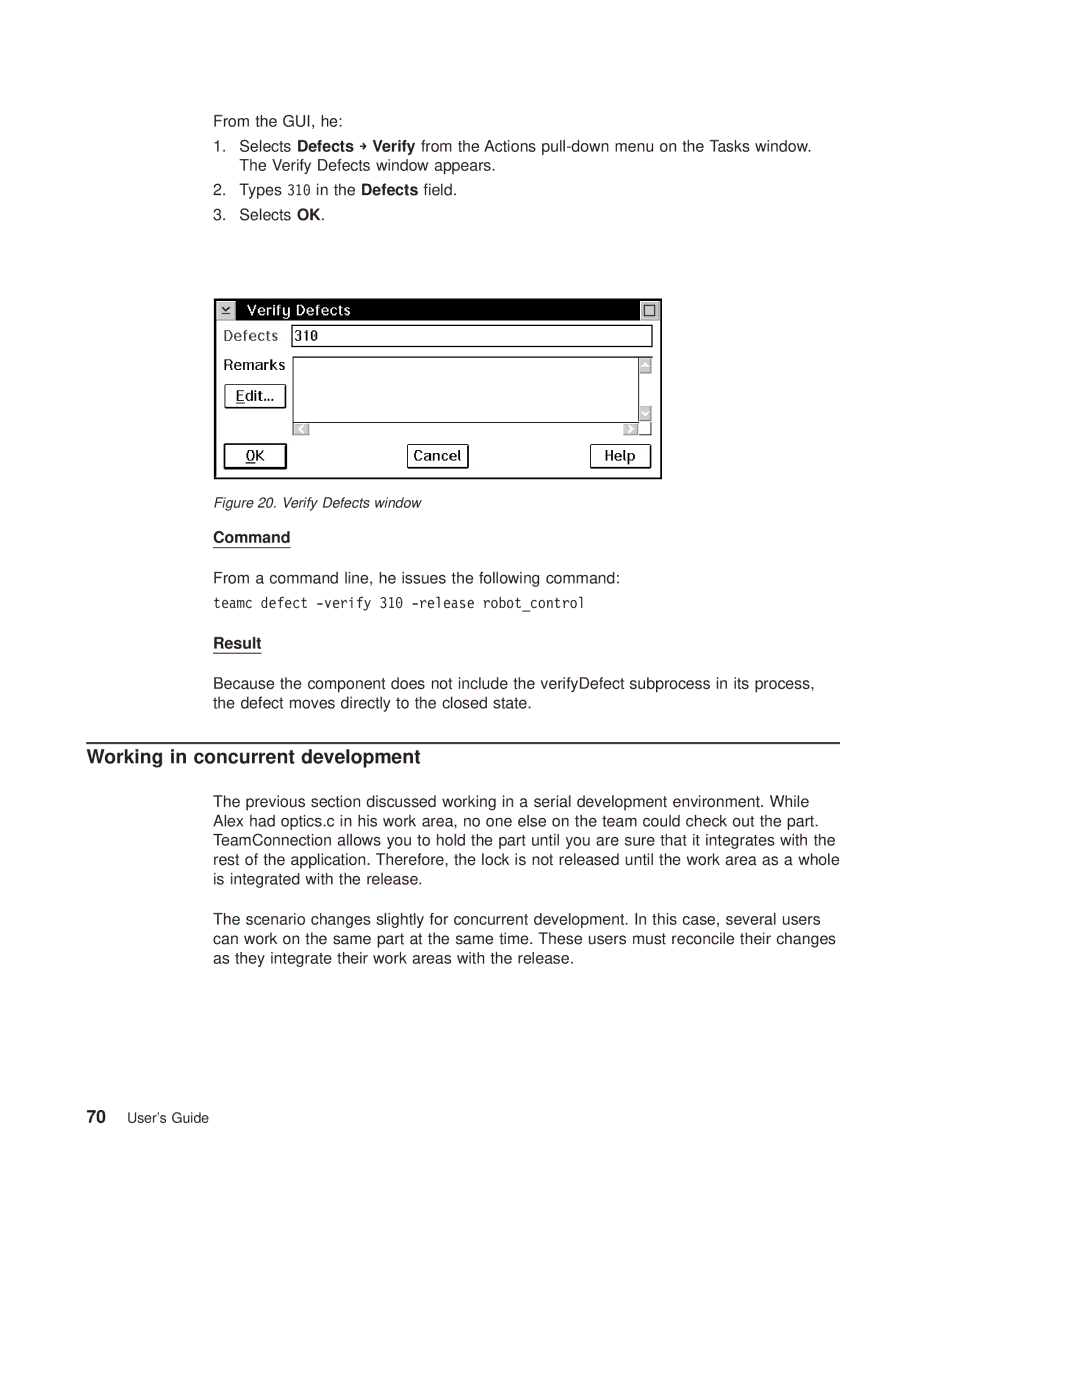
Verify Defects window
Refreshing the work area from the driver
Following tasks are required
From a command line, she issues the following command
Reconciling differences
GUI
Reconcile Collision Record window
Result
Working with component and release processes
Moving through design, size, and review
Changing defect ownership
Results
Accepting a defect
Approving
\robot\src in the Destination directory eld
Accept Approval Records window
Checking in the changes
\robot\src in the Source directory eld
Now the work area contains the following part versions
Teamc workarea -freeze 456 -release robotcontrol
Building the application
Accepting x records
Complete Fix Records window
Integrating changed parts into a release
Adding a driver member
Reconciling the differences
Returning the work area to the x state
Reactivating the x record
Activate Fix Records window
Refreshing the driver
Building the driver
Refresh Drivers window
Restricting the driver
Integrating the parts
Restrict Drivers window
Completing the driver
Complete Drivers window
Testing the built application
Accept Test Records window
Using a congured process
Retrieving a past version of a part
Teamc workarea -freeze 1208 -release robotcontrol
Working with component and release processes
TeamConnection system returns the following report
Part 3. Using TeamConnection Notes Integrated Databases
101
Users Guide
Introduction to TeamConnection Integrated Notes Databases
Getting started
103
Using TeamConnection with Lotus Notes
Prerequisites and dependencies
Sources of user information
Database types
Generic
Forms and subforms
Test Case Management and Tracking
User Dened
Views
Requirements
All documents
Reviews
Document archiving
Users Guide
Important notice to administrators
Creating and Maintaining Integrated Notes Databases
111
Initializing the original template and creating a database
Select Access Control
Users Guide
Select Administration-Document Control
Select File-Save
Creating customized production databases
Select Administration-Document Control
Performing reconciliation
Database maintenance refreshing design from a template
From the File menu, select Database-Replace Design
Important notice to administrators
Rules of thumb and general advice
Database Design Strategies and Advanced Customization
121
Using the Customization setup facility
Database-specic Options
Modify Database Optional Information
Common Database Options
Modify the document hierarchy
Modify TeamConnection Access
Reconciliation of Notes and TeamConnection Data
Activate Reconcile Defects and Features
Advanced customization
Log Document Options
Users Guide
Basic build concepts
Part 4. Using TeamConnection to build applications
127
Working with parsers
Building an application an example
Basic build concepts
Physical structure of the build function
129
Build event
Build object model
TeamConnection part
Builder
Input parts
Parent-child relationships in a build tree
Build script
Output parts
Users Guide
Working with a build tree
Sample build object model for msgcat.exe
Build tree for the hello application
Putting the pieces together
For more information about this task Go to this
For more information about this task Go to this
Creating a build server on MVS
Installing, starting, and stopping build servers
Installing the build function
137
Cd JCL data set for load module
Creating a build server on MVS/OE
Cd data set for teamproc jcl
Starting build servers using teamcbld
Starting an MVS build server
Runpgm Exec PGM=TEAMCBLD
Starting the MVS/OE build server
Creating build startup les for non-MVS environments
Stopping the build servers
Stopping an MVS build server
Users Guide
Working with build scripts and builders
Creating a builder
147
Fromscriptfilespec -scriptname
Release
Environment
Comparison operator and RC value
Timeout
Writing a build script
Parameters
Passing parameters to a build script
As attributes of a builder
As parameters of the part -build command
As attributes of a part in the build tree
Writing a simple build script
Writing an executable le for a build script
Testing a build script
Modifying the contents of a build script
Putting a builder to work
Removing a builder from a part
Modify Part Properties window
Working with VisualAge C++ and Templates
Users Guide
Working with MVS build scripts and builders
Creating a builder for MVS builds
159
Builder
Script, File type, and Source le
File type none Script fhbc
File type none Script null
Comparison operator are as follows ± EQ or == Equals
Fhbcobm.jcl
Writing an MVS build script
Fhbmasm.jcl
Fhbmpli.jcl
File name conversions for MVS
Passing parameters to an MVS build script
TeamConnection syntax for MVS build scripts
Tcbldusr
Positional parameters
Supported JCL syntax
Exec statement
Keyword parameters
DD Statement
WELLSK.TEAMC.ERROR
Example of a build script for a C compile
Working with MVS build scripts and builders
Example of a build script for a Cobol compile
UNIT=SYSDA,SPACE=TRK,10,5
Example of a build script for a link
DCB=RECFM=FB,LRECL=80,BLKSIZE=3200
Sysmod DD TCEXT=LOAD,DISP=NEW,DELETE
Working with MVS build scripts and builders
Users Guide
Working with parsers
Creating a parser
175
Include
Create Parser window
Writing a parser command le
Putting a parser to work
Removing a parser from a part
From a command line, type the following
Building an application an example
181
Sample build tree
Starting the build servers
Creating builders and parsers
Creating the build tree for the application
Mvspool
Create Parts window
Create Parts window
Modify Part Properties window
Connect Parts window
Starting the build on the client
Build tree display
Work area
Build mode
Build target
Build pool
Putting the build scripts to work
Unconditional
Detail le name
Finishing the job and reporting the results to the user
Monitoring the progress of a build
Running a build in spite of errors
Building all parts, regardless of build times
Canceling a build
Finding out which parts will be built
More sample build trees
Dening multiple outputs from a single build event
Synchronizing the build of unrelated parts
He creates the collector part
Building an application an example
Users Guide
199
Part 5. Using TeamConnection to package products
Chapter Using TeamConnection to package a product
Chapter
Users Guide
Using TeamConnection to package a product
201
Setting up your build tree for packaging
Setting up a build tree for the gather tool
She also connects a readme le for the application
Adding the gather step to the build tree
Using the Gather tool
Using the teamcpak command for the Gather tool
205
Command line ¯ags
String
Inputles
Using the Gather tool
Examples of the teamcpak gather command
Writing a package le for the Gather tool
Syntax rules for a Gather package le
Keywords for a Gather package le
Packageformat gather
Targetroot targetrootpath
Source list of le specications
Target Targetpath
Using exit keywords in the Data clause
Using exit keywords in the Rule clause
EXITPRIOR, EXITPOST, and Exitreplace String
Using exit keywords an example
Package le looks like this
Users Guide
Using the Tivoli Software Distribution packaging tool
215
InputFile
Example of the teamcpak softdist command
Writing a package le for Tivoli Software Distribution
Syntax rules for a Tivoli Software Distribution package le
Keywords for a Tivoli Software Distribution package le
Example
Packageformat softdist
Nodes
Installpgm
Option
Sample package le
Log le
Trace facility
Profile
Using the Tivoli Software Distribution packaging tool
Exit # end of file
Part 6. Appendixes
225
Users Guide
Appendix A. Environment Variables
227
Nlspath
Tcbuildpool
Tccasesense
Tcmakeimportverbose
Tcrelease
TeamConnection dynamically set build environment variables
Setting environment variables
Appendix B. Importing makele information into TeamConnection
235
Modied makele
Create le
Connect le
Le mask
Content
Creating a rules le
Connect
Component
Appendix C. TeamConnection Merge
239
Parameter Description
Creating a TeamConnection-enabled Workframe project
Setting up your project options
241
Using your TeamConnection Workframe project
Project actions
Edit part
Part actions
View part information
Show parts
Using your project a simple scenario
245
Tcuser
Tcbecome
TC View Part Information
TC View Part Contents
TC Extract Part
TC Build Part
Users Guide
Overview of the ENVY/Manager-TeamConnection Bridge
249
Scope of this documentation
How the bridge communicates with TeamConnection
Preparing to use the ENVY/Manager-TeamConnection Bridge
Setting up the bridge environment
Prerequisites
Environment variables
Loading the ENVY/Manager-TeamConnection Bridge
Testing the ENVY/Manager-TeamConnection Bridge
Using the ENVY/Manager-TeamConnection Bridge
Setting default properties
Defaults
Context
Operations
Locking
Import
Replace existing les
Export
Exporting Envy components to TeamConnection
Storage in TeamConnection
Exporting conguration maps and applications
Exporting les
Importing Envy components from TeamConnection
Scenario assumptions
TeamConnection
Envy
VisualAge Generator Developer
Object mapping in TeamConnection
Build generation
TeamConnection build function
Making a change to a member
TeamConnection change control
TeamConnection change control
Appendix G. Source Code Control Users Guide
Projects vs Families
267
Installing the TeamConnection source code control DLL
Removing the TeamConnection Source Code Control DLL
Connecting TeamConnection to an IDE
Using TeamConnection as your source code control provider
Before you start
Integrated features
Opening a project
Check-out
Full features of TeamConnection
Check-in
Uncheck-out
Migrating project data bases
Starting a new project
Users Guide
Appendix H. Supported expandable keywords
275
Then the expanded keywords will look like
277
Associated release ApprovalReject Approval record owner
Page
Page
Page
Page
Page
Page
Page
Page
Page
Page
Page
Page
Page
Page
Page
Page
Page
New test record owner, subscribers
Page
Page
Page
Users Guide
Appendix J. Sample Rexx execs, build scripts, and parsers
Sample Rexx execs
301
Script name Function Inputs
DrvrMem Lists the defect and feature members of a DriverName
Script name Function Inputs
Sample build scripts
Sample parsers
Sample package les
IBM Talklink
Customer support
307
Internet
DB2 service maintenance and technical library
Bibliography
IBM VisualAge TeamConnection Enterprise Server library
309
TeamConnection technical reports
Related publications
Glossary
Users Guide
Compare to
Glossary
313
Contrast with
Users Guide
Glossary
See also build dependent
End user. See user
HPFS. See high-performance le system
Users Guide
Pool. See build pool
Users Guide
TeamConnection superuser. See superuser
Users Guide
Index
323
Builder
Debug
GUI
Exitpost
Parts nding
Releases
Tcmakeimportrules 227, 235
Work area Automatic creation
Users Guide
Readers Comments Ð Wed Like to Hear from You
How satised are you that the information in this book is
Ibmr
Readers Comments Ð Wed Like to Hear from You
Page
Ibmr