Manuals
/
Panasonic
/
Household Appliance
/
Home Security System
Panasonic
BL-VT164W, BL-VP104W, BL-VP100
manual
Click Finish
Models:
BL-VP100
BL-VP104W
BL-VT164W
BL-VT164
1
128
180
180
Download
180 pages
49.05 Kb
125
126
127
128
129
130
131
132
Troubleshooting
Install
Action at an alarm occurrence
Password
Default English
Indicator
Wireless QoS
Maintenance
Configure the Https settings
Preset*2
Page 128
Image 128
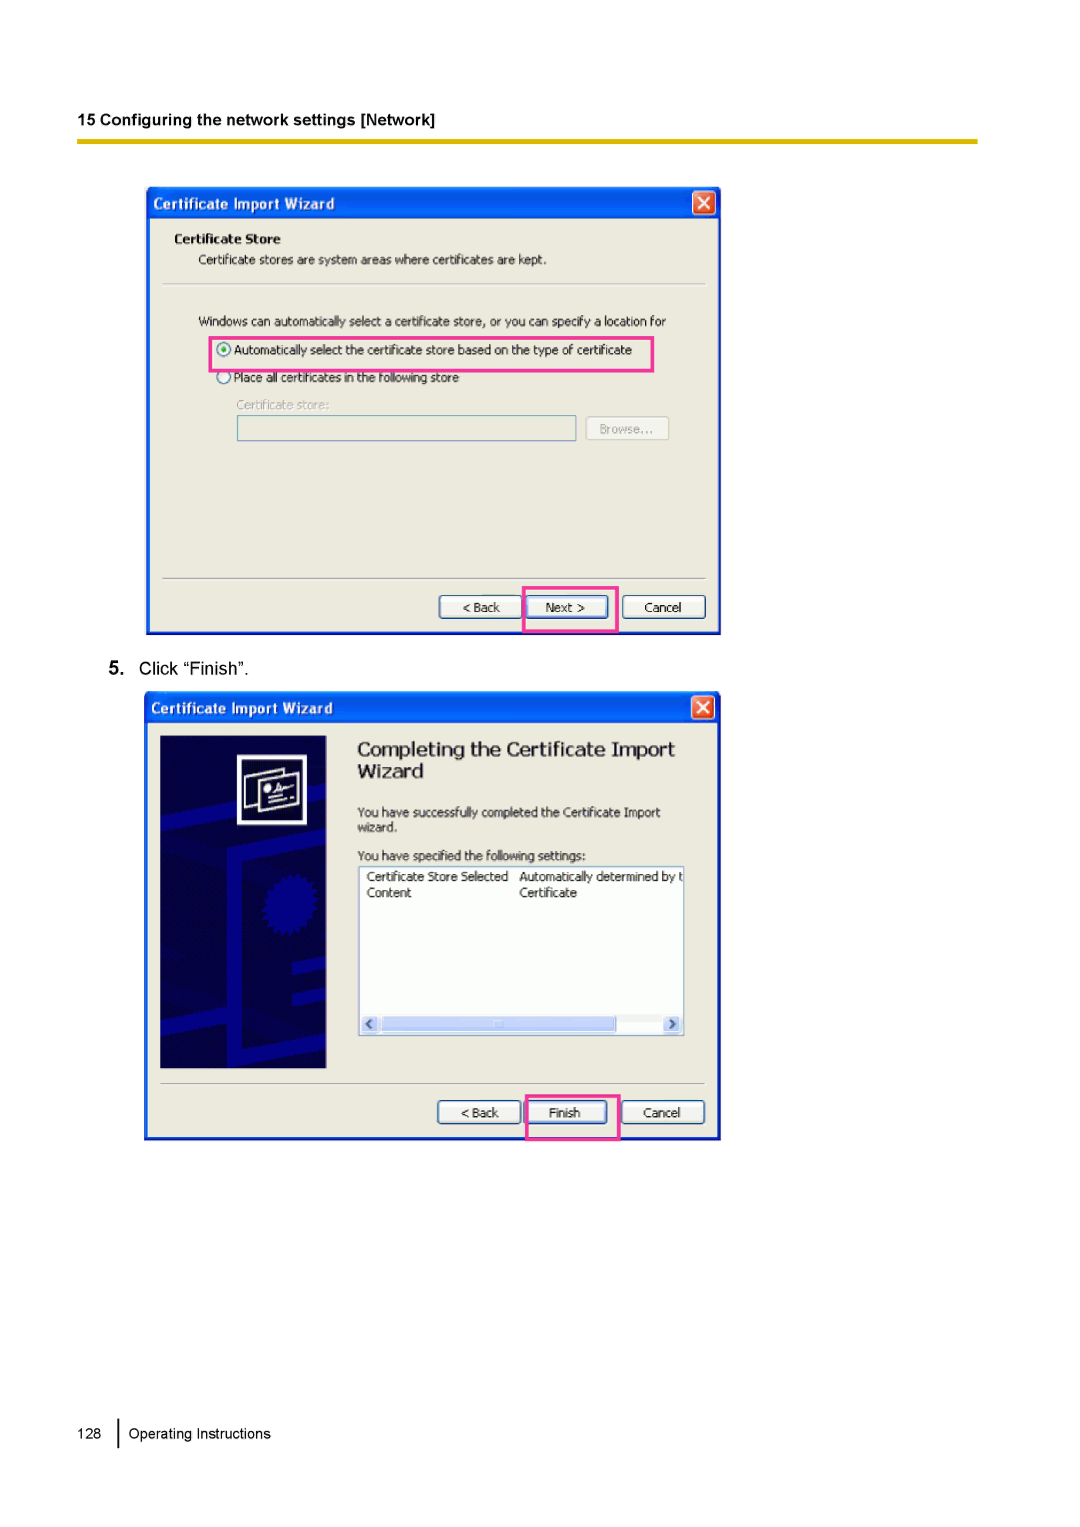
15 Configuring the network settings [Network]
5.
Click “Finish”.
128
Operating Instructions
Page 127
Page 129
Page 128
Image 128
Page 127
Page 129
Contents
Operating Instructions
Network Camera
Preface
About notations
Trademarks and registered trademarks
Abbreviations
Viewer software
Table of Contents
11.5
11.6
11.7
11.8
20.3 Installing the manuals 163 20.4
148
16.4
18.1 Check the system log System log 154 18.2
Monitor images from a single camera
Example of IPv4 access Example of IPv6 access
Monitor images on a PC
Monitor images on a PC
Refresh interval of Jpeg images
About the Live page BL-VT164W/BL-VT164
640x360 320x180 800x600 1280x720
Image quality buttons
AUX buttons*2
Zoom buttons*2
Preset*2
Alarm occurrence indication button*2
Control pad/buttons*2
Brightness buttons*2 Available range 0
Snap shot button
Mic input button*3
Audio output button*3
Main area*2
Monitor images on a PC
About the Live page BL-VP104W/BL-VP104/ BL-VP101
VGA
640x360 320x180 800x600
Zoom buttons
Main area*2
Monitor images from multiple cameras
Monitor images on a cellular phone/mobile terminal
Monitor images on a cellular phone
Monitor images on a cellular phone/mobile terminal
Functions
Outline of functions
Monitor images on a mobile terminal
Monitor images on a cellular phone/mobile terminal
Click the button of the function that you want to operate
Pan/Tilt VT164W VT164
Image in the aspect ratio
AUX control
Privacy Mode control VT164W
Monitor images on a cellular phone/mobile terminal
Action at an alarm occurrence
Action at an alarm occurrence
Alarm type
Action at an alarm occurrence
Transmit images onto an FTP server
About the network security
Equipped security functions
Display the setup menu from a PC
How to display the setup menu
How to operate the setup menu
Example
Display the setup menu from a PC
About the setup menu window
Maintenance button
Setup
Advanced func. button
User mng. button
Date/time
Configure the basic settings of the camera Basic
Camera title
Time display format
Date/time display format
Summer time daylight saving
NTP/Time zone
Brightness status display
Indicator
OSD Position
Alarm status update mode
Alarm status reception port
Automatic installation of viewer software
Wireless indicator Red/Orange/Green
Default English
Language
Configure the Internet settings Internet
UPnP Auto port forwarding
Recommended network setting for internet
Default 169 VT164W
Aspect ratio
Configure the settings relating to Jpeg images JPEG/H.264
Live page Initial display
Refresh interval Jpeg
Image capture size
Image quality setting
Default 640x360 VT164W
Default Quality1
Image quality
Configure the settings relating to H.264 images JPEG/H.264
Operating Instructions
Internet mode over Http
2641/H.2642
Default Normal
Transmission priority
Frame rate
Max bit rate per client
Refresh interval
Transmission type
Unicast port1Image*2
Unicast port2Audio*2
Smoother live video display on the browser buffering
Available value Default
Multicast TTL/HOPLimit*3
Default 1min
Home position
Self return
Self return time
Extra zoom
About extra zoom
Digital zoom
Pan-Tilt degree/Zoom ratio display
Extra zoom VP104W VP104
Image adjust
Preset position VT164W
Privacy zone
Adaptive black stretch
Mask area
Light control mode
Back light compensation BLC
Auto slow shutter
Day & Nightelectrical
White balance
Red gain
Blue gain
Chroma gain level
Aperture level
Pedestal level
Divided into 48
Borders on the image displayed on the Image/Privacy tab will
Image in the aspect ratio
Register the preset positions
Preset ID
Preset ID 0-9,A-Z
Position No
Zoom buttons, Brightness buttons, Control pad/buttons
Set button
Delete button
Zone setting
Privacy zone
Display type
Zone select
Area
Close button
Audio encoding format
Default G.726
Audio transmission/reception
Mic input volume Camera to PC
Audio output volume PC to Camera
Audio bit rate
Mic input interval Camera to PC
Muting while panning/tilting
Audio output port PC to Camera
Permission level of audio trans./recep
Example of entry
Configure the multi-screen settings Multi-screen
IP address
Available number of characters 1 128 characters
Configure the alarm settings Alarm
Configure the settings relating to the alarm action Alarm
Alarm
Terminal 1 VT164W
VMD alarm
Command alarm
Terminal 3 VT164W
Body heat sensor VT164W VT164
Camera action on alarm
Available range Default
Terminal alarm
Default Off Terminal alarm
Configure the settings relating to the alarm image Alarm
Default Off VMD alarm
Default Off Command alarm
Body heat sensor
Alarm image
Alarm output terminal setup
Change the AUX name Alarm BL-VT164W/ BL-VT164
AUX title
Select a preset position
Configure the VMD settings VMD area
VMD area setting BL-VT164W/BL-VT164
Procedure for setting the VMD area
VMD information addition
Information addition
All areas button VT164W
Status
Detection area
Detection sensitivity
Light detection control
Mail notification
Mail server
Destination of notification
Panasonic alarm protocol notification
Panasonic alarm protocol
Additional alarm area dataVMD
Destination port
Available range Default
XML notification
XML notification
Destination setting for XML notification
Face detection
Face detection
Authentication
User auth
User check
Password Retype password
Access level
Host auth
Host check
Priority stream
Activation
Destination IP address1
Destination IP address2
Image capture size
Configure the settings of the servers Server
Configure the settings relating to the E-mail server E-mail
Smtp server address
Smtp port
Configure the settings relating to the FTP server FTP
Default None
Sender’s E-mail address
Type
Configure the settings relating to the NTP server NTP
FTP mode
Default Passive
FTP server address
Time adjustment
NTP server address setting
Default Manual
NTP server address
Time zone
Time adjustment interval
Default 1h
Configuring the network settings Network
Configure the network settings Network
Network Settings
IPv4 network
IPv6 network
Common
Camera short cut
UPnP
Auto port forwarding
CA Certificate CA Certificate install
CRT key generate
Self-signed Certificate Generate
Self-signed Certificate Information
Bandwidth controlbit rate
FTP access to camera
Easy IP Setup accommodate period
WAN
Configure the Https settings
Generation of the CRT key SSL encryption key
Description
Available number of characters
Indication
Generation of CSR Certificate Signing Request
Installation of the server certificate
Configuration of the connection protocol
Access the camera using the Https protocol
Install the security certificate
120 Operating Instructions
Operating Instructions 121
122 Operating Instructions
Operating Instructions 123
124 Operating Instructions
Operating Instructions 125
OS Windows XP, Web browser When using Internet Explorer
Operating Instructions 127
Click Finish
About Dynamic DNS Update RFC2136 compliant
Configure the settings relating to Ddns Ddns
About Ddns services IPv4/IPv6
Global address is changed
Access using the current global address
PersonalCamera URL
Your Account Link
Global address is obtained via the URL domain name
Access interval
When using Dynamic DNS Update
Host name
Configure the settings relating to Snmp Snmp
Community
System name
Available number of characters 0 32 characters
FTP periodic image transmission
Location
Contact
Available number of characters 0 255 characters
FTP periodic image transmission
Transmission interval
How to set the schedules
How to delete the set schedule
Operating Instructions 139
Click the Basic tab on the Wireless page. →page 34,
Available number of characters 1 32 characters
Communication mode
Default wifi
Hex characters 128bit
WEP key
Hex characters 64bit
Alphanumeric characters 128bit
Network key
Alphanumeric characters 64bit
About Wi-Fi Protected Setup WPS
Performing settings automatically with PIN code settings
Using the PIN code configured to the wireless router
Using a selected PIN code set to the camera
Operating Instructions 147
Wireless QoS
Using the cameras Wireless QoS Basic
Confirming the cameras wireless information Status
Wireless module status
Firmware version Wireless
Operation mode
Auto setup WPS
Authentication method
Radio wave status
Configure the settings relating to the schedules Schedule
152 Operating Instructions
Body heat sensor permission VT164W
Maintenance of the camera Maintenance
Upgrade the firmware Upgrade
Check the system log System log
Time & date
Operating Instructions 155
Check the status Status
Self check
Reset the settings/Reboot the camera Default reset
Viewnetcam.com UPnP
Reset to the default Except the network settings
Load the default Html files setup menu
Reset to the default and load the default Html files
Reboot
Privacy Mode BL-VT164W/BL-VT164
Configuring the Privacy Mode with the Privacy button
Configuring the Privacy Mode with the setup menu
Turning the Privacy Mode off
Using the CD-ROM
About the CD launcher
Installing Panasonic IP Setting Software
For Windows Vista/Windows
Installing the manuals
Installing the Viewer software
164 Operating Instructions
Operating Instructions 165
Error indications relating to Smtp
Error indications relating to FTP
About the displayed system log
Category Indication
Category
Error indications relating to Viewnetcam.com
Error indications relating to Dynamic DNS Update
Log indications relating to Https
Error indications relating to NTP
Log indications relating to login
Panasonic alarm protocol notification error
Troubleshooting
Symptom
Cause/solution
Reference pages
When the camera and the PC are connected in the same subnet
When communicating using IPv4
105 106 129 132 156
104 119
Installation Guide
Operating Instructions 175
176 Operating Instructions
Cannot connect to the wireless router
When using Internet Explorer
Information Bar
Operating Instructions 179
For Europe and other countries
PGQP1208YA C0312-1042
Top
Page
Image
Contents