FrameSaver� Flex
Copyright E 2000 Paradyne Corporation All rights reserved
Contents
Configuration
Security and Logins
Troubleshooting
Setting Up NetScout Manager Plus for FrameSaver Devices
Index
About This Guide
Purpose and Intended Audience
Document Organization
Devices. Describes setup of the NetScout Manager Plus
Setting Up OpenLane for FrameSaver Devices. Identifies
Where installation and setup information is located and how
Setting Up NetScout Manager Plus for FrameSaver
Product-Related Documents
Highlighted text
When viewing this manual online. Click on
Conventions Used
To indicate a hyperlink to additional information
About the FrameSaver Flex
System Overview
System Overview
FrameSaver Flex Feature Sets
Flex Flex SLV
Feature Feature Set Basic Advanced
Basic Flex Features
Through Connections PVCs Dedicated Management PVCs
9123-A1-211 9123-A1-213 Feature 9123-A1-221 9123-A1-223
Maximum Number of PVCs and Management PVCs Supported
Models
July
Advanced Flex SLV Features
OpenLane SLM System
NetScout Manager Plus and NetScout Probes
About the FrameSaver Flex
User Interface Basic Operation
Logging On
Procedure
If your login was Then
Main Menu
Select
Main Menu
Service Level Verification System Options
Screen Work Areas
Screen Format Description
Navigating the Screens
Keyboard Keys
Press
Select For the screen Press Enter to Function
Function Keys
Selecting from a Menu
Switching Between Screen Areas
Selecting a Field
Entering Information
Example
User Interface and Basic Operation
Configuration
Configuration
Basic Configuration
Configuration Menu
Configuration EDIT/DISPLAY
Configuration Option Area Description
Configuration Option Areas
Main Menu → Configuration
Accessing and Displaying Configuration Options
Configuration → PVC Connections
Changing Configuration Options
Saving Configuration Options
Using the Easy Install Feature
Main Menu → Easy Install
Easy Install Screen Example
Default
If the selection is Unit is configured to operate
Main Menu → Control → System Information
Setting Up So the Router Can Receive RIP
Entering System Information Setting the System Clock
Configuration → Data Ports → Dlci Records
AUTO-CONFIGURATION
Setting Up Auto-Configuration
Main Menu → Auto-Configuration
Auto-Configuration Screen Example
Selecting a Frame Relay Discovery Mode
Main Menu → Auto-Configuration → Frame Relay Discovery Mode
Discovery Mode Configuration Description
9123-A2-GB20-10 July
Automatically Removing a Circuit
Setting Up Back-to-Back Operation
Changing Operating Mode
Main Menu → Control → Change Operating Mode
Configuring the Overall System
Configuration Option Tables
LMI Behavior
Configuring Frame Relay and LMI for the System
Main Menu → Configuration → System → Frame Relay and LMI
System Frame Relay and LMI Options 1
LMI Status Enquiry N1 Possible Settings 1, 2, 3, 4
System Frame Relay and LMI Options 2
Traffic Policing
System Frame Relay and LMI Options 3
LMI Heartbeat T1 Possible Settings 5, 10, 15, 20, 25
Service Level Verification Options 1
Configuring Service Level Verification Options
Service Level Verification Options 2
SLV Timeout Clearing Event Threshold
SLV Packet Size bytes
Configuring General System Options
Main Menu → Configuration → System→ General
General System Options
Network Physical Interface Options 1
Configuring the Physical Interfaces
Configuring the Network Interface
Main Menu → Configuration → Network → Physical
Network Initiated LLB
Network Physical Interface Options 2
Bit Stuffing
Transmit Timing
Ansi Performance Report Messages
Network Initiated Dclb Possible Settings Disable, V.54&ANSI
Network Physical Interface Options 3
Network Initiated PLB
Circuit Identifier
Network Physical Interface Options 4
Transmit Clock Source
Configuring the User Data Port
Main Menu → Configuration → Data Ports → Physical
Data Port Physical Interface Options 1
Data Port Physical Interface Options 2
Monitor RTS Control
Port DTE Initiated Loopbacks
Main Menu → Easy Install → Time Slot Assignment Screen
Assigning Time Slots/Cross Connections
Assigning Frame Relay Time Slots to the Network Interface
Frame Relay Network 1 Assignment
Frame Relay Network Time Slot Assignment Screen Example
Value Meaning
Time Slot Assignment Rule
Select Frame Relay Network Assignments
Assigning the Synchronous Data Port to Network Time Slots
Synchronous Data Port Assignment Screen Example
Sync Data Port Assignment
Clearing Assignments
Interface Frame Relay Options 1
Configuring Frame Relay for an Interface
LMI Parameters
Interface Frame Relay Options 2
Frame Relay DS0s Base Rate
Interface Frame Relay Options 3
Dlci Record Options 1
Manually Configuring Dlci Records
Main Menu→ Configuration→ Network/Data Port→ Dlci Records
Dlci Type Possible Settings Standard, Multiplexed
Excess Burst Size Bits
Dlci Record Options 2
CIR bps
Committed Burst Size Bc Bits
Dlci Record Options 3
Dlci Priority
Outbound Management Priority
Configuring PVC Connections
Main Menu → Configuration → PVC Connections
PVC Connection Options 1
Destination Edlci
PVC Connection Options 2
Destination Link
Destination Dlci
Configuring Node IP Information
Setting Up Management and Communication Options
Node IP Options 1
Node IP Options 2
TS Access Management Link
Node IP Options 3
TS Access
Configuring Management PVCs
10. Management PVC Options 1
Name
Primary Link Possible Settings Net1-FR1, Port-1, Clear
10. Management PVC Options 2
Set DE
10. Management PVC Options 3
Primary Dlci
Primary Edlci
Snmp Management
Configuring General Snmp Management
Name 1 Access
11. General Snmp Management Options 1
Configuring Telnet and/or FTP Session Support
11. General Snmp Management Options 2
12. Telnet and FTP Session Options 1
12. Telnet and FTP Session Options 2
Inactivity Timeout
FTP Session
FTP Login Required
12. Telnet and FTP Session Options 3
Disconnect Time Minutes
NMS IP Validation
Configuring Snmp NMS Security
Access Type
13. Snmp NMS Security Options
Number of Trap Managers
Configuring Snmp Traps
14. Snmp Traps Options 1
Snmp Traps
Enterprise Specific Traps
14. Snmp Traps Options 2
Link Traps Possible Settings Disable, Up, Down, Both
14. Snmp Traps Options 3
Rmon Traps
Configuring the Ethernet Port
15. Ethernet Port Options 1
Interface Status
Proxy ARP
15. Ethernet Port Options 2
Character Length
Configuring the Communication Port
16. Communication Port Options 1
Port Use
Ignore Control Leads
Login Required
16. Communication Port Options 2
Stop Bits
16. Communication Port Options 3
RIP
16. Communication Port Options 4
17. External Modem COM Port Options
Configuring the COM Port to Support an External Modem
External Modem Commands
Dial-In Access
Configuration
Security and Logins
Controlling Asynchronous Terminal Access
Limiting Access
Set the configuration option
Controlling Telnet or FTP Access
Controlling External COM Port Device Access
Limiting Telnet Access
Limiting FTP Access
Limiting Telnet or FTP Access Over the TS Management Link
Disabling Snmp Access
Controlling Snmp Access
Assigning Snmp Community Names and Access Levels
Limiting Snmp Access Through IP Addresses
Creating a Login
Main Menu → Control → Administer Logins
Field Enter
Deleting a Login
Modifying a Login
Operation and Maintenance
Displaying System Information
Main Menu → Status → Identity
View this field To find
Viewing LEDs and Control Leads
Main Menu → Status → Display LEDs and Control Leads
Display LEDs & Control Leads Screen
General Status LEDs 1 Label Indication Color What It Means
LED Descriptions
Network Interface LEDs Label Indication Color What It Means
General Status LEDs 2 Label Indication Color What It Means
Network Interface
Control Lead Descriptions
User Data Port LED Label Indication Color What It Means
Additional Control Leads Label Indication What It Means
Device Messages 1 What It Indicates What To Do
Device Messages
See Changing Software
Device Messages 2 What It Indicates What To Do
Device Messages 3 What It Indicates What To Do
Software
Device Messages 4 What It Indicates What To Do
Changes? prompt
Device Messages 5 What It Indicates What To Do
Status Information
Status Menu
Status
Self-Test Results Messages
Self-Test Results Messages Last System Reset Date and Time
Last System Reset Date and Time
System and Test Status Messages
Health and Status Messages 1 What It Indicates
Health and Status Messages
Frame relay link
Health and Status Messages 2 What It Indicates
Frame relay link 1, 2
Health and Status Messages 3 What It Indicates
Test Status Messages 1 What It Indicates
Test Status Messages
LMI-Reported DLCIs Status Screen Example
Network LMI-Reported DLCIs Status
Test Status Messages 2 What It Indicates
Main Menu → Status → LMI Reported DLCIs
Network LMI-Reported DLCIs Status Field What It Indicates
10. PVC Connection Status 1 Field
PVC Connection Status
Main Menu → Status → PVC Connection Status
PVC Connection Status Screen Example
10. PVC Connection Status 2 Field What It Indicates
Network Timeslot Assignment Status Screen Example
Time Slot Assignment Status
Displaying Network Time Slot Assignments
Main Menu → Status → Timeslot Assignment Status → Network
Cross Connect Status Field Indicates Bottom
11. IP Routing Table Values 1 Column What It Indicates
IP Routing Table
Main Menu → Status → IP Routing Table
IP Routing Table Screen Example
11. IP Routing Table Values 2 Column What It Indicates
Performance Statistics
Performance Statistics
Main Menu → Status → Performance Statistics
Performance Statistics Menu
Performance Statistics → ESF Line
Clearing Performance Statistics
Performance Statistics → Clear All Statistics
Performance Statistics → Frame Relay
Service Level Verification Performance Statistics
Average round trip latency is measured every SLV sampling
Dlci Performance Statistics
Main Menu → Status → Performance Statistics → Dlci
13. Dlci Performance Statistics 1 What It Indicates
CIR&EIR
13. Dlci Performance Statistics 2 What It Indicates
14. Frame Relay Performance Statistics 1 What It Indicates
Frame Relay Errors
Frame Relay Performance Statistics
Main Menu → Status → Performance Statistics → Frame Relay
Frame Relay Errors contd
14. Frame Relay Performance Statistics 2 What It Indicates
Frame Relay LMI
14. Frame Relay Performance Statistics 3 What It Indicates
Frame Relay Hdlc Errors
ESF Line Performance Statistics
Main Menu → Status → Performance Statistics → ESF Line
To select intervals You must enter an interval or time on
±LOFC±±
ESF Line Performance Statistics Screen Example
UAS
Statistic What It Indicates
Main Menu → Status → Performance Statistics → Ethernet
Ethernet Performance Statistics
Trap Event LOG
Trap Event Log
Main Menu → Status → Trap Event Log
Trap Event Log Screen Example
FTP File Transfers
Dir directory
Command Definition
If the message displayed is Then
Upgrading System Software
6.1.4.1.1795.2.24.2.6.9.4.4.2
Dlci EIR
6.1.4.1.1795.2.24.2.6.9.4.7.1
6.1.4.1.1795.2.24.2.6.9.4.5.2.1
6.1.4.1.1795.2.24.2.6.9.4.10.3.1
6.1.2.1.10.32.2.1
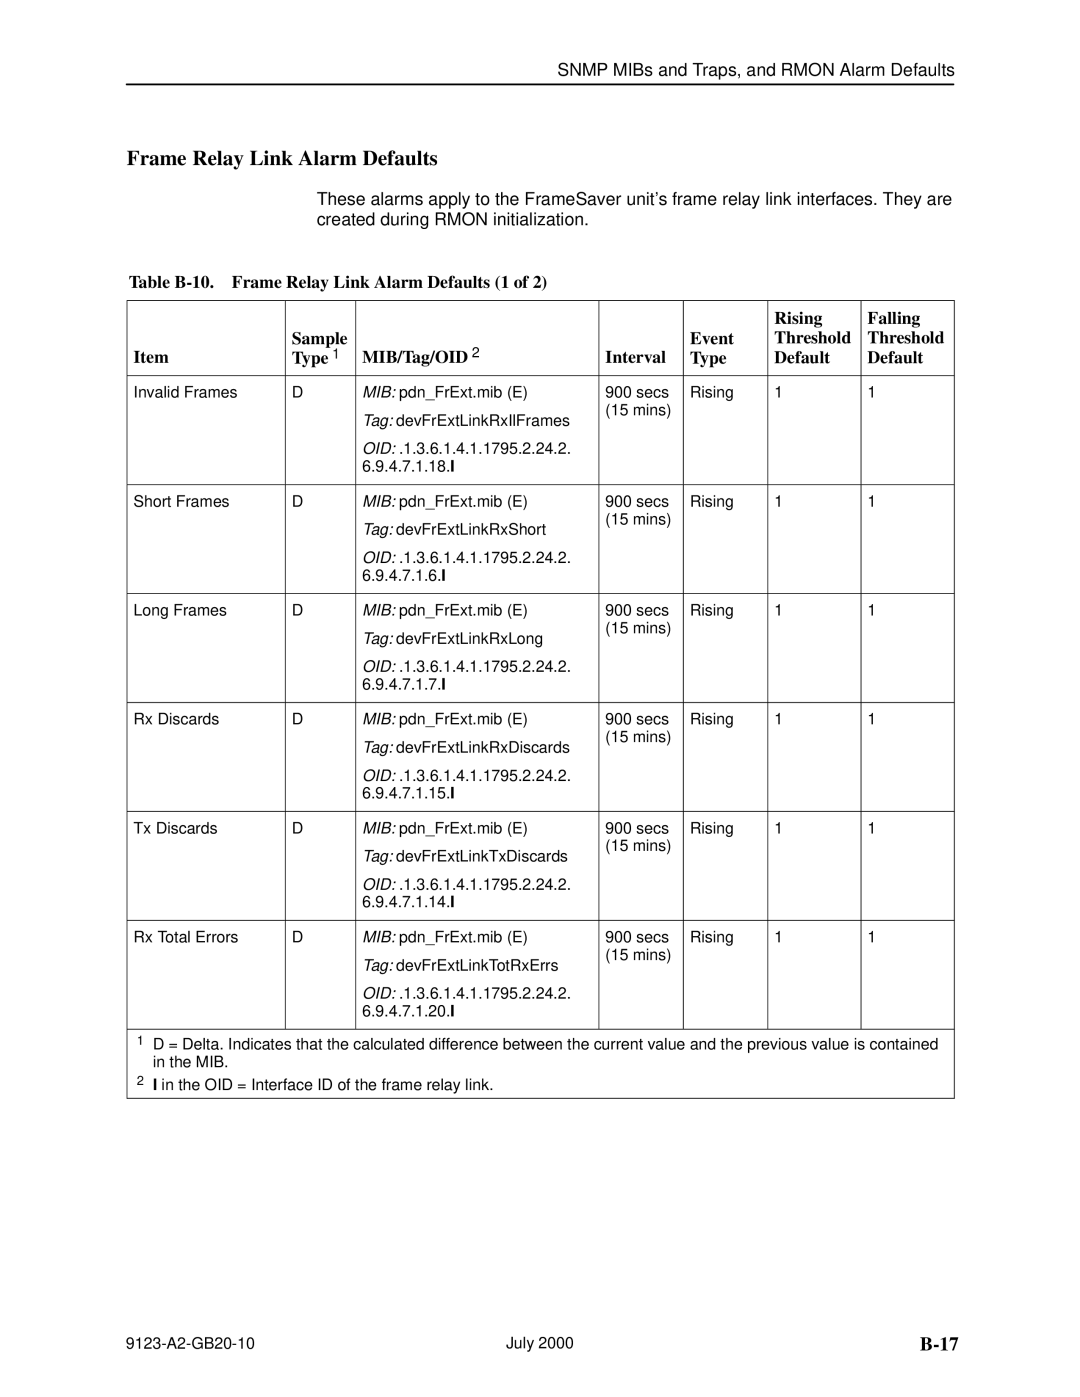
Snmp MIBs and Traps, and Rmon Alarm Defaults
Snmp MIBs and Traps, and Rmon Alarm Defaults
Rear Panel
Connectors, Cables, Pin Assignments
Function Circuit Direction Pin Number
T1 Network Cable Feature No -F1-500
Canadian T1 Line Interface Cable Feature No -F1-510
T1 Network Interface
Signal Direction Pin #
COM Port Connector
Pin
Standard EIA-232-D Crossover Cable
AT Command String To configure the modem to
Direction Pin Socket
Data Port Connector
Signal
Standard V.35 Straight-through Cable
Ethernet Port Connector
Connectors, Cables, and Pin Assignments
Technical Specifications
Data Port
COM Port
T1 Network Interface
Ethernet Port
Equipment
Description Model / Feature Number
FrameSaver Flex SLV Upgrade
Equipment List
NMS Products
Description Part Number Feature Number
Optional Features
Cables
Numbers
Index
IN-2
IN-3
IN-4
IN-5
IN-6
IN-7
IN-8
IN-9
IN-10