Page
Electronic Imaging Division Musick, Irvine, CA
For U.S.A. only
For Canada only
Office Product Group McNABB Street
For New Zealand only
17th Floor Queen Street Auckland New Zealand Phone 64 9 307
Preface
Super G3 High-speed Communications
Destination telephone directory Dual access
High-resolution U-FINE mode
Weekly timer mode
Table of Contents
Multi-Key Quick Broadcast Group Broadcast Transmission
Memory RX Setting
Table of Contents
Automatic Supplies Order Setting
RDC Remote Diagnosis Configuration Service
Specifications
When a Power Failure Occurs
Precautions
Page
Description of the 1 Digital Copier
Description of the Digital Copier
STUDIO16
Description of the Optional Equipment
STUDIO20/25
Description of the Optional Equipment
ADF Automatic document feeder
Used to adjust the brightness of the message display panel
Main Components
Brightness control
Main Components
Connecting the Cables
Description of the Control Panel
Printer key
Cancel key
Image Mode key
Arrow keys
Description of the Control Panel
Function Keys
One Touch keys
Print a transmission report for one job
Prints a Job Reservation List See
Description of the Digital Copier
Basic Operation
2BASIC Operation
Send Modes
Multi-address transmission See
Send Modes
Polling transmission See
Security TX
Receiving Modes
Original
About Originals
Original Size
Original Scanning Range
Message Ready indicates that you can make copies at any time
Against the original scale
About Originals
Preparing for Transmission
Precautions When Feeding Originals
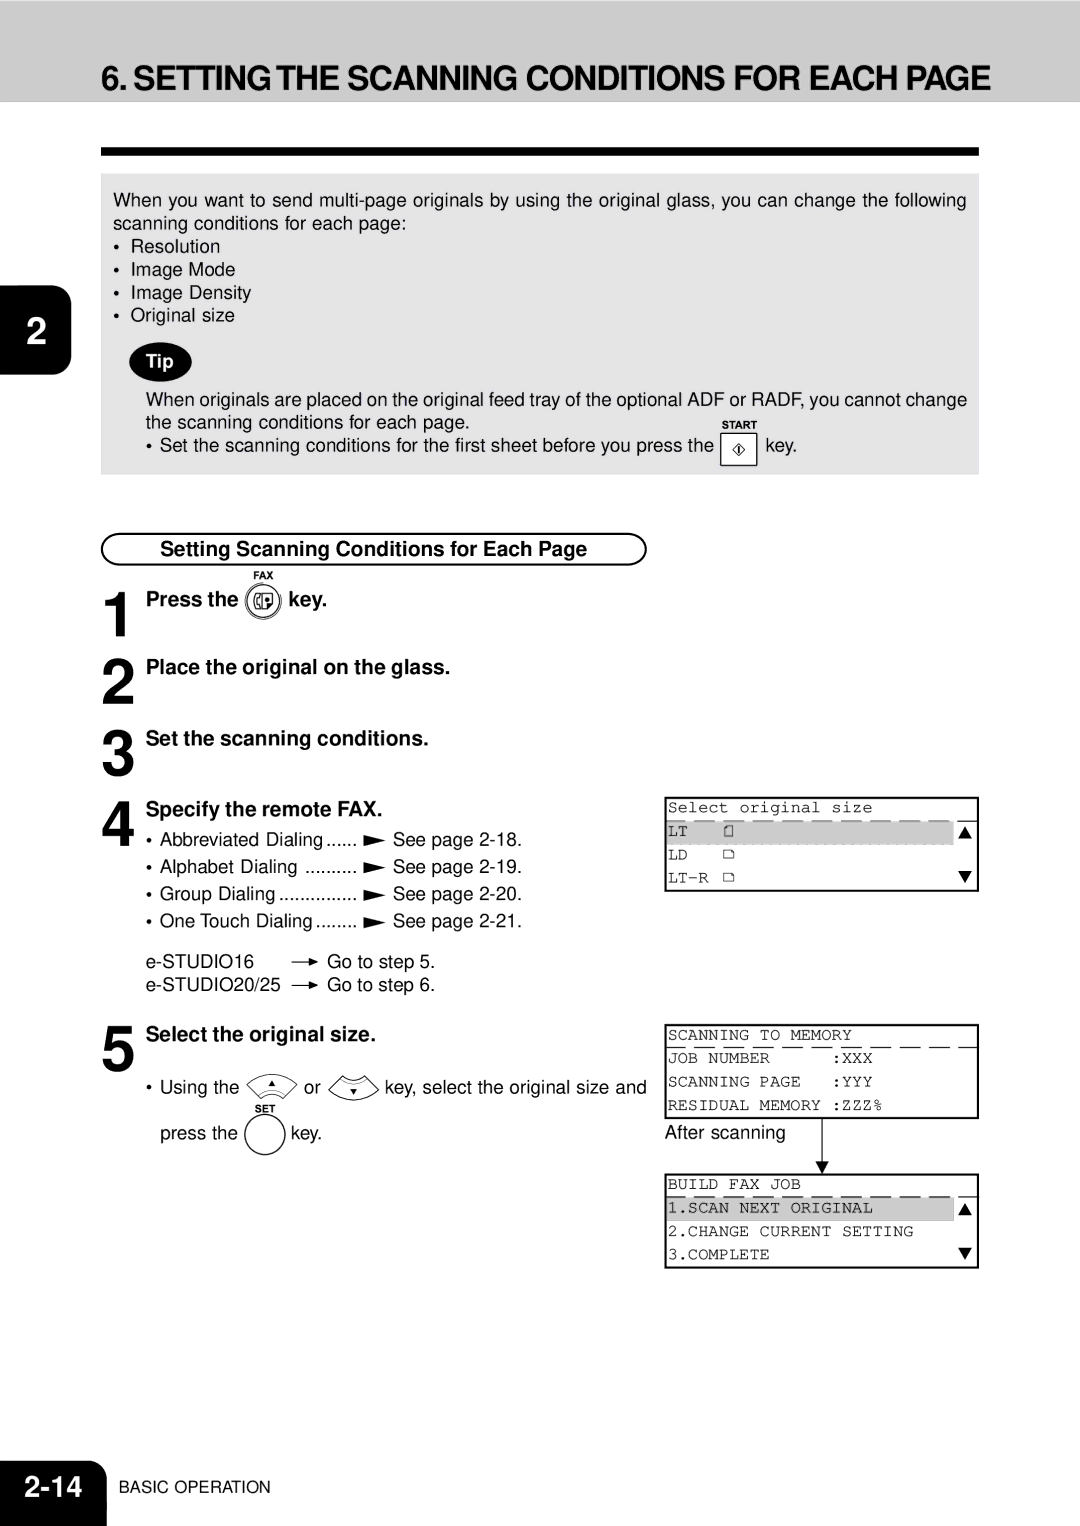
Press Key
HOW to SET Scanning Conditions
How to Set the Resolution
To cancel setting midway, press the key
How to Set Image Quality Mode
Key until the desired mode lamp
Illuminates
Is no need to set it
HOW to SET Scanning Conditions
How to Set Image Density
Automatic Image Density Mode Setting Procedure
Select Manual by pressing the key and press Key
Manual Image Density Mode Setting Procedure
Press Key to complete the setting
Press the key
Using the or key, select the original size Press the key
Select the original size
After scanning
Select Build job Item
Set the items to change
Scanning the Next Sheet
Keypad Dialing
Specifying the Remote FAX
Tone Key
Pause Key
Specifying the Remote FAX
Here. e-STUDIO16 only See
Destinations must already have been entered
Alphabet Dialing
You can see the registered groups in the list See
Jobs waiting to be redialed are displayed
One Touch Dialing Press Key Press the desired One Touch
Dialing by REDIAL/PAUSE Key Press the key
Destinations must already have been entered See
Sending Originals Memory TX
Press Key Place the original
Memory TX
Group cannot be designated as a remote FAX number
Direct TX by Default Setting
Sending Originals Direct TX
Press the key Place the original
To select 1.YES, press
Temporary Direct TX
Set the Scanning conditions. See pages 2-10 to
Press Key Select the desired Direct TX Option
Press Key in the Control Panel
For scanning on the glass, setting the original size is
Sending Originals Direct TX
On-hook Transmission
Required here. e-STUDIO16 only See
For scanning on the glass, setting for the original size is
Off-hook Transmission External Telephone Dialing
Remote FAX, press Key Press Key. Select 1.TRANSMIT
Checking Transmission Results on the Message Display
Checking Transmission Results
Checking Transmission Results by Printing Reports
Select the Print Number
To print the 50 communications 1 page, press
TX mode
Checking Transmission Results
Checking Reserved Transmissions by Printing Reports
PressFAX. the key to return to the initial screen for
Canceling Transmissions
Canceling transmissions during scanning
Select the desired job to be canceled by using Or key
Canceling Transmissions
Auto Receive is selected
RECEPTION-TYPES of Auto Reception Mode
When to Set
Mode
Press the key to return to the initial screen for FAX
RECEPTION-TYPES of Auto Reception Mode
Eliminate the problem
Memory RX
Outputting Originals Stored in the Memory
Each press of a digital key dials a number
Using the Telephone
So, if you make a mistake when dialing the remote FAX
On-hook Dialing
Tone services can be used even on pulse dial lines
Sending a Tone
Is displayed before you press Key and replace Handset
38BASIC Operation
Advanced Features
2HANDY Features
Delayed Communication Time Designation
Specify the remote FAX number
Priority Transmission Priority TX
To select 6. Duplex SENDING, press To select 2. ON, press
For details on how to place originals on the original glass
Make sure that Memory TX has been set in the FAX Setup
Sending TWO-SIDED Originals
Specifying the remote FAX and press
LOW Speed Transmission
Resend the original
Select the desired bit rate
Multi-Key Quick Broadcast
Enter the remote FAX number
Press
MULTI-ADDRESS Transmission Broadcasting
Select the Delete or Modify Facsimile Number
Select Complete and press key Group Broadcast Transmission
Mailbox ITU-T Compatible
Mailbox ITU-T Compatible
Setting Up an Open Mailbox
Select the password option
Enter the password
Otherwise, the Message Display shows Invalid number
Select the Mailbox Setup
Make sure that the correct password is entered
Deleting an Open Mailbox
To reserve the document to a Bulletin Board, press
Reserving a Document to a Mailbox Local Hub
Facsimile starts printing the document
Enter the password and press the key
Screen for entering the password
Printing a Document from a Mailbox Local Hub
Dial the FAX number of the remote hub unit
Sending a Document to a Mailbox Remote Hub
Retrieving Polling a Document from a Mailbox Remote Hub
Deleting Documents in a Mailbox Local Hub
Relay Transmission, Relay-Relay Transmission Overview
What is a Relay Transmission?
What is a Relay-Relay Transmission?
Relay Transmission
Facsimile unit
How to Setup a Relay Transmission
Relay Transmission
Conditions for a Relay/Relay-Relay Transmission Network
Press Key Displaying the Mailbox Menu and select BOX
Setting Up a Relay Box
If an end station is assigned to a Group Number, press
Enter the End Station
If the end station is assigned to a One Touch key, press
Press Enter the Abbreviated Dial Number and press
Deleting a Relay Box
Press Go to Step
Relay Transmission to a Remote Hub
Polling Reservation
Polling Communications
Polling Communications
Using Key, select the security option Key, if necessary
Using the digital keys and press
After setting the security option, press Key
Specify the remote FAX. See pages 2-16 to
Individual Polling RX
Programmed to the document to be polled, press
Press then Select the Security Option
Turnaround Polling
To select 4. DURATION, press
Continuous Polling
Press Then To select 5. INTERVAL, press
To select 2. START, press
To select 3. END, press
To select 6. SECURITY, press
To select 7.ENTER TEL NUMBERS, press
All the settings are cleared to defaults
Clear the Settings of the Continuous Polling
Chain Dialing
When all the required entries are performed, press Key
Dialing, and Keypad Dialing by using
Mission when you press Key before pressing
32HANDY Features
Entering Setting Items
Entering & Setting Items
Entering Characters
Keys used for Character Entry
Provides the user interface for entering numeric characters
Special Character Table
Entering Characters
Example Enter Chicago
Entering Characters
Press key while pressing the key Keys To enter
Press To quit character entry
Press While pressing
Correct Entered Characters
Press the key to delete hicago Then While pressing Key
Press the key to delete the D
One Touch Numbers
Entering the Remote FAX Number
Entering to TEL List
Abbreviated Dial Numbers
Key To select 5.COMM. OPTIONS, press
Has two or more faxes optional setting and press
Entering the Remote FAX Number
Entering Abbreviated Dialer Registration Press Key
To select 5. Quality TX, press
To select 2. Delayed COMM, press
To select 3. TX REPORT, press
To select 4. Line MONITOR, press
Digits and press the key
To select 6. SUBADDRESS, press
Displaying the Group Numbers Menu
Groups Number Registration Press Key
Press the key to return to the initial screen for FAX
Modify the Remote Station
Correcting Groups Modify the Remote Station Press Key
Complete modifying Groups
Enter the ABB. Number and press
Press ONE Touch key
Complete modifying Remote Station
16ENTERING & Setting Items
To select 1. YES press
Deleting Groups
Press the key to return the initial screen for FAX
By pressing
Entering Various Functions
Terminal ID Entry
Enter your telephone number and press
Enter any Delete Access Digit number
Dial Type Entry
Display the Dial Type Menu Press then Select your dial type
Enter the digits for obtain public line
Select the Access Type
Entering Various Functions
Exchange Type Entry EU Model only
Temporary Line Monitor Change
For details on how to place the originals on the glass See
Select 1.OFF or 2.ON to change the setting
Line Monitor
Receive Interval Setting
Display the ECM Menu Press then Select the ECM option
To turn ECM to OFF, press To turn ECM to ON, press
Temporary ECM Change Press the key Place the original
Select the Image Density
Default Setting for Document Mode
Display the Redial Mode Menu
Press Then Select the Document Mode
Redial Mode Setting
To select Memory TX OFF, press To select Memory TX ON, press
Default Setting for Memory Transmission
Temporary Security TX Change
Security TX Transmission Setting
Cover Sheet Registration
Enter the Remote FAX Name and press the key
Attaching or Printing Cover Sheet
Cover Sheet Format
Setting Recovery Transmission
Displaying the Recovery TX Menu Press Then
Select the Recovery Transmission option
Using the key, you can delete the job stored for resending
Sending Recovery Transmission
Using the or key, select the job to be resent
Using the key, you will confirm the detailed information
TTI Transmit Terminal ID Print Setting
Send After Scan Default Setting
Select the Memory Full option
To delete the pages that have been scanned, press
Enabling or Disabling Send After Scan Temporarily
Account Codes
Enterkey. the 4-digit Account Code and press
Account Code Entry
Separator Page Setting
Secure RX Security Code Setting
Secure RX Activation Period Setting
To enter the Start TIME, press
Enter the Start Time and press the key
For example, to select 03.MONDAY, press
To enter the END TIME, press
Set Secure RX option for each day
Enter the END Time and press the key
Secure RX Manual Activation
To start manual activation, press
Press the key on the Function key panel
Secure RX Print
Reception Reduction Setting
Reception Discard Setting
To set Discard to OFF, press To set Discard to ON, press
Privileged Reception
To print the RTI, press LT size or up
RTI Remote Terminal ID Print Setting
Displaying the RTI Menu Press Then Select the RTI option
To not print the RTI, press
Select the Long Original option
Long Original Setting
Setting the Page Count
Load the original on the document feeder
Press Key to display the COMM. Options
Enter the Pin Code and press the key
Enter the number of remote FAX using the Dial
Pin Mask
Keypad Press Key on the Function key panel
Sub-Address Transmission
Password
For details on how to place the originals on the glass
Dialing with Sub-address
Select one of the following operations from the menu
Remote Mailbox
List & Report Options Setting
Outputting Lists & Reports
Reservation to Local Mailbox
If Auto is selected
Select the manual output option
Select the automatic journal option
If Manual is selected
Select the option for A5/ST-R size print
Outputting Lists & Reports
To not print an image of the facsimile document on
Select the option for first page image
To always print a Report whenever a document is
Relay Originator Report Always 2.ON Error 3.OFF
To select the Local Mailbox, press
Select on or OFF for the Reception List
To send an image of the facsimile document, press
Select the Job type for Reception List printing
Press the key Select a Desired List
List and Report Printing Procedure
Department Code List
Tel List
Press the key To select 7.MENU LIST, press
Function List
Mailbox/Relay Box List
Fax Option List
Manual Print always available see
List and Report Print Format
Transmission/Reception Journal
Auto Print available if programmed see
62ENTERING & Setting Items
16 x 300 dpi
Error code Result OK Successful NG Failure
Auto Print if programmed see
Transmission Report
Memory Transmission Report
Multi-Address Transmission Report
Page
Multi-Polling Report
Page
Relay Transmission Originator Report
Relay Station Report
Relay Transmission Relay Station Report
Page
Relay Transmission Relay End Terminal Report
Other indications
Your own station
Department Control List
Reservation List
78ENTERING & Setting Items
FAX NUMBER/E-MAIL Address
Alphabetical Sort List
ON/OFF
Abbreviated Dial Number List
Page
Group Number List
One Touch Number List
84ENTERING & Setting Items
FAX Option List
86ENTERING & Setting Items
Memory Reception File NBR Type From Date Time
Power Failure List
88ENTERING & Setting Items
Troubleshooting
2TROUBLESHOOTING
When the Graphic Symbols Flash
Troubleshooting
Error Message
Troubleshooting
Replace process unit
Transmission Trouble
Reception Trouble
Error Codes Printed on Reports
Document again
Again
Remote Service
2REMOTE Service
RDC Remote Diagnosis Configuration
RDC Remote Diagnosis Configuration Service
Automatic Supplies Order
Automatic Supplies Order Setting
Specifications
2SPECIFICATIONS
9600/7200/4800/2400 bps Encoding System
Specifications
4SPECIFICATIONS
Index
Entering Characters Entering One Touch Dialer Registration
Canceling transmissions During scanning
Index
Abbreviated Dial Number List Abbreviated Dialing
Manual Image Density Mode
Features of the e-STUDIO16/20/25
For details on how to specify remote FAXes
How to Set Image Density How to Set Image Quality Mode
Sending a Document to a Mailbox Remote Hub Sending a Tone
TTI Transmit Terminal ID Print Setting Turnaround Polling
Index
Printing a Document from Mailbox Local Hub
When a Power Failure Occurs When the Graphic Symbols Flash
Index
GD-1060 E1-17041C

 key.
key. or
or  key, select the original size and
 key.
key.