Betriebsanleitung
Mode Demploi
Manuale Duso
Manual DEL Usuario
N E R S M a N U a L J 7 J 7 F
Disturbances in the pulse / heart rate measurement
F E T Y I N S T R U C T I O N S
S E M B LY
J7 Hand Rail and Interface ,2,3
E R C I S I N G
Women 226 age Men 220 age
Active trainer 70-80 % of maximum heart-rate
T E R F a C E
Use your imagination Learn self-discipline
Make your choice. Press OK to confirm
Error Codes
S P L AY S
Dist = training distance 0.1-99.9 km
N U a L
N T R O L
O G
I N T E N a N C E
Cleaning the Treadmill
Lubricating the Running Deck
Aligning the Running Belt
Adjusting the Belt Tension
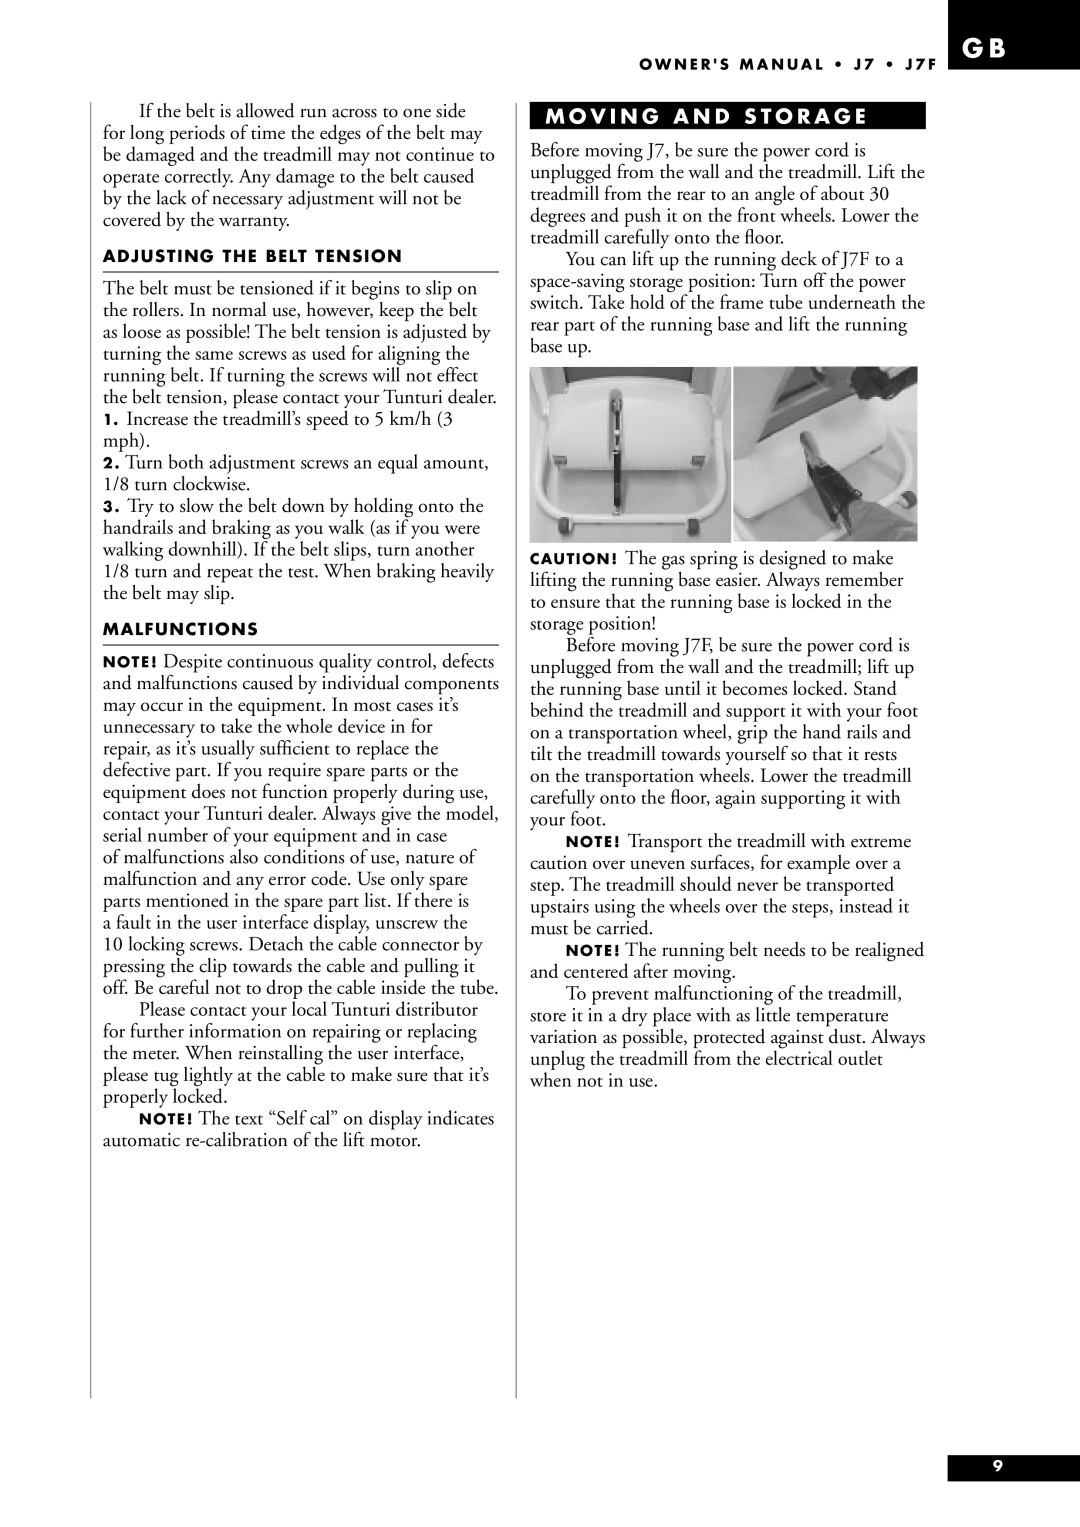
V I N G a N D S T O R a G E
Malfunctions
P S
C H N I C a L D ATA
C H T I G E C H E R H E I T S H I N W E I S E
N TA G E
J7 Handlauf UND Cockpit ABB , 2
Frauen 226 Alter Männer 220 Alter
A I N I E R E N
Anfänger 50-60 % der maximalen Herzfrequenz
Fortgeschrittene 60-70 % der maximalen Herzfrequenz
PSC In der PSC -Funktion stellen Sie
C K P I T
Auf der Anzeige erscheint der Text Set
SET UND Reset
WICHTIG! Die Verwendung der PSC
Fehlercodes
Drücken Sie OK , worauf das Messgerät
Oben/nach unten verändern
Steigen Sie auf das Laufband, wobei Sie
Bestätigen Sie die Wahl mit der OK-Taste
Trainingsprofile
WA R T U N G
Pflege erforderlich. Stellen Sie nach jeweils
Das Laufband ursprünglich ordnungsgemäss ausgerichtet wurde
A N S P O R T U N D F B E WA H R U N G
Nachspannen DER Laufmatte
Betriebsstörungen
C H N I S C H E D AT E N
S E M B L a G E
N S E I L S AV E R T I S S E M E N T S
An frappant doucement avec l’outil d’assemblage
J7 Barre D’APPUI ET Interface ,2,3
Entraînement actif 70-80 % du pouls maximum
Femme 226 âge Homme 220 âge
Touches DE Commande ’INCLINAISON
Touches DE Commande DE Vitesse
Pour Terminer Votre Exercice
Comment Vous Motiver Pour Perseverer ?
Appuyez sur la touche Set
F I C H a G E S
Le voyant indique quelle est la valeur affichée sur l’écran
Démarrez le tapis ou appuyez sur la touche Manual
Profils D’ENTRAÎNEMENT
Appuyez deux fois sur la touche Prog l’écran affiche rECO
Mesure DU Pouls DE Recuperation
Entretien
Nettoyage DE L’APPAREIL
Réglez la vitesse à 5 km/h ou 3 mph
Reglage DE L’ALIGNEMENT DU Tapis
Reglage DE LA Tension DU Tapis
R a C T E R I S T I Q U E S C H N I Q U E S
A N S P O R T E T R a N G E M E N T
Position de rangement 70 cm
Position de rangement 155 cm
Propos DE L’UTILISATION DE L’EQUIPEMENT
AV V E R T E N Z E
T R a I N I N G
S E M B L a G G I O
Qualunque sia lo scopo che tu ti sia prefissato
Donne 226 meno l’età Uomini 220 meno l’età
Trainer attivo 70-80 % del massimo di pulsazioni
Principianti
Mettete i piedi sui binari laterali e non sul nastro
Prefissati degli obiettivi realistici
Premi il tasto Set
Sul display compare il testo Set 4 = uso
S P L AY
Controllo Velocità DA Posizione PSC
Codici Disfunzioni
Profili DI Esercizio
Misurazione Della Frequenza DI Recupero
N U T E N Z I O N E
Procedura PER LA Lubrificazione
Pulizia DAL Treadmill
O S TA M E N T O I M M a G a Z Z I N a G G I O
Accendere l’attrezzo e regolare la velocità su 5 km/h
Regolazione Della Tensione DEL Nastro
Disturbi Durante L’USO
G G E R I M E N T
AT I T E C N I C
Circa LA TUA Salute
Circa L’AMBIENTE in CUI Esercitarsi
F O R M a C I Ó N Y E C a U C I O N E S
N T a J E
J7 Manillar Y Interfa , 2
Mujeres 226 edad Hombres 220 edad
E R C I C I O S
Principiante
Entrenamiento
T E R F a Z
En la pantalla, aparece el texto Set 2 =
Pulse la tecla Set
N T a L L a S
Empiece usar de la función PSC seleccionando
Ponga la cinta rodante en marcha o pulse la tecla Manual
Confirme con la tecla OK
Combinación ambos luz de la indicación
Pulsando la tecla Stop una vez, se para la
N T E N I M I E N T O
Ajuste DE LA Cinta Rodante
Limpieza DE LA Máquina
Ajuste DE LA Tension DE LA Cinta
Defectos DE Funcionamiento
A S L a D O Y a L M a C E N a J E
AT O S T É C N I C O S
N S E J O S
Sólo una persona por vez puede usar el equipo
M E R K I N G E N A D V I E Z E N
Bij het afstellen en het onderhouden van
N T a G E
Looptrainer Elektriciteitssnoer
E T S E N
T N E S S T R a I N I N G
Het display toont de tekst Set 5 =
Druk op de SET-toets
Storingen
Druk op de OK-toets
Trainingsprofielen
Bevestig met de OK-toets
Meting VAN DE Herstelhartslag
D E R H O U D
Smering
Reiniging VAN DE Looptrainer
A N S P O R T E N O P S L a G
B R U I K S S T O R I N G E N
BELANGRIJK! Het kan zijn dat de loopmat
HET Spannen VAN DE Loopmat
C H N I S C H E G E G E V E N S
L a N G R I J K E T I P S
N T E R I N G
M Ä R K I N G a R O C H VA R N I N G a R
Formade stommen i öppningarna på handstöden
J7 Handstöd OCH Gränssnitt
Kvinnor 226 åldern Män 220 åldern
Ä N I N G
Aktiv idrottare 70-80 % av maximipulsen
Fatta alltid tag i handstödet när du stiger på
V Ä N D a R G R Ä N S S N I T T
S N I N G P Å S K Ä R M E N
Tangenten Manual, Pulse Control eller Prog
Dist = sträcka 0,01-99,9 km
Koder FÖR FEL
Starta löpmattan eller tryck på Manual
Träningsprofiler
Återhämtningspulsmätning
Smörjning
R V I C E
Rengöring AV Löpband
Centrering AV Löpband
A N S P O R T O C H R VA R I N G
Kontakta genast din försäljare om du
Du kan vika ihop J7F löpbandet för att
OBS! I förvaringsläge måste löpbandet alltid vara låst
Koppla alltid av strömmen efter varje träningspass
Redskapet får användas av endast en person åt gången
O M a U T U K S E T J a VA R O I T U K S E T
E N N U S
Laitteen ehdoton enimmäiskäyttäjäpaino on 135 kg
R J O I T T E L U
Naiset 226 ikä, miehet 220 ikä
Kuntoilijan taso 60 70 % maksimisykkeestä
Aktiivikuntoilijan taso 70 80 % maksimisykkeestä
Y T T Ö L I I T T Y M Ä
Y T Ö T
Paina Set-näppäintä
Käynnistä juoksumatto tai paina Manual- näppäintä
Voit vaihtaa sykeohjausmallin harjoituksen aikana
Aloita vakiosykeohjelma painamalla jänisnäppäintä
Hyväksy OK-näppäimellä
Mikäli harjoitusprofiili suoritetaan loppuun
Juoksumaton Puhdistus
Säädä nopeudeksi 5 km/h
Maton Keskittäminen
Maton Kireyden Säätö
L J E T U S J a S Ä I LY T Y S
K N I S E T T I E D O T
N K K E J Ä
WA L K
J7J7F
103 Frame 233
Washer /1 pc grounding
5834026