ZebraNet Wired and Wireless Print Server User Guide
Part Number P1043301-005
Contents
Installation
Getting Started
ZebraLink WebView
Using Printing Protocols
Printing Queues
Print Server Web Pages
Control Panel
Hardware Troubleshooting
Frequently Asked Questions 147
Glossary Index
Contents
About This Document
Who Should Use This Document
How This Document Is Organized
Introduction on
Document Conventions
Ztools
About This Document
About This Document
Introduction
Overview
Supported Services
Address Administration Protocols
Support
Supported Wireless Radio Cards
Supported Security Types
ZebraNet Wireless Plus Print Server
Security Types Supported on the Wireless Plus Print Server
Print Server
ZebraNet Wireless Print Server
Security Types Supported on the Wireless Print Server
Wired Print Servers Available by Printer
Hardware Wired Print Servers
Printer Requirements
Hardware Wireless Print Servers
Wireless Print Servers Available by Printer
Zebra Part Numbers for ZebraNet Wireless Print Server Boards
Memory Requirements
Firmware 10/100 Print Server
SN Yyyyyyy EN Zzzzzzzzzzzz
Firmware Wireless
Supported Firmware Versions
ZT230 V72.18.X ZT410 V75.19.7Z ZT420 ZD500 V74.19.6Z
External ZebraNet 10/100 Print Server Specifications
Specifications
Compatibility
Internal ZebraNet 10/100 Print Server Specifications
Wireless Print Server Specifications
Introduction
Installation
External ZebraNet 10/100 Print Server
To upgrade you printer firmware, complete these steps
Before You Begin
Illustration
External ZebraNet 10/100 Print Server
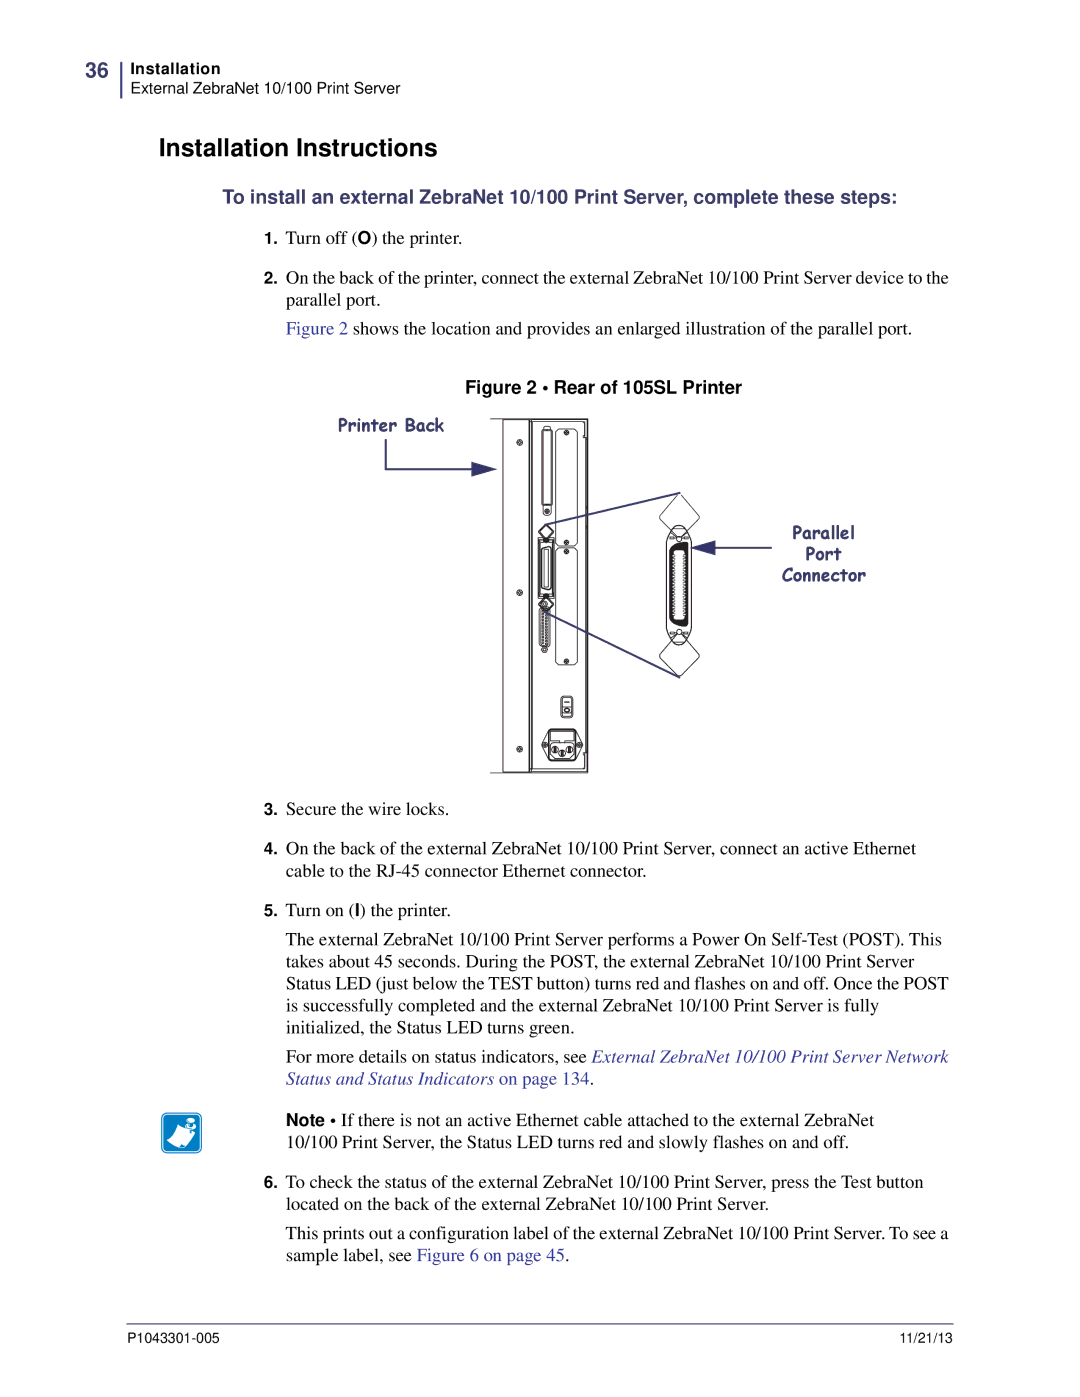
Installation Instructions
Rear of 105SL Printer
Wireless Radio Card
Wireless Print Servers
Install a Radio Card in a Wireless Print Server
To install a wireless radio card, complete these steps
Install a Radio Card in a Wireless Print Server
Compact Flash Wireless Radio Card
Installing a Compact Flash Wireless Radio Card
Installation
Getting Started
Getting Started
User ID admin Password
Default User ID and Password
Before You Begin
Label Width
211 63.5 150 127.00
Subnet Mask Default Gateway Serial Number
You reach List Network
From the control panel, enter Setup Mode. Refer to
Not available on HC100
Getting Started
Printer Configuration Wristband for HC100
Configuration of Wireless Securities
LCD Link Status and Wireless Signal Indicators
View Wireless Status through the Control Panel
Link Status Indicators
Wireless Signal Indicators
Signal Strength
ZD500R Wired and Wireless Status Indicator Icons
HC100 Wireless Status Indicator Lights
HC100 Wireless Status Indicator Lights
Yellow Flash Steady Green
Flashing Green
Determining the Active Print Server
Viewing IP Addresses and the Active Print Server
Active Device Selection
PAX4
Skip
Wired
Wireless
Check
Assigning an IP Address on any Print Server
With Dynamic Host Configuration Protocol Dhcp
Assigning an IP Address Without Dhcp via ZebraNet Bridge
Assigning an IP address Without Dhcp from the Control Panel
192.168.254.254
Assigning an IP Address Without Dhcp via a Telnet Session
To use this method, complete these steps
Gleaning
Setting and Monitoring Alerts on Any Print Server
ZebraLink Alerts
ZebraLink Alerts and Destinations
Using ZebraNet Bridge
Using WebView
Add Alert
Checking Print Server Configuration Settings
To access the print server settings, complete these steps
Browser View
Print Server Configuration
Access Settings
To enable protocols using WebView, complete these steps
Enabling Protocols
Print Server Configuration
Protocol Configuration
Defaulting ALL Print Servers
Restore to Factory Defaults
Using a ZPL Command
Defaulting the Wireless Print Server on the S4M
Defaulting the Print Servers on the ZM400 and ZM600 Printers
Defaulting the Print Servers on the HC100 Printers
Getting Started
Getting Started
Printing Queues
Configuring the Print Queue
Berkeley Software Distribution BSD-Style Print Queue
Unix Configuration
System V Queue Installation
Configuring Operating System V Queue for ZebraNet Printing
Prerequisites
Printing Queues
Using Printing Protocols
IPP
FTP
To send information to the printer, perform these steps
Using Printing Protocols
ZebraLink WebView
WebView
Home
To open the WebView of your printer, complete these steps
View Printer Configuration
Configuration Settings
View and Modify Printer Settings
To view and modify printer settings, complete these steps
View and Modify Printer Settings
View and Modify Printer Settings Menu Options
General Setup Serial Communications Setup
Network Communications Setup Print Listings on Label
Rfid Setup Rfid Printers/Print Engines only
Media Setup Calibration
ZPL Control Advanced Setup
100
Click Network Configuration
Network Communications Screens
Click Submit Changes
Primary/Secondary Settings
Subscreens Network Communications Setup
101
102
X60.15.x and ZSPx
103
Wireless Setup Wireless Encryption Setup
104
105
Directory Listing
To view the Directory Listing, complete these steps
106
107
Create New Script
Preview Label
Reset
108
Print Label
Save
109
Save As
110
Printer Controls
To view Printer Controls, complete these steps
Print Server Web Pages
Status and Configuration
Print Server Features
112
Print Server Settings
113
114
Enabled Protocols
Print Server Configuration Menu Options
115
TCP/IP Configuration
116
TCP/IP Logical Printing Ports
117
System Snmp
Web Admin
Smtp Email Alert Configuration
118
119
Output Port Configuration
POP3 Email Printing
Print Server Status
120
121
To view the port status complete this step
To reset the print server, complete these steps
Reset
122
Restore
123
124
Control Panel
Control Panel Menu Options
Wired Network Parameters on the LCD
Wired Network Parameters
126
127
Load LAN FROM?
Reset Network
128
Wireless Network Parameters
Wireless Network Parameters on the LCD
129
130
Wlan Security
Wireless Network Parameters
131
132
Hardware Troubleshooting
Resetting to Factory Defaults
Troubleshooting the External 10/100 Print Server
134
External ZebraNet 10/100 Print Server Issues and Solutions
Troubleshooting the External ZebraNet 10/100 Print Server
135
136
Troubleshooting the Internal ZebraNet 10/100 Print Server
137
138
For the ZM400, ZM600, HC100, Xi4, and 105SLPlus Printers
ZebraNet n Print Server Will Not Operate on the 5Ghz Band
Troubleshooting the Wireless Print Server
Resetting the Wireless Print Server to Factory Defaults
139
Ping the Printer
ZebraNet Bridge Discovery or Configuration Problems
Unable to Print
140
Telnet
141
Wireless Error Messages
Unable to Configure Device
HP JetAdmin or HP Web JetAdmin
Error Messages
General Issues and Recommended Solutions
General Wireless Issues
143
144
Encryption and Authentication Issues
145
IP Issues and Recommended Solutions
IP Issues
146
Frequently Asked Questions
FAQs
148
149
UDP Ports
150
Glossary
152
Lightweight Extensible Authentication Protocol
153
154
155
156
Index
Index
Not Associated message Not Authenticatd message
Print server features WebView 112 print server status
Radio Warning Poor Signal
Index
Index
164
Page
Zebra Technologies Asia Pacific, LLC
Zebra Technologies Corporation
Zebra Technologies Europe Limited
ZIH Corp P1043301-005