User Guide
Part Number P1009874-002
Declaration of Conformity
Xi4 Series 110Xi4, R110Xi4, 140Xi4, 170Xi4
Compliance Information
FCC Compliance Statement
Canadian DOC Compliance Statement
Contents
Configuration
Routine Maintenance 115
Operations
Troubleshooting 133
Specifications 163
End User License Agreement Glossary Index
Contents
About This Document
Who Should Use This Document
How This Document Is Organized
Contacts
Mail Back Technical Library
Document Conventions
Icons Used
Sample Figure with Callouts
About This Document
Introduction
Printer Components
Printer Components
Control Panel
Location of Control Panel Buttons and Lights
LCD
Printer Setup
Before You Begin
Storage Temperature and Humidity
Handling the Printer
Unpack and Inspect the Printer
Store the Printer
Select a Site for the Printer
Connections and Configuration The baud rate, number
Select a Data Communication Interface
Data Communication Interfaces
Limitations and Requirements
Connections and Configuration No additional
Twinax/Coax Optional
Connections and Configuration Refer to the ZebraNet
Configuration Refer to the ZebraNet Wireless User Guide for
Data Cables and Wireless Cards
Connect the Printer to a Power Source
Power Cord Specifications
Power Cord Specifications
Install the Control Panel Keypad Cover
Control Panel Keypad Cover
Types of Media
Radio frequency identification Rfid smart media-RFID
Roll and Fanfold Media
Non-Continuous
Roll Media
Fanfold Media
When to Use Ribbon
Ribbon Overview
Coated Side of Ribbon
To perform a media scratch test, complete these steps
To perform an adhesive test, complete these steps
To perform a ribbon scratch test, complete these steps
Operations
Print Mode Descriptions and Printer Requirements
Print Modes and Printer Options
Print Modes and Printer Options
Media Paths
Media Paths for Print Modes with Various Printer Options
Cutter
Prepare the Media for Loading
Roll Media
110Xi4/R110Xi4 600 dpi
110Xi4/R110Xi4 200 dpi and 300 dpi Other Xi4 Models
Fanfold Media
To load fanfold media, complete these steps
If using Then use this access slot
Load Media in Tear-Off Mode
Ribbon OUT error
Operations
Operations
Load Media in Peel-Off Mode
Media Loaded in Peel-Off Mode
To set up the printer in Peel-Off mode, complete these steps
Operations
Ribbon OUT error
Operations
Operations
Operations
Load Media in Cutter Mode
To set up the printer in Cutter mode, complete these steps
Operations
Ribbon OUT error
Operations
Operations
Load Media in Rewind Mode
Media Loaded in Rewind Mode
To set up the printer in Rewind mode, complete these steps
Operations
Ribbon OUT error
Operations
Operations
Operations
Remove Media Liner from the Rewind Spindle
Yes
Operations
Load Ribbon
To load ribbon, complete these steps
If… Then…
Thread the ribbon over the media dancer assembly 1 and under
Yes
Operations
Remove Used Ribbon
To remove used ribbon, complete these steps
Operations
Calibrate the Printer
Types of Calibration
Auto-calibration
Long Calibration
Sensor Profile
Calibration
Media and Ribbon
Sensor Sensitivity
Adjust Transmissive Media Sensors
Upper Media Sensor
Operations
Operations
To adjust the lower media sensor, complete these steps
Lower Media Sensor
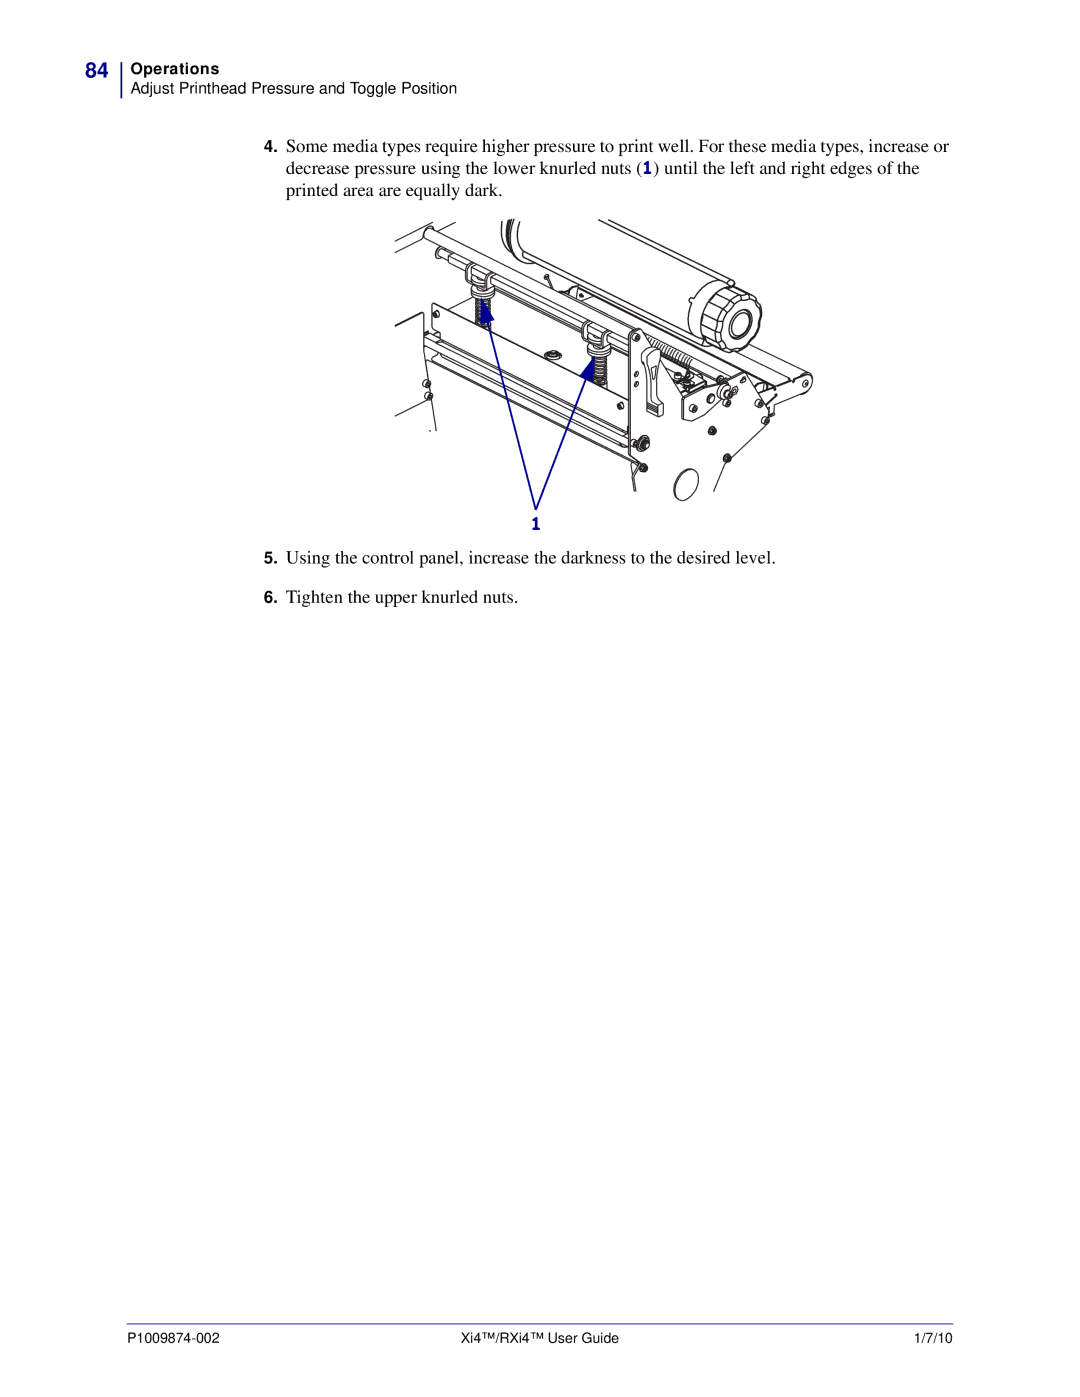
Adjust Printhead Pressure and Toggle Position
Toggle Position Adjustment
To position the toggles, complete these steps
Printhead Pressure Adjustment
To adjust printhead pressure, complete these steps
Operations
Configuration
Setup Mode
Enter and Use Setup Mode
Exit Setup Mode
To leave Setup mode, complete these steps
Change Password-Protected Parameters
Default Password Value
Disable the Password Protection Feature
Print a Configuration Label
To print a configuration label, complete these steps
Print a Network Configuration Label
To print a network configuration label, complete these steps
Adjust Print Darkness
Adjust Print Speed
Standard Control Panel Parameters
Printer Parameters Sheet 1
Adjust the Tear-Off Position
Default Value
Select Print Mode
Printer Parameters Sheet 2
Printer Parameters Sheet 3
Set Media Type
Set Sensor Type
Select Print Method
Printer Parameters Sheet 4
Set Print Width
Print Width Ranges and Maximum Values
Default Value Disabled
Printer Parameters Sheet 5
Set Maximum Label Length
Set Supplies Low Warning
Set Early Warning for Maintenance
Set Printhead Cleaning Interval for Early Warning
Reset Printhead Cleaning Counter for Early Warning
Printer Parameters Sheet 6
Reset Printhead Life Counter for Early Warning
View Non-Resettable Counter
Printer Parameters Sheet 7
Set Printhead Life for Early Warning
Printer Parameters Sheet 8
List Network Settings
Printer Parameters Sheet 9
List All
Initialize Flash Memory
100
Printer Parameters Sheet 10
Print Sensor Profile
Default Value Bidirectional
101
Printer Parameters Sheet 11
Calibrate Media and Ribbon Sensor Sensitivity
102
Printer Parameters Sheet 12
103
Printer Parameters Sheet 13
104
Printer Parameters Sheet 14
Set Control Prefix Character
Set Format Prefix Character
Select ZPL Mode
Default Value ZPL
Select Media Power-Up Option
105
Adjust Label Top Position
106
Printer Parameters Sheet 16
Select Head Close Option
Adjust Left Position
107
Printer Parameters Sheet 17
Set the Head Test Count
Default OFF
Set Applicator Port Mode
108
Printer Parameters Sheet 18
109
Printer Parameters Sheet 19
Set Reprint Mode
See next column View Sensor Settings
110
Printer Parameters Sheet 20
111
Printer Parameters Sheet 21
Default Value English
112
Printer Parameters Sheet 22
Select the Display Language
Additional Control Panel Parameters
113
114
Routine Maintenance
Ordering Replacement Parts
Replacing Printer Components
Lubrication
Recycling Printer Components
Cleaning Schedule and Procedures
Clean the Exterior
Recommended Printer Cleaning Schedule
117
Clean the Media Compartment
Clean the Printhead and Platen Roller
118
119
120
Clean the Sensors
121
122
Upper Media Sensor
123
Media Out Sensor
Clean the Snap Plate
124
125
126
Rfid Printers
127
128
129
Clean the Cutter
To clean the cutter, complete these steps
130
To replace a faulty fuse, complete these steps
Replace the Fuse
131
132
Fuse Locations
Troubleshooting
Troubleshooting Checklists
134
LCD Error Messages
LCD Error Messages
135
136
Print Method on
137
138
139
Refer to the Maintenance Manual for
140
Print Quality Problems
Print Quality Problems
141
142
143
144
Bar code printed
On a label does not
Scan
Calibration Problems
Calibration Problems
145
Communications Problems
Communications Problems
146
Ribbon Problems
Ribbon Problems
147
Rfid Problems
Rfid Problems
RFID-enabled
148
149
150
Miscellaneous Printer Problems
Miscellaneous Printer Problems
151
152
Printer Diagnostics
Power-On Self Test
To initiate the Power-On Self Test, complete these steps
153
Cancel Self Test
To perform the Cancel Self Test, complete these steps
154
Pause Self Test
155
To perform a Pause self test, complete these steps
Feed Self Test
156
To perform a Feed self test, complete these steps
157
Bar Code Darkness Comparison
158
Judging Bar Code Quality
Feed and Pause Self Test
159
To perform a Feed and Pause self test, complete these steps
Communications Diagnostics Test
160
Sensor Profile
161
162
Specifications
Features
Standard Features
Optional Features
164
Zebra Programming Language ZPL
Bar Codes
165
General Specifications
Physical Specifications
Electrical Specifications
166
Print Specifications by Model
110Xi4 and R110Xi4
167
140Xi4, 170Xi4,
168
Ribbon Specifications
169
Media Specifications
170
140Xi4, 170Xi4, and 220Xi4 Printers
171
172
140Xi4, 170Xi4, and 220Xi4 Black Mark Sensing
End User License Agreement
174
175
176
177
178
Glossary
Glossary
Lightweight Extensible Authentication Protocol
Glossary
Index
Numerics
Index
Index
Index
Rfid
Wireless cards, 27 wireless print server characteristics
Page
Zebra Technologies Corporation
Zebra Technologies Europe Limited
Zebra Technologies Asia Pacific, LLC