Leica CM1950 manual Manual defrosting of the specimen cooling

Page 40

8.Working with the Instrument

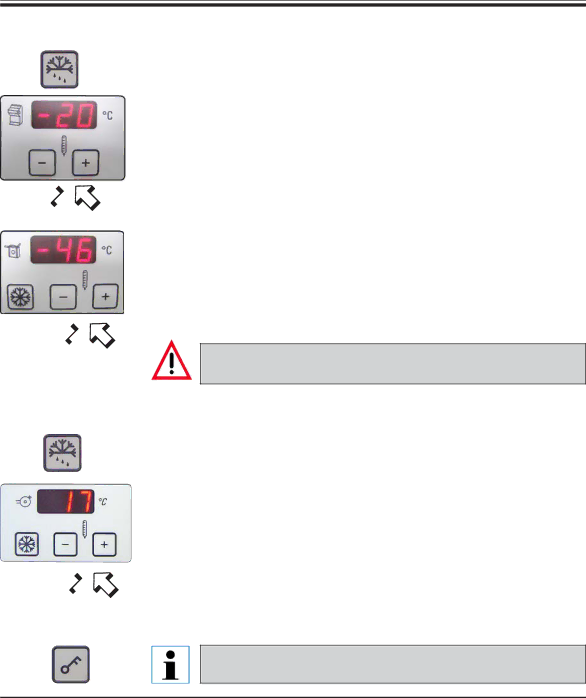
Manual defrosting of the cryochamber

Push the manual defrost button (with the melting snowflake) on the left over the key button to activate the defrost cycle of the cryochamber on demand.

Activation is confirmed by an audible signal.

Then, push the "+" or "-" button on the panel for the cryochamber temperature.

The manual defrost cycle (12 min.) is activated.

There is a flashing indication of the temperature of the cryochamber during the whole defrost cycle.

If necessary, push the manual defrost button again to deactivate the manual defrost cycle.

When the manual defrost begins, the specimen head adjusts to a tem- perature between -10°C and -5°C (reduction of ice formation). The specimen head cooling turns off. This is confirmed by the flashing of the decimal points on the panel for the specimen cooling.

Ten seconds after the manual defrost cycle has been completed, the specimen cooling turns back on.

Before starting the defrost cycle, remove all specimens from the cryochamber!

Manual defrosting of the specimen cooling

Push the manual defrost button (with the melting snowflake) on the left over the key button to activate the defrost cycle of the specimen head.

Activation is confirmed by an audible signal.

Then, push the "+" or "-" button on the panel for the specimen temperature.

There is a flashing indication of the specimen temperature during the defrost cycle.

For 15 minutes, the specimen head is adjusted to a temperature of 45°C.

Subsequently, the instrument adjusts to the specimen temperature which

has been programmed prior to the manual defrost cycle.

If necessary, push the manual defrost button again to deactivate the manual defrost cycle.

Press the key button, then the "+" button = specimen head on

Press the key button, then the "-" button = specimen head off

40

Operating Manual V1.1 – 05/2007

Image 40
Contents Leica CM1950 Page Page Table of contents 11.1 12.112.2 12.3Symbols Used in This Manual and Their Meaning Important InformationQualification of Personnel Designated UseGeneral Safety Instructions Safety and DesignUnpacking and Installation Opening the packaging Transport to the Installation Location Ramp assemblyRemoving the packaging Safety Features Microtome knivesKnife guard Securing/Locking the HandwheelCleaning, Disinfection Turning the Instrument Back On Handling Specimens Defrosting MaintenanceRemoval of the Microtome Technical Data Technical Data Refrigeration system CM1950, 50 Hz CM1950, 60 HzStandard Delivery Set of filters 5 piecesHandwheel, motorized General Overview Control Panel Fields and Cryostat Chamber Installation Site RequirementsRight side Left sideTransport to the Site Assembling the Handwheel Centering the Handwheel Optional Locking/Unlocking the HandwheelEmergency-stop function active, or Existing power system Connection to Power Supply SystemOnly for instruments sold in Japan Selecting the frequency Installation Installing the Storage Systems Optional For reasons Shelf, Movable OptionalInserting the Section Waste Tray Section waste tray with the a Cutout a facing the userInstalling the Heat Conductor Block, Stationary Optional Installation Mark for suction nozzle Instrument Controls Control Panel Fields on the CM1950 Control Panel Field12 o’clock Position 6 o’clock Retraction 0μm20.0μm 60.0μmMotion continues as long as the button is held Coarse feed functionsBrief press of the button retracts the specimen by 20μm Control panel 3 Motorized sectioning optional Sectioning modesDisinfection Duration 30min Duration 180 min Leica Cryofect is not available in all countriesWorking with the Instrument Turning the Instrument On Configuring the Parameters Working with the Instrument Working with the Instrument Manual defrosting of the specimen cooling Entering the trimming thickness Working with the Precooled Cryostat 8.4.1 Preparatory Work Trimming with Extraction Anti-roll Guide Installed Handwheel position 12 3 o’clock, valve open all the way Cutting with Extraction Anti-roll Guide installed Shut off VAC LED in VAC button goes out10μm 40% 60% 80% 100% 20μm 30μm 40μm SpeedSpeed Extract. value 1μm 5 μm 40% 60% 80% 100% 10μm Working with the Instrument Problems During Work TroubleshootingProblem Causes Remedies Cryochamber Sections tear Alternately Longer sufficient Temperature Selection Chart in minus C Tissue type Chamber temperatureOptional Accessories Ordering InformationCryofect, VPE Leica Cryofect 4x 350ml When using low-profile blades, the ruler With anti-roll guideLever 6 for the lateral shift Lever 7 for clamping the bladeBlade holder CE with finger rest for NB + BB Inserting the blade into knife holder CE Will result Cleaning the knife holder CE Daily cleaning Unscrew the bolts 35 of the pressure plateNot Visible Optional Accessories Anti-roll guide system Optional Accessories Specimen discs in various dimensions Optional Accessories Maintenance and Cleaning General MaintenanceChanging Fuses Replacement of the Lamp/UVC Lamp Installation of the new lamp This equipment has been cleaned and decontaminated Decontamination Certificate masterNB Microtome knives must be in boxes Yes No indicated belowBU Return Authorization Number Anne De Greef-Safft President Biosystems Division EC Declaration of ConformityWarranty and Service Peoples Republic of China