HP 1050 manual Control Panel of HP FAX, Bottom view

Page 13

The HP Fax 1040/1050

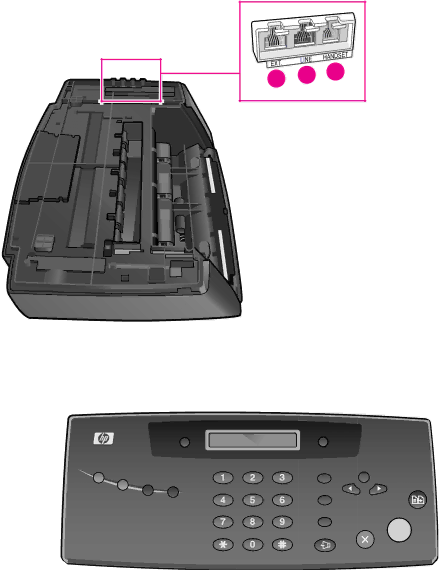
Figure 2-3 Bottom view

3

2

1


Control Panel of HP FAX

Figure 2-4Control panel of HP 1040 Fax

1Connect handset to the HANDSET port.

2Connect telephone line to the LINE port.

3HP 1040 only: Connect answering machine or extension phone to the EXT. port.

HP Fax basics 7

Image 13
Contents HP 1040/1050 Fax series Page Contents Digital message center HP 1050 Fax only Additional featuresAdvanced faxing Care and maintenance Feature referenceSpecifications and regulatory information Declaration of conformity Load paper Quick startSend a fax Load documents to fax or copyMake a copy Receive a faxPrint Order then Normal will display Make a telephone callHP Fax basics Parts of the HP Fax HP Fax 1040/1050Bottom view Control Panel of HP FAX5Control panel of HP 1050 Fax Fax Mute/Search 20 Rcv. Mode/Contrast Menus Basic FAX menu Overview of menu optionsECM Mode ResolutionAdvanced FAX menu Fax LogSET UP TAM menu SET UP Sound menuTools menu Speakerphone-HP 1050 Fax Loudspeaker-HP 1040 FaxNavigate the menus Ready modeMenu buttons Most text fields Enter dates, times, text, and telephone numbers## , $$ , %% Fax header telephone numberEnter dates, times, text, and telephone numbers Store a number in the phone book Speed dialingDial from the phone book Print the phone bookDocument types and sizes Paper types and sizesSet document resolution and contrast for a single copy Ringer volume Adjust volumeSpeaker volume Receiving via an extension telephone HP 1040 Fax only Automatic fax redialSet rings to answer Additional featuresBlock junk fax numbers Use Caller IDImage TCR Scan & Fax ModeDelete a number Teach the HP Fax the ring pattern Distinctive ring DrpdSet up distinctive ring Drpd answer mode Answer/receive modeHP1040 Fax FAX HP1050 FaxSet up a separate telephone number for Machine returns to Ready mode Turn on the message center Digital message center HP 1050 Fax onlyPlay your greeting Record your greetingAnnouncement only Screen or monitor your callsPlay back messages Erase selected messages Erase messagesErase all messages in memory Remote Password Remote AccessAccess the message center Toll Saver Message paging Set up message pagingRecord a conversation Receive a messagePage Broadcasting Advanced faxingDelayed fax Polling Setting send pollingPolling another fax to receive To cancel the scheduled jobStart Date&Time will display Forward faxesForward faxes Advanced faxing Set the date and time Alarm soundsTurn on and off sounds Set the fax header information Silent modeKey sounds Automatic reports Print reportsReports you can print System Data Reprinting faxesJunk Fax TAM StatusFax Header Clearing memoryDial/Schedule Faxes in MemoryRedial a number in memory View ink level Print cartridge informationReplace the print cartridge Print the self testReplace the print cartridge Document jams during transmission Clear jammed documents and paperPaper jams during printing Maintain the print cartridge Clean the print cartridge nozzlesWipe the print nozzles and contacts Clean the cartridge carrier contacts Clean the document scanner area Clean the document scanner area LCD error messages Adjust the scannerJunk Fax Full Junk Fax EmptyLoad Document Memory FullPolling Error Poll Code ErrorPoll job exists AlreadyFax problems TroubleshootingFine Paper feeding problems Print quality problemsIf Ink Low. Install new ink cartridge is displayed Digital Message Center problems Troubleshooting Care and maintenance Acceptable documents Specifications and regulatory informationPrint cartridge Product specificationsYES Sample of ITU #1 test chart reduced to 60.5% Environmental product stewardship program Regulatory notices Regulatory notices Declaration of conformity Declaration of conformityBefore calling customer support Use Hewlett-Packard support servicesTampered with Hewlett-Packard Limited Warranty StatementHewlett-Packard Limited Warranty Statement Page Index Page Page Page
Related manuals
Manual 54 pages 54.74 Kb