Handbook for the TRGpro Handheld Computer
Palm Desktop Software
Copyright
Disclaimer and Limitation of Liability
Contents
Chapter Managing Your Applications
143
115
Setting Preferences for Your Handheld Computer
Appendix a
Warranty and Other Product Information
215
Appendix B
Page
About This Book
Page
Getting to know your handheld computer
What is a TRGpro handheld computer?
Chapter
System requirements
Upgrade information
Minimum requirements
Optional equipment
Locating front panel controls
TRGpro components
Using the backlight
Protective flip cover
Locating back panel components
To install the batteries
Installing the batteries
Tap with the stylus to get things done
Tapping and typing
Icons Abc
Elements of the handheld computer interface
Menu bar
Scroll bar
Opening applications
Next
Previous
To open the menu bar
Using menus
To open an application
Choosing a menu
Graffiti menu commands
Three ways to enter data
Command
Displaying online tips
To display an online tip
Graffiti writing
Onscreen keyboard
To open Memo Pad
Importing data
Using Palm Desktop software
To set the current time
Customizing your handheld computer
To open the Preferences screens
To set the current date
To set the volume level
Palm Desktop software
With Palm Desktop software, you can do the following
To connect the cradle
Connecting the cradle
Installing Palm Desktop software
To install Palm Desktop software
Using your handheld computer with another PIM
Introduction to Your TRGpro Handheld Computer
Writing Graffiti characters
Using Graffiti writing to enter data
To write Graffiti letters
Graffiti tips
Letter
Graffiti alphabet
Writing numbers
Writing capital letters
Writing punctuation marks
Graffiti numbers
Additional Graffiti punctuation
Writing symbols and extended characters
Additional non-English characters
Writing accented characters
Accent strokes
Graffiti ShortCuts
Navigation strokes
Move cursor right Move cursor left
Next Field Address Book only
Entry ShortCut
To use the onscreen keyboard
Using the onscreen keyboard
Using your personal computer keyboard
To import data
Importing data
Chapter
Entering Data in Your Handheld Computer
Switching between applications
Using the Applications Launcher
Selecting applications
Categorizing applications
To display applications by category
Changing the Applications Launcher display
To categorize an application
To change preferences for an application
Choosing preferences
To change the Applications Launcher display
To install add-on software on your handheld computer
Installing and removing applications
Installing add-on applications
Chapter
Installing games
Removing Palm Desktop software
Removing applications
To remove an add-on application
To remove Palm Desktop software
CD if you want to synchronize data with another PIM
To assign a password
Assigning a password
Security
Security, you can do the following
Locking your handheld computer
Changing or deleting a password
To change or delete your password
To delete a forgotten password
Recovering from a forgotten password
To lock your handheld computer with a password
Managing Your Applications
Using Your Basic Applications
Date Book
Overview of basic applications
Date Book, you can do the following
To open Date Book
To open Address Book
Address Book
Address Book, you can do the following
To open To Do List
To Do List
To Do List, you can do the following
Calculator
Memo Pad
Memo Pad, you can do the following
Calculator, you can do the following
Expense, you can do the following
Expense
To open Calculator
To open Expense
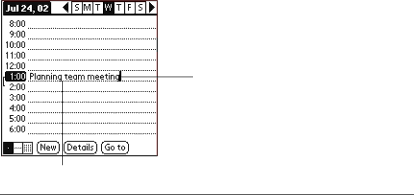
Creating records
Common tasks
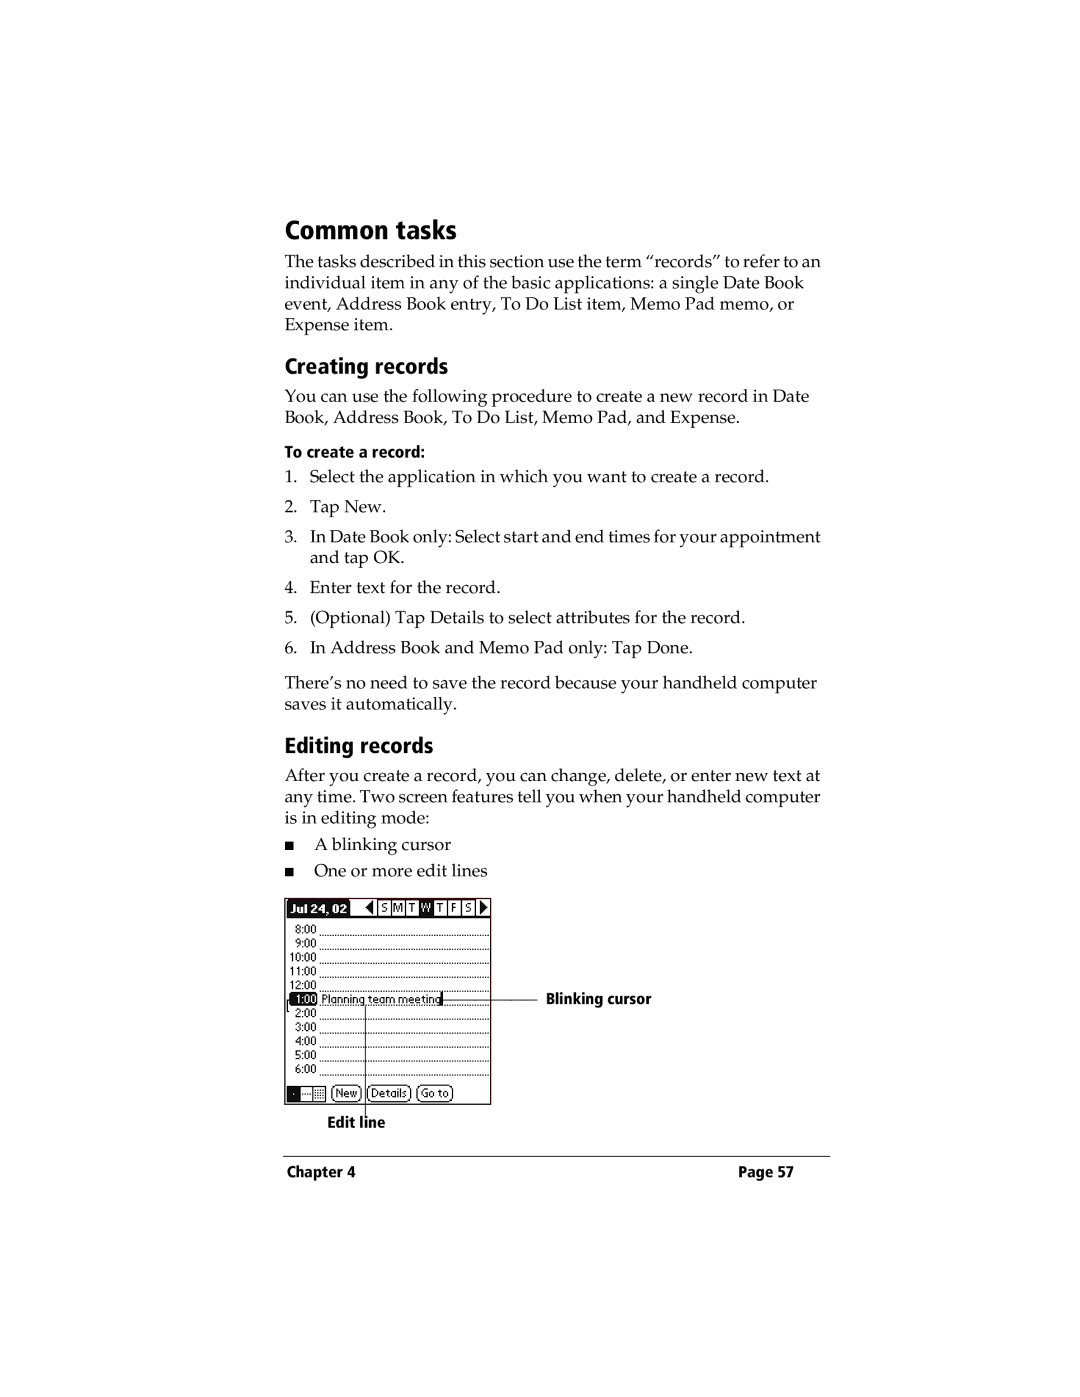
Editing records
To create a record
Edit menu
Entering text
Other ways to delete records
Deleting records
Keyboard
Graffiti Help
To purge records
Purging records
Exchanging and updating data HotSync operations
To perform a local HotSync operation
Performing a HotSync operation for the first time
HotSync button
Categorizing records
Default categories
To display a category of records
To move a record into a category
To rename a category
To define a new category
Using Your Basic Applications
Looking up Address Book records
Finding records
To use Find
Using Find
To look up an Address Book record
To use Phone Lookup
Using Phone Lookup
To add names to an Expense record
Phone Lookup tips
Looking up names to add to expense records
To sort records in Address Book and Memo Pad
Sorting lists of records
To sort records in To Do List and Expense
Hiding private records
Making records private
To display private records
To hide private records
To make a record private
Attaching notes
To attach a note to a record
To review or edit a note
To change the font style
Choosing fonts
To schedule an event for the current day
Application-specific tasks
Scheduling an event
Tap the time of an event
To schedule an event for another day
To schedule an untimed event
To set an alarm for an event
Setting an alarm for an event
Rescheduling an event
To reschedule an event
To schedule a repeating or continuous event
Scheduling repeating or continuous events
To cycle through Day, Week, and Month views
Changing the Date Book view
To display the Week View
To display the current time
Spotting event conflicts
Working in Month View
Record menu Options menu
Date Book menus, preferences, and display options
Chapter
Book
Preferences
To create a new Address Book entry
Creating an Address Book entry
To select other types of phone numbers in an entry
Selecting types of phone numbers
Next Field
To open the Address Entry Details dialog box
Changing Address Entry details
Options menus
Address Book menus
Record menus
Book
To create a To Do List item
Setting priority
Changing To Do List item details
Checking off a To Do List item
To set the priority of a To Do List item
To check off a To Do List item
Setting a due date
To Do Show Options
Show Due Dates
To Do List menus
Show Priorities
Categories
To create a new memo
Reviewing memos
To review a memo
Memo Pad menus
Pad
To display recent calculations
Recent Calculations
Calculator
Calculator menus
About
To create an Expense item
Entering receipt details
Changing the date of an Expense item
To change the date of an Expense item
To open the Receipt Details dialog box
Customizing the Currency pick list
To define a custom currency symbol
Defining a custom currency symbol
Transferring your data to Microsoft Excel
Show Options
To create or print an expense report
Creating or printing an expense report
Using expense report templates
Chapter
Record menu
To view your expense data using a Microsoft Excel template
Expense menus
Options menu
Using Your Basic Applications
Communicating Using Your Handheld Computer
Mail, you can do the following
Setting up Mail on the desktop
To set up Mail
To select HotSync options
Viewing e-mail items
Synchronizing Mail with your e-mail application
Opening the Mail application on your handheld com- puter
To open an e-mail item
Displaying full header information
To close an e-mail item
To display full header information
Creating e-mail items
To create an e-mail item
To reply to an e-mail item
To look up an e-mail address
Looking up an address
Adding details to e-mail items
Sending a blind carbon copy
Setting a priority
To set a priority for your e-mail item
To add a BCC field to your e-mail item
To create a signature
Adding a signature to your e-mail item
Requesting confirmations
Storing e-mail to be sent later
Editing unsent e-mail
To retrieve an e-mail item
Draft e-mail
To save an e-mail item as a draft
Filing e-mail
To edit an e-mail item saved as a draft
To file e-mail
Removing e-mail from the Deleted folder
Deleting e-mail
To remove e-mail from the Filed folder
To delete e-mail
Folders
Purging deleted e-mail
Message List options
Sorting the Message List
Date column
All
HotSync options
To open the HotSync Options dialog box
Send Only
Creating special filters
Filter
Unread
Ignoring or receiving e-mail
Defining filter strings
To retrieve high-priority e-mail items
High-priority e-mail
To define a filter string
To truncate e-mail items
Truncating e-mail items
Message menus
Mail menus
To beam a record, business card, or category of records
Beaming information
To select a business card
To receive beamed information
Tips on beaming information
To beam an application
Communicating Using Your Handheld Computer
To set the HotSync options
Selecting HotSync setup options
Always available
When Palm
Available only
Desktop software
Speed
Serial Port
To customize HotSync application settings
Customizing HotSync application settings
Chapter
Preparing your personal computer
Conducting a HotSync operation via modem
Modem
Setup String
Preparing your handheld computer
Advanced HotSync Operations
Selecting the conduits for a modem HotSync operation
To change the Conduit Setup for a modem HotSync operation
Conducting a HotSync operation via a network
Connecting to your company’s dial-in server
Performing a HotSync operation via a modem
To perform a modem HotSync operation
To prepare your computer for a network HotSync operation
To prepare your organizer for a network HotSync operation
Conducting a HotSync operation via infrared communication
Preparing your personal computer for infrared communication
To install a Windows 95 infrared driver
To check the ports used for infrared communication
To perform an IR HotSync operation
Performing an IR HotSync operation
To return to cradle HotSync operations
Returning to cradle HotSync operations
Problem Solution
Frequently asked questions about IR HotSync operations
Using File Link
To create a user profile
Creating a user profile
To use a profile for the first-time HotSync operation
Advanced HotSync Operations
Preferences screens, you can do the following
Viewing preferences
To change the Buttons preferences
Buttons preferences
Pen preferences
Turn Off & Lock
To change the Pen preferences
Backlight
HotSync buttons preferences
Digitizer preferences
Beam Data
To change the HotSync buttons preferences
To set the country default
Country default
Formats preferences
Time, date, week start, and numbers formats
General preferences
Auto-off delay
To set the Auto-off delay
Volume level and System, Alarm, and Game Sounds
System, alarm, and game sounds
To set the system and alarm sounds
To unlock the Owner Preferences screen
Owner preferences
To enter the Owner preferences
To create a ShortCut
ShortCuts preferences
Creating a ShortCut
Deleting a ShortCut
Editing a ShortCut
To edit a ShortCut
To delete a ShortCut
Connection preferences
Creating new configurations
Example a connection for remote IR HotSync operations
Connection/Network Preferences Examples
To create an IrCOMM to Modem connection
To prepare the HotSync Manager for a modem HotSync operation
To perform the HotSync operation
Network preferences and TCP/IP software
Selecting a service
To enter a user name
To select a service
Entering a user name
To enter a password
Entering a password
To enter your server phone number
Adding telephone settings
Entering a prefix
To enter a prefix
To disable Call Waiting
Disabling Call Waiting
To use a calling card
Using a calling card
Creating additional service templates
Connecting to your service
To add a new service template
To duplicate an existing service template
Idle timeout
Adding detailed information to a service template
To set the Idle timeout
To select a connection type
To enter a primary and secondary DNS
Defining primary and secondary DNS
To enter a permanent IP address
IP address
To identify dynamic IP addressing
Token-based authentication systems
Creating a login script
Plug-in applications
To create a login script
Delay
Password
Wait For
Send
Get IP
Command set queryDNS
Prompt
End
To delete a service template
Deleting a service template
TCP/IP troubleshooting
Network preferences menu commands
Service menu Options menu
Displaying expanded Service Connection Progress messages
To view the Network Log
Adding a DNS number
CompactFlash CF Cards
CompactFlash, CFpro, and CFBackup
Recommended CF Cards TRGpro Examples
CF Memory Cards, CFpro, and CFBackup
Removing a CF Memory Card
Inserting and Removing Memory Cards
Inserting a CF memory card
CompactFlash, CFpro, and CFBackup
CFpro menus, preferences, and options
CFpro
CFpro, you can do the following
To launch CFpro
Preferences
Tools menu
Copy to CF
Example Copying files using CFpro
Copy to CF as
Move to CF
Chapter
CFpro Notes
Using a CF Card with your Personal Computer
CFBackup, you can do the following
CFBackup
To launch CFBackup
To restore your data
Conducting a HotSync operation via CF modem
CF Modem Cards
Check your connection preferences
Inserting a CF modem card
Chapter
To perform the CF Modem HotSync operation
Chapter
CompactFlash, CFpro, and CFBackup
Caring for your handheld computer
Appendix a
Battery considerations
To perform a soft reset
Resetting your handheld computer
Performing a soft reset
To restore your data after a hard reset
Performing a hard reset
To perform a hard reset
Appendix a
Maintaining Your Handheld Computer
Appendix B
Software installation problems
Problem
Operating problems
Tapping and writing problems
Application problems
Appendix B
HotSync problems
Appendix B
Frequently Asked Questions
Appendix B
Beaming problems
Password problems
To find information about your TRGpro system
Technical support
Carriage return and line feed
Appendix C
Use of char
Literal characters
Warranty and Other Product Information
Page
Warranty and Other Product Information
TRG Products End User Software License Agreement
Warranty and Other Product Information
Page
Canadian RFI Statement
FCC Statement
Declaration of Conformity
Index
Index
Index
Index
Index
Index
Index
See also Deleting
Index
Index