XR-DV3M
Fonction anti-déformation
XR-DV3M
Anti-distortion function
Función antidistorsión
XR-DV3M
Electric Power
Precautions
Explanation of Graphical Symbols
Installation
Outdoor Antenna
Maintenance
Damage Requiring Service
Precautions on the built-in monitor
Table of Contents
Before USE
Features
Connect the supplied antennas
Connections
Connect the speaker cords to the speakers
Connect the speaker cords to the main unit
Connect the AC cord to an AC outlet
Connecting AN Outdoor Antenna
Selecting a Function
Remote Control
To Turn the Power on
Before Operation
Using the Cursor KEY Using the Monitor
Within 4 seconds, press Enter
Setting Power Economizing Mode
While the power is turned on, press DEMO/ECO Twice
While the power is turned on, press DEMO/ECO
Audio Adjustments
Information Displayed on the Monitor Screen
Basic Operations
Loading a Disc
Playing a Disc
Selecting a Track
Press c to start play
RANDOM/REPEAT Play
Repeat Play
Random Play
Press Enter
Press PRGM/RANDOM on the remote control once Stop mode
Programmed Play
Within 5 seconds, press Enter
Displaying Playing Status on the Monitor Screen
Press SET UP repeatedly during play
Changing the Display Information
Changing the Playing Time Information on the Display
Types of Video CDS
DISC-RELATED Terms
Video CD without the PBC function
DVD
VCDs with the PBC function
Using the Software Specific Menu
DVDs
To display the menu
To return to normal play
Playing a VCD Without Using Playback Control PBC
Selecting a Track with the Remote Control VCD only
Press r or t during play
Slow Play
Frame Advance and Slow Play
Frame Advance
Random Play VCD only
Press Repeat repeatedly on the remote control during play
Repeat Play DVD
Repeat Play DVD and VCD
Repeat Play VCD
Programmed Play VCD Only
VCDs
DVDs
Shows the memorized mark points information
When playing a DVD
When playing a VCD
Shows the angle information
Adjusting the Monitor Picture
Marking and Searching
Marking
Title Search DVD only
Chapter Search DVD only
Time Search
If you entered wrong numbers
Changing the Angle DVD only
Special DVD Features
Press Zoom on the remote control during play
Zoom Function DVD only
Press Audio Select during play
Subtitles DVD only
Changing Audio Tracks DVD only
Press Subtitle ON/OFF during play
Manual Tuning
Press TUNER/BAND repeatedly to select the desired band
Press r or t to select a station
Presetting Stations
Preset Number Tuning
Repeat steps 1
Adjust the echo volume
Microphone Mixing
Functions
KEY Control Function
Using DVD Karaoke Discs
Setting the Sleep Timer
Setting the Clock
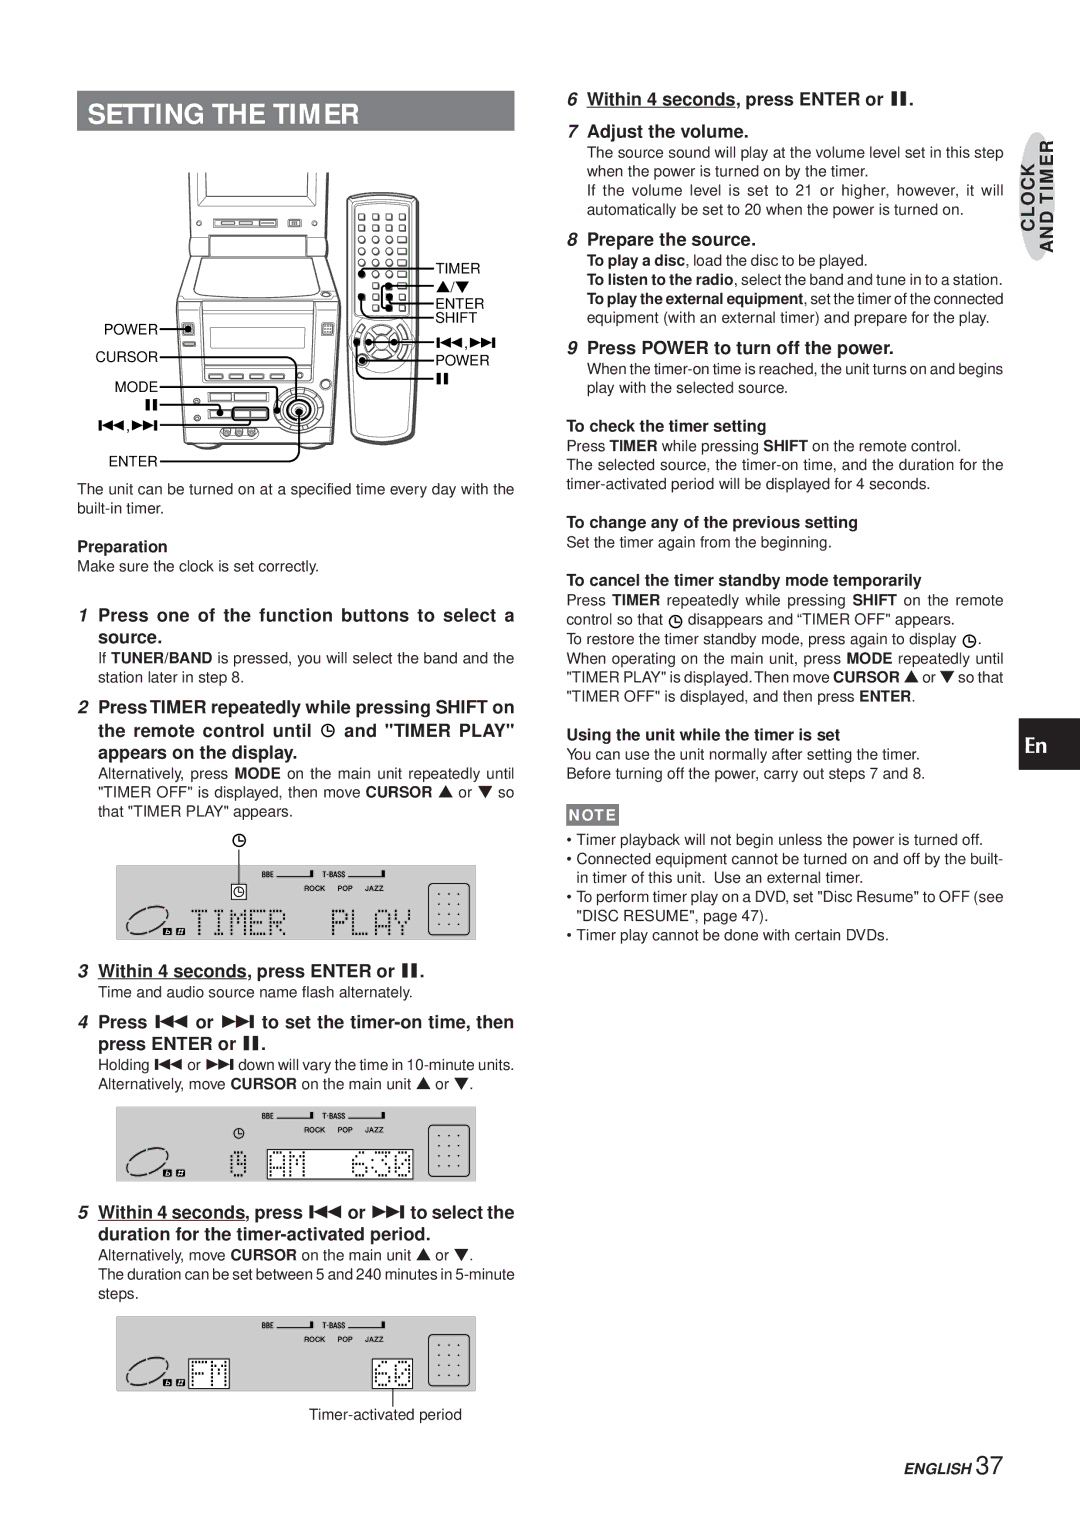
Setting the Timer
Connecting Optional Equipment
To Play the Equipment Connected to the AUX in Jacks
Listening to External
Sources
To Play the Equipment Connected to the Audio in Jacks
Overview of the Setup Menu
Press Enter
ON-SCREEN Menu
Guide Message
Background
Disc Languages
Audio Language
Subtitle Language
Down Mix PCM
Audio Output Setting
Disc Menu
Digital Stream
Down MIX Type
DTS Output
Letter BOX
TV Aspect
Wide TV
Normal TV
Ratings
Setting the Rating
Changing the Settings
If you forget your password
Disc Resume
When Disc Resume is set to on
Select PBC by using i/kin the setup menu.Then press
PBC
Code Country
Country Codes
Malawi
Code Language
Language Codes
Care and Maintenance
Unit
Discs
Troubleshooting
To Reset the Unit
To Reset the Setup Menu
Copyright
Specifications
Instalación
Precauciones
Advertencia
Explicación de los símbolos gráficos
Precaución
Nota
Preparativos
Índice
Antes DEL USO
Características
Conecte las antenas que se suministran
Conexiones
Conecte los cables de los altavoces a los altavoces
Conecte los cables de los altavoces a la unidad Principal
Conecte el cable de CA a una toma de corriente CA
Conexión DE UNA Antena Exterior
Selección DE UNA Función
Mando a Distancia
Antes DE LA Operación
Cómo Encender LA Unidad
Cómo Usar LA Tecla Cursor
Cómo Usar EL Monitor
Con la unidad encendida, pulse DEMO/ECO
DE LA Pantalla Dimmer
Con la unidad encendida, pulse DEMO/ECO dos Veces
Antes de que pasen 4 segundos, pulse Enter
Ajustes DE Audio
Información Mostrada EN LA Pantalla DEL Monitor
Operaciones Básicas
Cómo Cargar UN Disco
Reproducción DE UN Disco
Selección DE UNA Pista
Reproducción Repetida A-B
Reproducción Aleatoria Repetida
Reproducción Aleatoria
Reproducción Repetida
Pulse Enter
Pulse Enter antes de que pasen 5 segundos
Pulse repetidamente SET UP durante la reproducción
Cómo Cambiar LA Información DE LA Pantalla
Pulse repetidamente on Screen Display
Tipos DE Discos Compactos DE Vídeo
Términos Relacionados CON LOS Discos
Disco compacto de vídeo sin la función PBC
En el caso de un DVD o de un VCD con función PBC , no
Cómo visualizar el menú
USO DEL Menú Específico DE Software
Cómo pausar la reproducción
Operaciones DVD/VCDCON
Cómo volver a la reproducción normal
Reproducción EN Avance Retroceso Rapido
Saltos
Pulse r o t o durante la reproducción
Cómo regresar a la reproducción normal
Avance DE Fotogramas
Reproducción a Cámara Lenta
Reproducción Aleatoria Sólo VCD
Reproducción Repetida A-B DVD Y VCD
Reproducción Repetida DVD
Cómo repetir la reproducción de la o las pistas de un disco
Reproducción Repetida VCD
Antes de que pasen 5 segundos, pulse Enter
Sólo VCD
Cómo Cambiar LA
Muestra información sobre el ángulo
Al reproducir un DVD
Al reproducir un VCD
Muestra la información sobre el sonido
Ajustes a LA Imagen DEL Monitor
Marcas Y Búsqueda
Marcas
Búsqueda DE Títulos Sólo DVD
Búsqueda DE Capítulo Sólo DVD
Búsqueda POR Tiempo
Si introdujo números equivocados
Pulse Zoom en el mando a distancia durante la reproducción
Funciones Especiales DE UN DVD
Función DE Zoom Sólo DVD
Cambio DE Ángulo Sólo DVD
Pulse Subtitle ON/OFF durante la reproducción
Subtítulos Sólo DVD
Cambio DE Pistas DE Audio Sólo
DVD
Cuando una emisión radiofónica en FM tenga ruido
Sintonización Manual
Pulse r o t para seleccionar una emisora
Cómo buscar rápidamente una emisora Autobúsqueda
Selección de una presintonía en la unidad principal
Presintonización DE Emisoras
Sintonización Mediante Presintonías
Repita los pasos 1 y
Ajuste el volumen del eco
Mezcla Microfónica
Funciones DE Desvanecimiento DE VOZ/ Multiplex
Karaoke
Función DE Control CON Tecla
Ajuste DEL Temporizador DE Apagado
Ajuste DEL Reloj
Prepare la fuente
Pulse Power para apagar la unidad
Ajuste DEL Temporizador
Antes de que pasen 4 segundos, pulse Enter o
Conexión DE UN Equipo Opcional
Cómo Reproducir Equipo Conectado a LAS Tomas Audio
Audición DE Fuentes DE Sonido Externas
Visualización DE Imágenes Provenientes DE UNA
Fuente Externa
Menú DE Configuración Generalidades
Pulse Enter
Menú EN Pantalla
Mensajes Guía
Fondo
Idiomas DE LOS Discos
Idioma DEL Audio
Idiomas DE LOS Subtítulos
Down Mix PCM Mezcla PCM
Configuración DE LA Salida DE Audio
Menú DE Discos
Banda Digital
Tipo DE Sonido DE Audición
Salida DTS
Letter BOX Buzón
Televisor
TV Panorámica
TV Normal
Si olvida la contraseña
Límite DE Tolerancia DE Visionado a Menores
Cómo Ajustar EL Límite DE Tolerancia
Cómo Cambiar LOS Ajustes
Control DE LA Reproducción
Reanudación DE LA
Cuando Disc Resume esté en on
Código País
Códigos DE Países
Polonia
Código Idioma
Códigos DE Idioma
Discos
LA Unidad
Solución DE Pequeños Problemas
Cómo Reajustar EL Menú DE Configuración
Cómo Reajustar LA Unidad
Derechos DE Autor
Especificaciones
Alimentation
Explication des symboles graphiques
Précautions
Avertissement
Précaution
Remarque
Préparatifs
Table DES Matières
Avant Lutilisation
Caractéristiques
Raccordez les antennes fournies
Raccordements
Raccordez les cordons denceinte aux enceintes
Raccordez les cordons denceintes à lunité principale
Pour positionner les antennes
Raccordement Dune Antenne Extérieure
Concernant laffichage de démonstration
Pour poser lantenne AM sur une surface
Sélection Dune Fonction
Télécommande
Avant LA Mise EN Service
Pour Mettre Sous Tension
Utilisation DE Lécran
Utilisation DE LA Commande Cursor
Quand lappareil est sous tension, appuyez sur
Réglage DU Mode Économie Dénergie
Obscurcissement DE LA Luminosité DE Lafficheur Dimmer
Dans les 4 secondes, appuyez sur Enter
Système Q Surround
Réglages Audio
Système Super T-BASS
Accentuation DES Sons Aigus
Information Affichée SUR Lécran
Opérations DE Base
Lecture DUN Disque
Chargement DE Disques
Sélection Dune Piste
Appuyez sur c pour démarrer la lecture
Lecture Aléatoire
Lecture Répétée
Lecture Répétée A-B
Appuyez sur Enter
Lecture Programmée
Dans les 5 secondes, appuyez sur Enter
Piste à lire en premier
Appuyez plusieurs fois sur on Screen Display
Appuyez plusieurs fois sur SET UP pendant la lecture
Changement DE Linformation Affichée
Affichage DE Létat DE Lecture SUR Lécran
Types DE CD Vidéo
Terminologie Relative AUX Disques
CD vidéo sans la fonction PBC
CD vidéo avec la fonction PBC
Utilisation DU Menu Particulier AU Logiciel
DVD
Pour afficher le menu
Lecture DUN CD Vidéo Sans Utiliser LA Commande DE Lecture
Appuyez sur r ou t pendant la lecture
Pour retourner à la lecture normale
Lecture Aléatoire CD Vidéo Seulement
Lecture EN Ralenti
Avance Image PAR Image
Lecture EN Ralenti
Lecture Répétée A-B DVD ET CD Vidéo
Lecture Répétée DVD
Lecture Répétée CD Vidéo
PRGM/RANDOM
Lecture Programmée CD Vidéo Seulement
CD vidéo
Indique linformation dangle
Affichage DE Letat DE Lecture SUR Lécran
Pendant la lecture dun DVD
Lors de la lecture dun CD vidéo
Réglage DE Limage DU Moniteur
Indexation ET Recherche
Indexation
Recherche DE Titre DVD Seulement
Si vous avez entré des chiffres erronés
Recherche DE Chapitre DVD Seulement
Recherche DE Temps
Pour les DVD Appuyez trois fois sur T-SEARCH
Changement Dangle DVD Seulement
Appuyez sur Zoom sur la télécommande pendant la lecture
Caractéristiques Spéciales DES DVD
Fonction Zoom DVD Seulement
Appuyez sur Audio Select pendant la lecture
SOUS-TITRES DVD Seulement
Changement DE BANDE-SON DVD
Appuyez sur Subtitle ON/OFF pendant la lecture
Quand une émission FM stéréo contient des parasites
Pour sélectionner une bande avec la télécommande
Accord Manuel
Appuyez sur r ou t pour sélectionner une station
Sélection dun numéro de préréglage sur lunité principale
Préréglage DE Stations
Accord PAR Numéro DE Préréglage
Répétez les opérations 1 et
Réglez le volume de lécho
Mixage Avec Microphone
Multiplex
Karaoké
Fonction Commande DU TON
Dans les 4 secondes, démarrez le réglage de Lheure
Réglage DE Lhorloge
Réglage DE Minuterie DE Sommeil
Appuyez sur a ou Enter avec lalimentation Coupée
Dans les 4 secondes, appuyez sur Enter ou a
Ce que et Timer Play apparaisse dans lafficheur
Appuyez sur Power pour mettre lappareil hors Tension
Réglage DE LA Minuterie
Raccordement DUN Appareil EN Option
Pour Lire UN Appareil Raccordé AUX Prises AUX
Écoute DE Sources
Externes
Pour Lire UN Appareil Raccordé À LA Prise Audio
Menu DE Configuration
Appuyez sur Enter
Menu À Lécran
Message DE Guidage
ARRIÈRE-PLAN
Langues DES Disques
Langue Audio
Langue DES SOUS-TITRES
Par la prise Digital Audio OUT Optical et les prises Line
Menu DE Disque
Flot Numérique
Down Mix PCM son audio PCM
Type Down MIX
Sortie DTS
Téléviseur Normal
Personnalisation DE LA Configuration DU DVD
Format DU Téléviseur
Téléviseur Large
Si vous oubliez le mot de passe
Limite Dutilisation
Réglage DE LA Limite
Changement DES Réglages
Commande DE Lecture
Reprise DE Disque
Quand Disc Resume est active
Code Pays
Codes DE Pays
Pologne
Code Langue
Codes DE Langue
Soins ET Entretien
Appareil
Disques
Pour Réinitialiser LE Menu DE Configuration
Guide DE Dépannage
Pour Réinitialiser Lappareil
Drois Dauteur
Spécifications
Parts INDEX/INDICE DE LAS PARTES/NOMENCLATURE