CSMIM-T1 Hardware Installation Guide
Page
Mmac and CSMIM-T1are trademarks of Cabletron Systems, Inc
FCC Notice
REN/SOC FIC Usoc CSMIM-T1
Industry Canada Certification Number
Equipment Attachment Limitations
Exclusion of Warranty Disclaimer of Liability
Viii CSMIM-T1 Hardware Installation Guide
Table of Contents
Table of Contents
Chapter Modem Guide
Xii CSMIM-T1 Hardware Installation Guide
Organization of this Document
General
Following conventions are used throughout this document
Document Conventions
Password
Login
Getting Help
Ctron.com
CSMIM-T1 Overview
CSMIM-T1 Front Panel
Software Information
CSMIM-T1
Console Port
System LED Indicators
SET UP Switch
There are 7 indicators to show system activity and status
Network Status / Alarms
4 T-1 Network Access
Modem Port Status LEDs
Modem Configuration Status LEDs
EFS Key Number
Connecting the CSMIM-T1 to a Full T-1 Line
Connectivity
Telco Connection Information
Telco Connection Information
Connecting the CSMIM-T1 to a Fractional T-1 Line
Compatibility
CSMIM-T1 Physical / Statistical Information
Height 11.5 in .4 cm Width Depth
Operating
Safety
Non-operating
Electromagnetic Compatability
CSMIM-T1 Hardware Installation Guide
Chapter Installing the CSMIM-T1
Locating the Ethernet Jumpers
Ethernet Jumper Settings
Setting the Subnet Jumper
Setting the Ethernet Jumpers
Network Bypass Jumper
Network Bypass Jumper
Install the CSMIM-T1 into the MMAC-FNB backplane as follows
Installing the CSMIM-T1
Mmac M8FNB
Connecting a Console Terminal
Making Connections
Line Speed Cable Length Feet Allowed Loss
Connecting a T1 Network Interface
POWER-UP and Test
Connecting a Drop/Insert Interface
REVISION/CONFIGURATION Information
AUTO-INITIALIZING the Roms
Bootp
Rarp
Software Installation Procedures
Execute the boot command see the boot command in Chapter
Invoking the Console Monitor
Self-Booting the CSMIM-T1
Reloading EFS Key Value
Chapter ROM Monitor Commands
ROM Monitor Commands
Commands
Addr
Addr -d
Addr -dcommand display looks like this
Addr command display looks like this
Boot -lv filename
Boot
CSMIM-T1 Hardware Installation Guide
Monitor boot
CSMIM-T1 Hardware Installation Guide
Boot -lcommand display looks like this
EOF
Config
Config command display looks like this
3 config
Command display looks like this
Console-baud
Console-baud
Erase
Erase
Help
Image
Image -d filename
Ipx command display looks like this
Image -dcommand display looks like this
8 ipx
Ipx -d
Latkey command display looks like this
Command syntax is
Latkey -dcommand displays the current LAT key setting
Latkey
11 net
10 mop
Mop -d
Net
Optionkey -dcommand displays the current settings
Optionkey command display looks like this
Optionkey
Ping
When invoked, the command displays a menu of options
Ports
Ports -d
CSMIM-T1 Hardware Installation Guide
Sequence -d interface,interface
Sequence
Slip -d port
Slip
Slip Command Prompts
CSMIM-T1 Hardware Installation Guide
Stats command display looks like this
Stats
Stats -slip
StatisticDescription
Command Command Type Description
T-1 Commands
Stats -T current total all intervalset clearalarm
Stats -T current command display looks like this
Argument Description
Frame synchronization. During this condition, the T-1
Field Description
Drop/Insert Interface is out of frame sync or not receiving
Reset t1 soft hard esf
Keyword Definition
Describes the arguments for T1loopback
Keyword Description
T-1 Parameters
CSMIM-T1 software comes with the following new parameters
Parameter Descriptions
Option Description
Sigproto
Tniclock
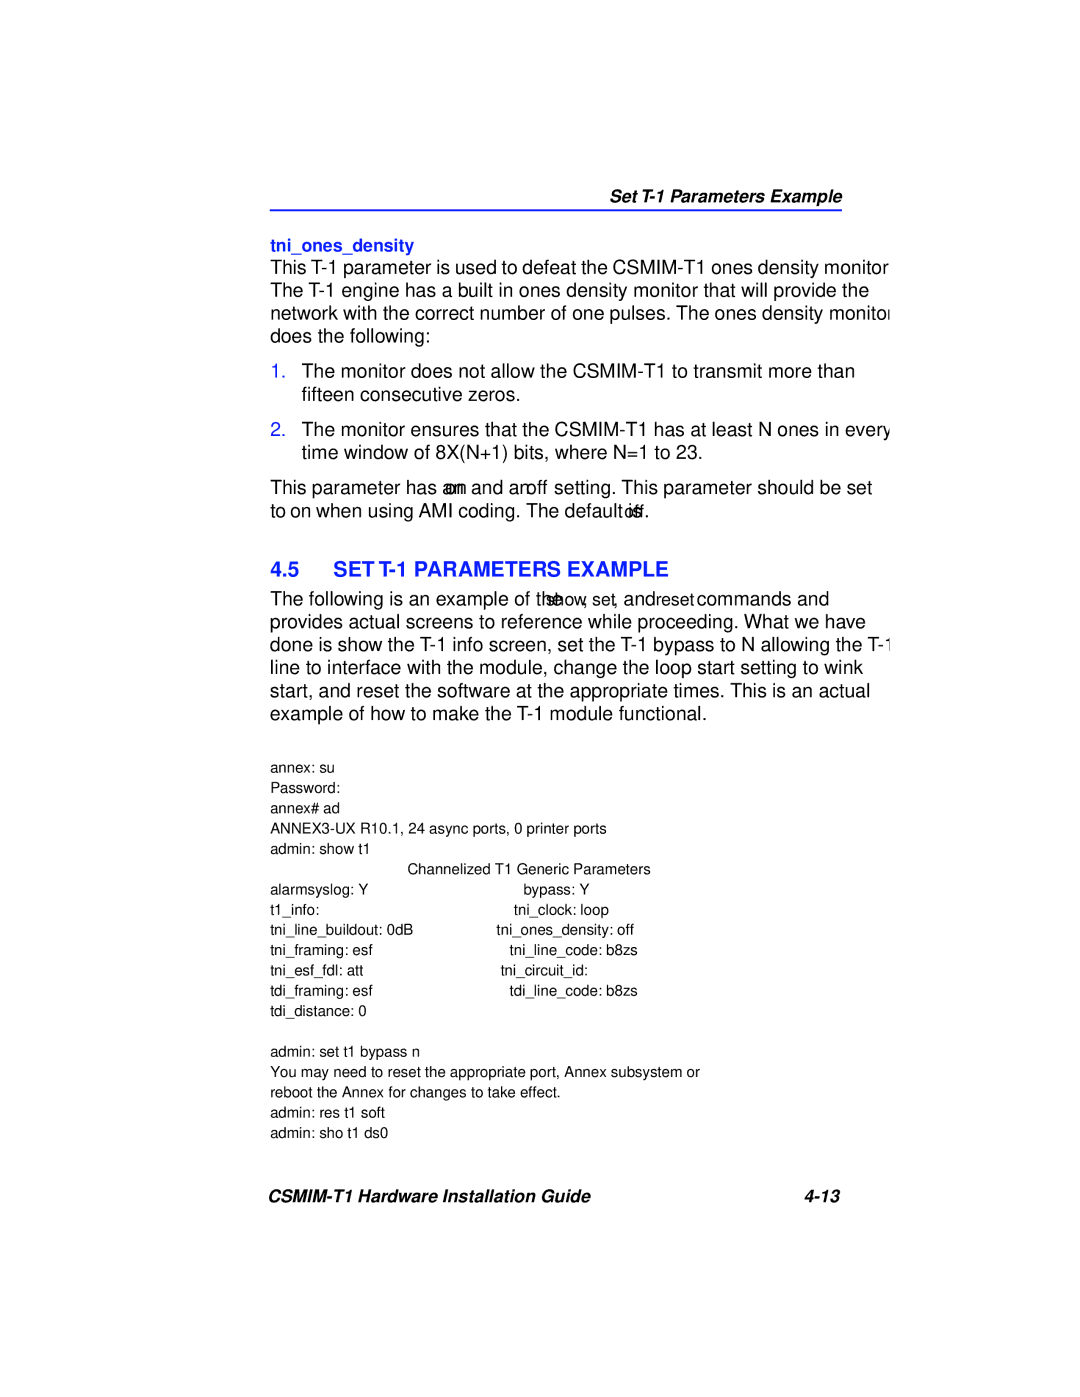
SET T-1 Parameters Example
Ds0=2 loopstart
Ds0=11
CSMIM-T1 Hardware Installation Guide
Chapter Troubleshooting Procedures
Status
LEDs Description
General
Normal Mode CSMIM-T1 Diagnostics
POWER-UP and Boot Procedures
Normal Mode Error-Free Sequence
Activity
Amber
Normal Mode Error Sequence
Setup Mode Error-Free Sequence
SET UP Mode
Setup Mode Error States
Boot Failures
Boot Error Report
Errors CSMIM-T1 sensed a hardware error during message
Error Description
See Table
ErrorDescription
Correcting CSMIM-T1 Parameters
Unix Host on the LAN
Load Server Host Not Responding
Another CSMIM-T1
VAX VMS Load Host on the LAN
Activity Green Amber
CSMIM-T1 Dumps
Network
System
Address Filename Pathname
Chapter Modem Guide
Features
Using the AT Command SET
Title Default
Key AT Command Factory Defaults
Establishing 11-Bit Data Connections
3 V.32bis Cellular Connections Using AT Commands
Universal Cellular Setup
MNP 10 V.32bis Quick Connect Cellular Only Setup
Modulation Protocols
V.32bis Protocols
Bell 212A protocol is for 1200 bps full-duplex connections
Protocol Issue %G0 Issue %G1
Protocol Configuration Command Settings
Speed and Protocol Connection Matrices
Modem Speed and Protocol Combinations
For operations at V.22 600 bps, both modems must be set to
Error Correction
Error Correction
Diagnostics
Power-Up Diagnostics
Local Analog Loopback with Self-Test
Remote Digital Loopback with Self-Test
Local Analog Loopback
Local Digital Loopback
Remote Digital Loopback
Automatically Terminating a Test Register S18
Respond to Remote Digital Loopback
Result Codes
Connection Result Code Tables
Short Form Long Form
ATV1-M0W0 or ATV1-M0W1 Report DTE Speed
Result Codes
Report Modulation Speed
ATV1-M0W2
ATV0W0 or ATV0W1 Report DTE speed
ATV0W2 Report Modulation Speed
Entering Commands
Command SET
Issuing AT Commands at any Speed
Repeat Last Command
Answer
Bn ITU-T/Bell Mode
An Auto-Reliable Fallback Character
\An Maximum MNP Block Size
Bn Modem-Port Bps Rate
\Bn Transmit Break
Compression Control
@Cn CTS, DSR, and DCD Connect Message Control
Cn Serial-Port DCD Control
\C0
\Cn Auto-Reliable Buffer
ATD 011225551234 Enter
H2 command
Dial Modifiers
Dial modifiers allow you to add conditions to the telephone
ATD 9,,5551234 Enter
Operating Mode Dial Modifiers
This bong signal. Once it detects it, the modem continues
First, the modem hangs up and displays no Prompt Tone
Dn Disconnect Buffer Delay
DL Redial the Last Telephone Number Dialed
Redials the last telephone number that the modem dialed
Repeat Dial
DTR Control
\Dn Serial-Port DSR/CTS Control
\D0
DCD
Result
Command Echo
En Auto-Retrain
EnModem-Port Data Length
\En Data Echo
En Compromise Equalizer
\E0
Mode
Secondary Flow Control
Restore Factory Defaults
Independent Serial-Port/Modem-Port Speed
Guard Tone
\Gn Modem-Port Flow Control
\G0
Hang Up
\Jn Bps Rate Adjust
Detect Phase
Link Negotiation Speed
Identification
\Kn Break Control
KnMNP Extended Services
2illustrates the \Kn command
Disables speed matching
Enables speed matching
Speed Matching
Provides partial speed matching
Mode Setting on Originating Modem Bell212A Bell103
Modem
Mode Mode Setting Answer Modem Originating
Allows connections through V.32bis
Modulation Selection
Allows connections through V.FC
Possible Connection Speed bps
MnMNP Class Connect Messages
Mn Power Level Adjustment For Cellular Telephone Connections
\N n Operating Mode
Sets auto-reliable mode
\N3
CSMIM-T1 Hardware Installation Guide
On Enter Connect State
On V.23 Equalizer Control
OnSerial-Port Parity
AT-O4D12345 Enter
PnCheck Parity
Pulse Dial
Fallback Modulation Speeds
Quiet
\Qn Serial-Port Flow Control
\Q3
Control and ignores the \Q setting
During direct mode connections, the modem does not use flow
Modem continues to send out the characters and empty
Your computer to resume transmitting data to the modem
Read All Registers
Sn? Read Configuration Registers
RTS/CTS Options
Sn DSR Options
Tn Test and Diagnostics Commands
Read Online Status
Tone Dial
Clear Serial-Port Speed
\Tn Inactivity Timer
\Vn Error Correction Result Code Form
Vn Result Code Form
Display Modem Firmware Version
Connection Speed Reporting
Display Bootstrap Revision
Wn Pulse Digit Command
Wn Store Current Configuration
Wn Store Complete Configuration
Xn Extended Result Codes
\Xn XON/XOFF Pass-Through
\X0
Yn Long Space Disconnect
Zn Reset
Yn Designate Default User Profile
Commands to Change or Read Registers
Displays the contents of all T n= n commands in decimal
Registers
S1=n Ring Counter
Range 0 255, Ascii decimal Default 43 +
S2=n Escape Code Character
S3=n Carriage Return Character
S5=n Backspace Character
S4=n Line Feed Character
S6=n Wait Before Dialing
S7=n Wait for Carrier After Dial
S8=n Pause Time for Dial Delay
S10=n Delay for Hang Up After Carrier Loss
S9=n Carrier Detect Response Time
S11=n Dtmf Tone Dialing Speed
S12=n Escape Code Guard Time
S14=n Bit Mapped Register
Bit Function Decimal Value Position
S16=n Bit Mapped Register, Test Options
S18=n Test Timer
S22=n Bit Mapped Register Table
S21=n Bit Mapped Register Table
S23=n Bit Mapped Register Table
S27=n Bit Mapped Register Table
S25=n Delay to DTR and Asynchronous Time Delay
T3=n Timer for V.21 and V.23 Answer Tone Duration
T2=n Timer for V.21 Mode During Multi-Protocol Answer
T4=n Timer for Line Turnaround Delay Carrier On
T5=n Timer for V.23 Half-Duplex Intercharacter Delay
T6=n Timer for DCD Turn On Delay
T7=n Timer for False Answer Abort
T9=n Primary XON Flow Control Character
T10=n Primary Xoff Flow Control Character
T11=n Secondary XON Flow Control Character
T14=n Connect Message Delay Timer
T12=n Secondary Xoff Flow Control Character
T15=n V.24 Control Register
T16=n CTS Turn On Delay Timer
T17=n V.32/V.32bis Connection Training Timer
Bit Function Position
T22=n DSR Timer
T19=n Bit Mapped Register
T23=n Bit Mapped Register Table
T42=n V.34/V.FC Connection Speed Selection
T26=n Bit Mapped Register Table
CSMIM-T1 Hardware Installation Guide
Console Port
Appendix a Port PIN/SIGNAL Allocations
Interface Ports
DCE Cabletron part number 9372075 for DB25 male
Additional Cabletron Cables and Connectors
CSMIM-T1 Hardware Installation Guide
Numerics
Symbols
INDEX-2
INDEX-3
INDEX-4
INDEX-5
INDEX-6
INDEX-7
INDEX-8
INDEX-9
INDEX-10