Hp psc Photosmart series All-in-one Reference guide
Page
Hp psc Photosmart series All-in-one
Safety information
Contents
Use the fax features
Technical information
Vii
Troubleshooting information
Viii
Get help
Help Description
Hp psc 2500 series
Hp psc overview
Hp psc 2500 series at a glance
Feature Purpose
Power connection USB port
Output tray Paper-width guide
Front panel overview
Button
Button
Menu overview
Rotate
Use the hp director software to do more with your hp psc
Open the hp director for Windows users
Select the HP PSC 2500 Series
Feature
HP PSC
Open the hp director all-in-one using Macintosh OS
Open the hp director for Macintosh users
Open the hp photo and imaging director using Macintosh OS
Feature
Load originals and load paper
Load an original
Load paper
Load the input tray
Replace the output tray
Load envelopes
Load 4 by 6 inch 10 by 15 cm photo paper
Load postcards or Hagaki cards
Remove the output tray Remove all paper from the input tray
Recommended papers
Load other types of paper in the input tray
Paper Tips
Together
Set the paper type
Set paper type from the copy menu
Continuous banner
Set the paper size from the copy menu
Set the paper size
Set paper type from the photo menu
Set the paper size from the photo menu
Avoid jams
Load originals & paper
What is a memory card?
Use a photo memory card
Insert a memory card and save the files to your computer
Print photos from a proof sheet
Print a proof sheet
All Last Custom Range
Complete the proof sheet
Print photos by scanning a proof sheet
Create a video action print by scanning a proof sheet
Set photo print options
Change photo menu print options
Borderless print
Set new print photo defaults
Print photos directly from a memory card
Print individual photos
Create borderless prints
Deselect photos
Use quick print to print the current photo
Print a Dpof file
View photos in a slide show
Change the speed of the slide show
To print camera-selected photos
Share digital photos through hp instant share
Share photos through e-mail
Use the hp photo & imaging gallery
Share photos through the Share Menu
Use the copy features
Overview
This section contains the following topics Overview on
Press 9 to select Set New Defaults from the Copy Menu
Change default copy settings
Press to highlight a quality setting, and then press OK
Increase copy speed or quality
Press Start Black
Copy a two-page black-and-white document
Hp photo & imaging help that came with your software
Remove the first page from the glass and load the second
Make a 4 by 6 inch 10 by 15 cm borderless copy of a photo
Brochure Glossy *. Brochure Matte
Make multiple copies of the same original
Press Start Color
Copy a 4 by 6 inch 10 by 15 cm photo onto a full-size
Paper sizes available vary by country/region
Copy a photo several times on one
Resize an original to fit onto letter paper
Press to highlight Fit to Page, and then press OK
Press to darken the copy, and then press OK
Copy a washed-out original
Copy a document that has been faxed several times
Press 8 to select Color Intensity from the Copy Menu
Enhance light areas of your copy
Make a poster
Prepare a color t-shirt transfer
To stop copying, press Cancel on the front panel
Stop copying
Press to highlight Iron-On, and then press OK
Scan an original on Stop scanning on
Use the scan features
Scan an original
Send the scan to a memory card loaded in your hp psc on
Send the scan to a computer connected directly to the hp psc
Imaging help that came with your software
On the keypad
Scan
To save your scan to an hp instant share destination
Press 2 to select HP Instant Share
Image saved on the secure HP Instant Share server
To stop scanning, press Cancel on the front panel
Stop scanning
Send the scan to a memory card loaded in your hp psc
Use the fax features
Send a fax
Enable fax confirmation
Send a basic fax
Send a two-page black-and-white fax
Send a color original or photo fax
Send a fax using speed dials
Receive a fax
Set number of rings before answering
Set up your hp psc to answer fax calls manually
Set the fax header
Receive a fax manually
Enter text
Print reports
Generate automated reports on Generate manual reports on
Generate automated reports
Generate manual reports
Set up speed dialing
Create speed-dial entries
Create speed-dial entries on Delete speed-dial entries on
Change resolution on Change contrast on Set new defaults on
Control resolution and contrast
Change resolution
Delete speed-dial entries
Change contrast
Set new defaults
Set fax options
Use error correction mode ECM
Redial a busy or unanswered number automatically
Adjust the volume
Set automatic reduction for incoming faxes
Change the answer ring pattern distinctive ringing
Set the date and time
Set the paper size
Set tone or pulse dialing
Reprint the faxes in memory
Set backup fax reception
To stop a fax you are sending or receiving, press Cancel
Stop faxing
Fax
Use the network configuration tools
Access the network menu
Network
Use network menu options
Print a network configuration
General network settings
Field Description
Hardware Address
DSL modem during installation
Default Gateway
Pieces of hardware have the same MAC address
Domain name hp.com. The Internets domain name servers DNS
Enabled device that appears on the network
Admin Password
Addresses to refer to one another
Wireless network settings
Number value ranging from 1 to 14, depending on country
Access point
Range of approved channels
Region
Security method is common on wireless networks
Authentication and encryption
Used on an authentication server
Networks
Enable or disable the wireless radio
Data transmission and receipt information
To restore wireless defaults
Restore wireless defaults
To enable or disable the wireless radio
Then
Change the link speed
Manage your hp psc using the embedded web server
To access the embedded web server
To change the link speed
Adding security to the network
Network config tools
Print from your computer
Print from a software application
Windows users
Macintosh users
Make changes to the print settings, and click Apply
Set print options
Click Print to begin printing
Layout panel
To change the print settings for the current print job
Copies & pages panel
Output options panel Paper type/quality panel
Stop a print job
Order print cartridges
Order supplies
Order media
Print cartridges Hp reorder number
Order supplies
Clean the glass
Clean the lid backing
Maintain your hp psc
Check the ink levels
Clean the exterior
Work with print cartridges
Estimated ink levels appear for the print cartridges
Print a self-test report
To check the ink level for Macintosh users
Handle print cartridges
Lines of color extend across
Replace the print cartridges
Maintain your hp psc
Use a photo print cartridge
Use the print cartridge protector
Align the print cartridges
To align the cartridges from the front panel
100
Clean the print cartridges
101
Clean the print cartridge contacts
Turn the HP PSC on and open the print-carriage access door
102
Press until the appropriate time appears, then press OK
Restore factory defaults
Set the power save time
103
Set the prompt delay time
104
Hp customer support
Get hp psc support
Get support and other information from the Internet
105
Call in North America during warranty
Call elsewhere in the world
106
107
Call in Australia post-warranty
Prepare your hp psc for shipment
108
Hp distribution center
109
110
Warranty service
Warranty information
Duration of limited warranty
Warranty upgrades
Extent of limited warranty
Returning your hp psc for service
Hewlett-packard limited global warranty statement
112
Local law
Limitations of warranty
Limitations of liability
113
Limited warranty information for EU countries
114
Technical information
System requirements
115
Technical
Paper specifications
Paper tray capacities
116
Paper sizes
117
Print specifications
Print margin specifications
118
Copy specifications
119
Fax specifications
Photo memory card specifications
120
Power specifications
Scan specifications
Physical specifications
Environmental specifications
Environmental product stewardship program
Hp inkjet supplies recycling program
Regulatory notices
Recycling program
Regulatory model identification number
FCC statement
124
Exposure to radio frequency radiation
125
126
Declaration of conformity European Union
Geräuschemission
127
Arib STD-1066 Japan
128
Declaration of Conformity
129
130
Hubs, switches, and routers on
Wired network setup
Wired networking basics
Cables on
Cables
Hubs, switches, and routers
Switches
Hubs
Internet connections
Recommended network configurations
Ethernet network with Internet access provided by modem
Ethernet network without an Internet connection
Set up your hp psc for wired network use
134
Connect your hp psc to the network
To connect your hp psc to the network
135
Install your hp psc software on a Windows computer
To install your hp psc software
136
Install your hp psc software on a Macintosh
137
Select the appropriate Language and Device
Click Network Option
138
139
Printers Found
At the Congratulations! screen, click Continue
Complete the Print Queue Setup
Click Continue
140
Communication modes
Wireless network setup
Wireless networking basics
Communication modes on
142
Encryption
Authentication
Security
143
Ad-hoc
Wireless network configurations
Media access control address authentication
144
Infrastructure to 802.3 Ethernet
Infrastructure
Ethernet to infrastructure
145
Set up your hp psc for wireless network use
Optimize your wireless network
146
Connect your hp psc to a wireless network or computer
147
148
149
Printer Found
Ssid that WEP is
Next
150
Wireless Encryption WEP
151
152
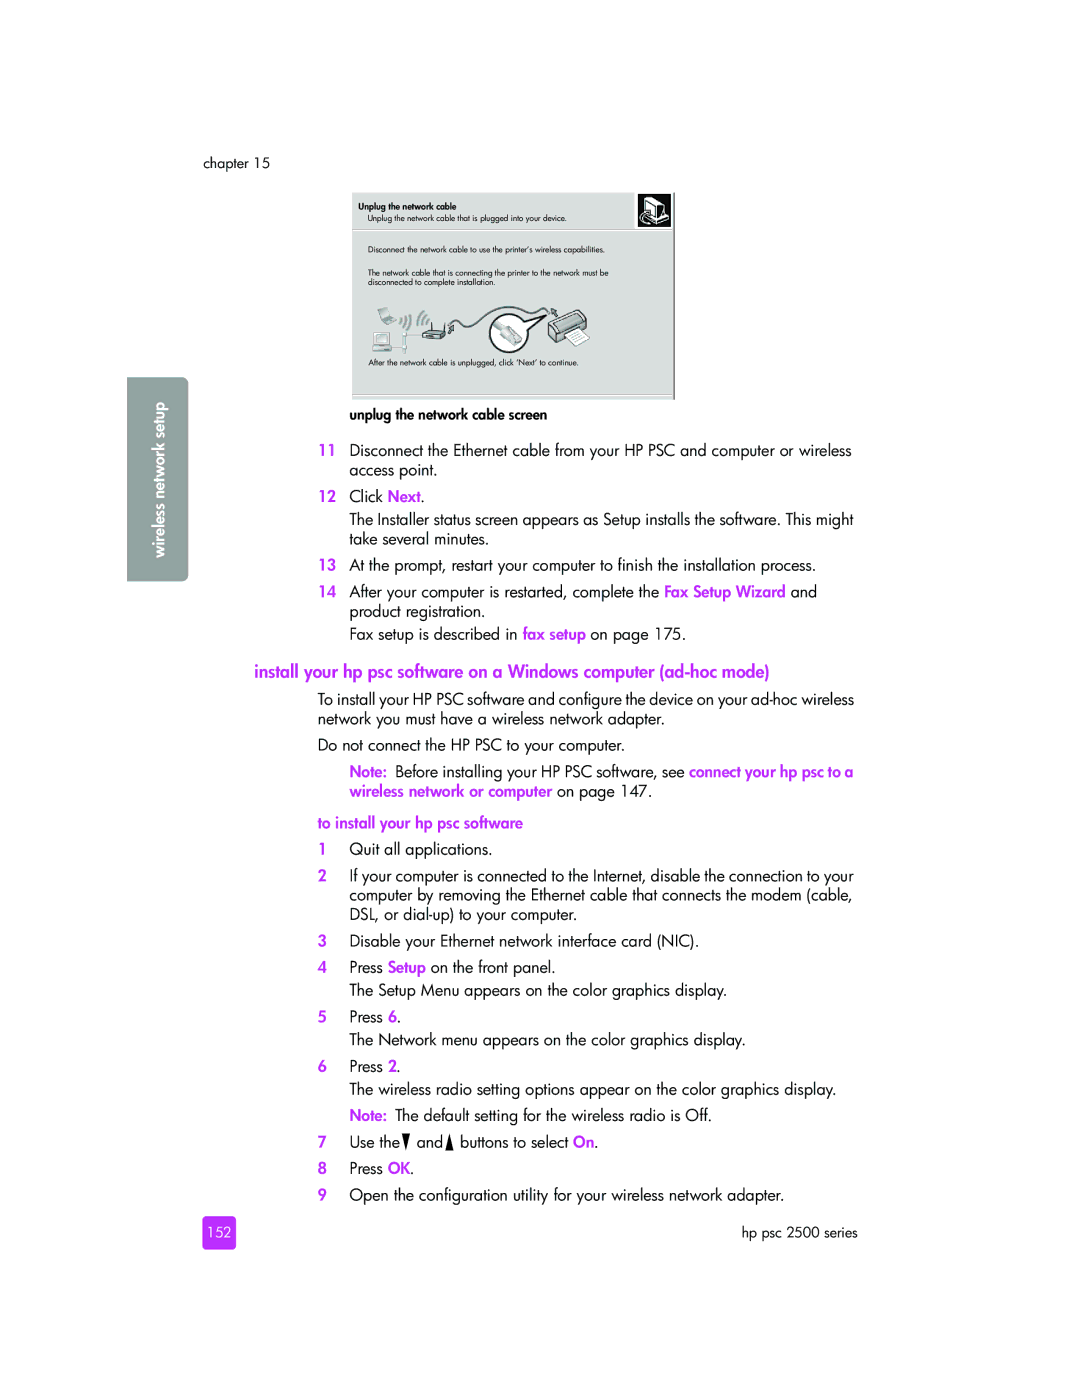
Unplug the network cable
153
154
155
Select a Network Name screen appears
156
Verify that the settings are correct, and then click Next
157
Install your hp psc software on a Macintosh ad-hoc mode
158
159
160
161
8GS97TW
162
163
AirPort is active in your machine
Wireless network setup
164
165
Use the embedded web server
Enter multiple WEP keys
166
To enter WPA encryption data onto the embedded Web server
Enter WPA encryption data
To enter multiple WEP keys onto the embedded Web server
167
Term Definition
Enter advanced authentication data
Glossary of terms
Select Infrastructure and click Next
169
Network using Shared Key authentication provides
Authentication
Network with No Authentication Open System does
Server-based EAP/802.1x authentication provides
Static encryption such as WEP The same key is used for
Dynamic encryption such as WPA Each device has a
API that is used in its AiO software solution
Network. It can also work with any other Ethernet-enabled
Switching of wireless LAN cards on a PC. This works
Protected Extensible Authentication Protocol. a mutual
Wireless subgroup of users and devices. An Ssid prevents
Service Set Identifier. a unique identifier up to
Wireless LAN. An Ssid provides basic access control to a
Access by any client device that does not have the SSID. By
Protocol TKIP. To strengthen user authentication, WPA
AirPort adapter a wireless card that plugs directly into
Wi-Fi Protected Access. Provides standards-based
Implements 802.1x and the Extensible Authentication
Fax setup
175
Vietnam
How to choose the right fax setup for your office
Venezuela
176
Select your fax setup case from this table
177
Case a separate fax line no voice calls received
How your hp psc will answer fax calls
179
Case C shared voice/fax line
180
How to answer fax calls automatically
How to answer fax calls manually
181
Case D fax line shared with PC modem no voice calls received
182
Case E shared voice/fax line with PC modem
183
Case F shared voice/fax line with answering machine
184
185
186
Case H shared voice/fax line with voice mail
187
Case I shared voice/fax line with PC modem and voice mail
188
189
Faxing from a DSL line
190
From the HP Instant Share tab, click Start HP Instant Share
Hp instant share direct connect setup Use
Use hp instant share in five easy steps Windows
191
Use the e-mail button
192
Use a scanned image
Access hp instant share from the hp director
Use the hp instant share photo menu option
Click the HP Instant Share tab
Select an image from the folder in which it is stored
Send a photo or image using your hp psc Macintosh
Open the HP Director
Click Next
195
Why should I register with hp instant share Windows
Access the e-mail option from the hp director
196
Use hp instant share in five easy steps
Hp instant share network setup
Before you start
197
Register with hp instant share Windows
Click If you don’t have an account, click here
198
Register with hp instant share Macintosh
199
200
201
Use the hp instant share scan menu option
Edit or add hp instant share destinations
To edit a destination Open the HP Director
To create an e-mail destination Open the HP Director
Print a network configuration
Why should I register with hp instant share
203
Hp psc 2500 series
Wired network setup troubleshooting
Troubleshooting information
Installation troubleshooting
Computer is unable to discover device hp psc
You received a System Requirements Error No TCP/IP
Printer not Found screen appears during installation
206
Wireless network setup troubleshooting
You are using a cable modem without a router
207
Verification fails at end of installation
208
209
Setup failed
210
211
Hp psc cannot find your computer
Wireless infrastructure mode troubleshooting
Hp psc cannot find the Wlan
Computer is unable to discover device
Wireless ad-hoc mode troubleshooting
Software installation troubleshooting
213
Minimum system checks screen appears
Red X appears on the USB connect prompt
214
Received a message that an unknown error has occurred
Some of the icons are missing in the hp director
215
Double-click the ApplicationsHP All-in-One Software folder
216
Fax wizard does not start
Digital Imaging Monitor does not appear in the task tray
217
Hardware installation troubleshooting
Front panel displays the wrong language
218
My USB cable is not connected
My hp psc does not turn on
Hp psc does not print
219
Troubleshooting
Additional installation troubleshooting help
Fax setup troubleshooting
You can also find more information on the HP website at
221
Cannot receive faxes, but I can send faxes
222
Cannot send faxes, but I can receive faxes
Fax tones are recorded on my answering machine
223
Hp instant share incorrect network settings
Hp instant share setup troubleshooting
Hp instant share service temporarily unavailable
224
Hp instant share connection not established
Operational troubleshooting
Hp instant share troubleshooting
Hp instant share connection lost
Too many destinations specified
Hp instant share error
Cannot read destination file
No destinations created
Networking troubleshooting
Problem Possible cause and solutions
Photo memory card troubleshooting
Unsupported file
File name is truncated
When I type a file name, I get an error message
Other users on the network can access my photo memory card
File name is uppercase
Index
Numerics
229
HP PSC
230
231
232
233
234
Page
Q3093-90182