Command | Description | Parameters / Response Values |
|
|
|
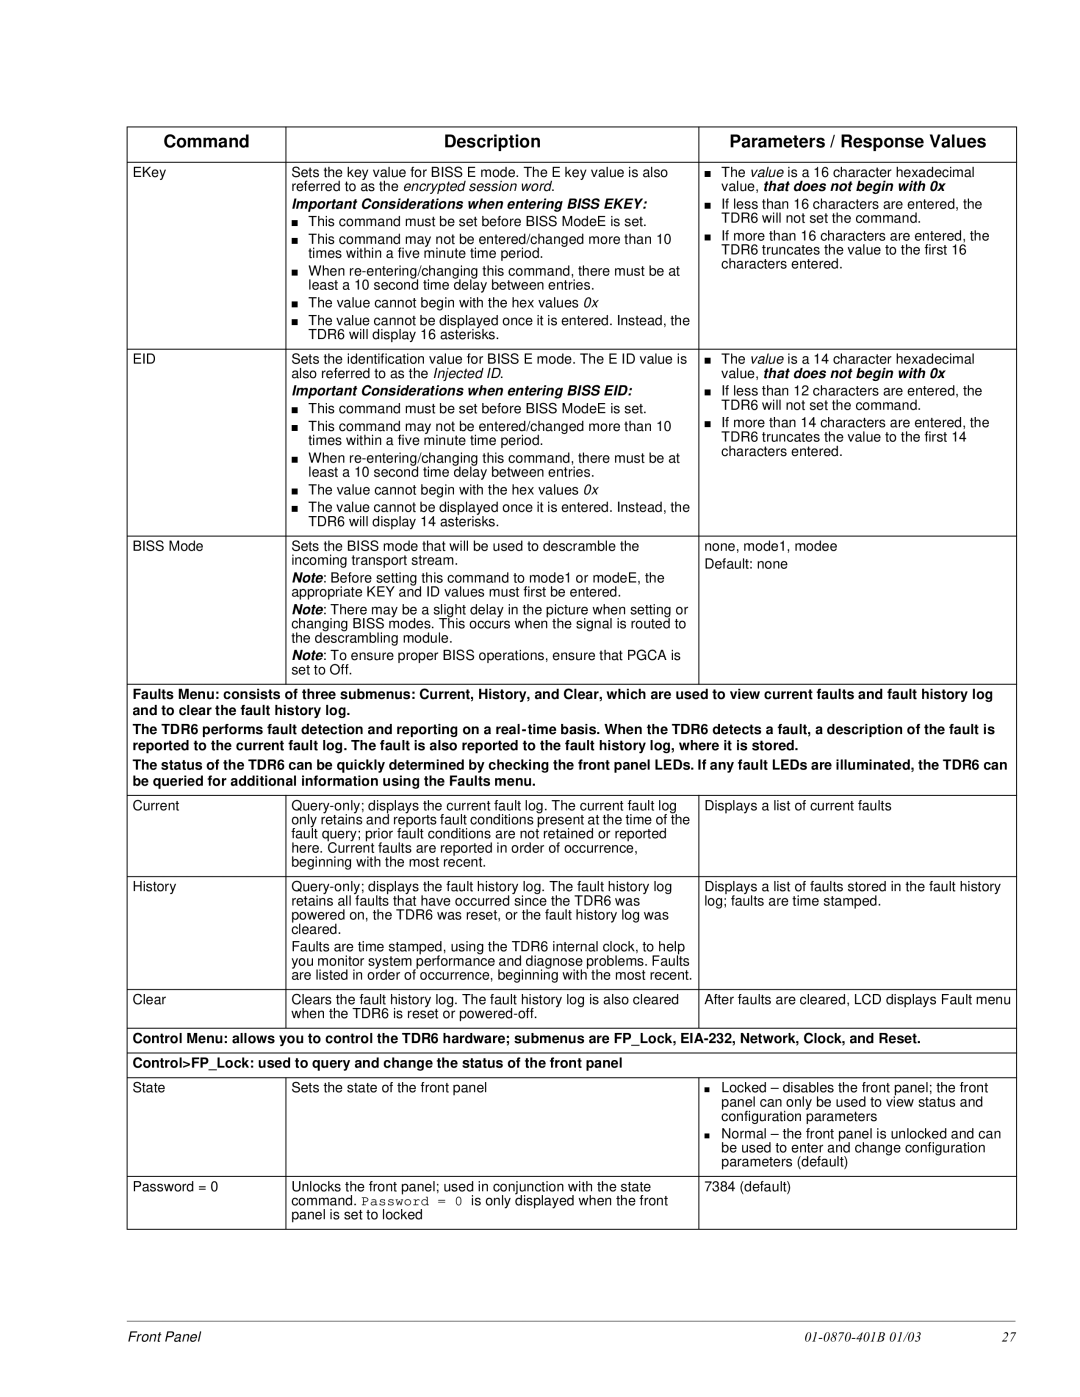
EKey | Sets the key value for BISS E mode. The E key value is also | ■ The value is a 16 character hexadecimal |
| referred to as the encrypted session word. | value, that does not begin with 0x |
| Important Considerations when entering BISS EKEY: | ■ If less than 16 characters are entered, the |
| ■ This command must be set before BISS ModeE is set. | TDR6 will not set the command. |
| ■ This command may not be entered/changed more than 10 | ■ If more than 16 characters are entered, the |
| times within a five minute time period. | TDR6 truncates the value to the first 16 |
| ■ When | characters entered. |
|
| |
| least a 10 second time delay between entries. |
|
| ■ The value cannot begin with the hex values 0x |
|
| ■ The value cannot be displayed once it is entered. Instead, the |
|
| TDR6 will display 16 asterisks. |
|
|
|
|
EID | Sets the identification value for BISS E mode. The E ID value is | ■ The value is a 14 character hexadecimal |
| also referred to as the Injected ID. | value, that does not begin with 0x |
| Important Considerations when entering BISS EID: | ■ If less than 12 characters are entered, the |
| ■ This command must be set before BISS ModeE is set. | TDR6 will not set the command. |
| ■ This command may not be entered/changed more than 10 | ■ If more than 14 characters are entered, the |
| times within a five minute time period. | TDR6 truncates the value to the first 14 |
| ■ When | characters entered. |
|
| |
| least a 10 second time delay between entries. |
|
| ■ The value cannot begin with the hex values 0x |
|
| ■ The value cannot be displayed once it is entered. Instead, the |
|
| TDR6 will display 14 asterisks. |
|
|
|
|
BISS Mode | Sets the BISS mode that will be used to descramble the | none, mode1, modee |
| incoming transport stream. | Default: none |
| Note: Before setting this command to mode1 or modeE, the |
|
| appropriate KEY and ID values must first be entered. |
|
| Note: There may be a slight delay in the picture when setting or |
|
| changing BISS modes. This occurs when the signal is routed to |
|
| the descrambling module. |
|
| Note: To ensure proper BISS operations, ensure that PGCA is |
|
| set to Off. |
|
|
|
|
Faults Menu: consists of three submenus: Current, History, and Clear, which are used to view current faults and fault history log and to clear the fault history log.
The TDR6 performs fault detection and reporting on a real- time basis. When the TDR6 detects a fault, a description of the fault is reported to the current fault log. The fault is also reported to the fault history log, where it is stored.
The status of the TDR6 can be quickly determined by checking the front panel LEDs. If any fault LEDs are illuminated, the TDR6 can be queried for additional information using the Faults menu.
Current | Displays a list of current faults | |
| only retains and reports fault conditions present at the time of the |
|
| fault query; prior fault conditions are not retained or reported |
|
| here. Current faults are reported in order of occurrence, |
|
| beginning with the most recent. |
|
|
|
|
History | Displays a list of faults stored in the fault history | |
| retains all faults that have occurred since the TDR6 was | log; faults are time stamped. |
| powered on, the TDR6 was reset, or the fault history log was |
|
| cleared. |
|
| Faults are time stamped, using the TDR6 internal clock, to help |
|
| you monitor system performance and diagnose problems. Faults |
|
| are listed in order of occurrence, beginning with the most recent. |
|
|
|
|
Clear | Clears the fault history log. The fault history log is also cleared | After faults are cleared, LCD displays Fault menu |
| when the TDR6 is reset or |
|
|
|
|
Control Menu: allows you to control the TDR6 hardware; submenus are FP_Lock, | ||
|
| |
Control>FP_Lock: used to query and change the status of the front panel |
| |
|
|
|
State | Sets the state of the front panel | ■ Locked – disables the front panel; the front |
|
| panel can only be used to view status and |
|
| configuration parameters |
|
| ■ Normal – the front panel is unlocked and can |
|
| be used to enter and change configuration |
|
| parameters (default) |
|
|
|
Password = 0 | Unlocks the front panel; used in conjunction with the state | 7384 (default) |
| command. Password = 0 is only displayed when the front |
|
| panel is set to locked |
|
|
|
|
Front Panel |
| 27 |