Getting Started
Setup Step 1
Plug the UTA220 into the power outlet. Turn the power switch on the rear panel ON.
Note: Do not connect the UTA220 to the ISDN line until the
UTA220 has been properly programmed.
The LCD displays the banner:
ISDN TERMINAL ADAPTER
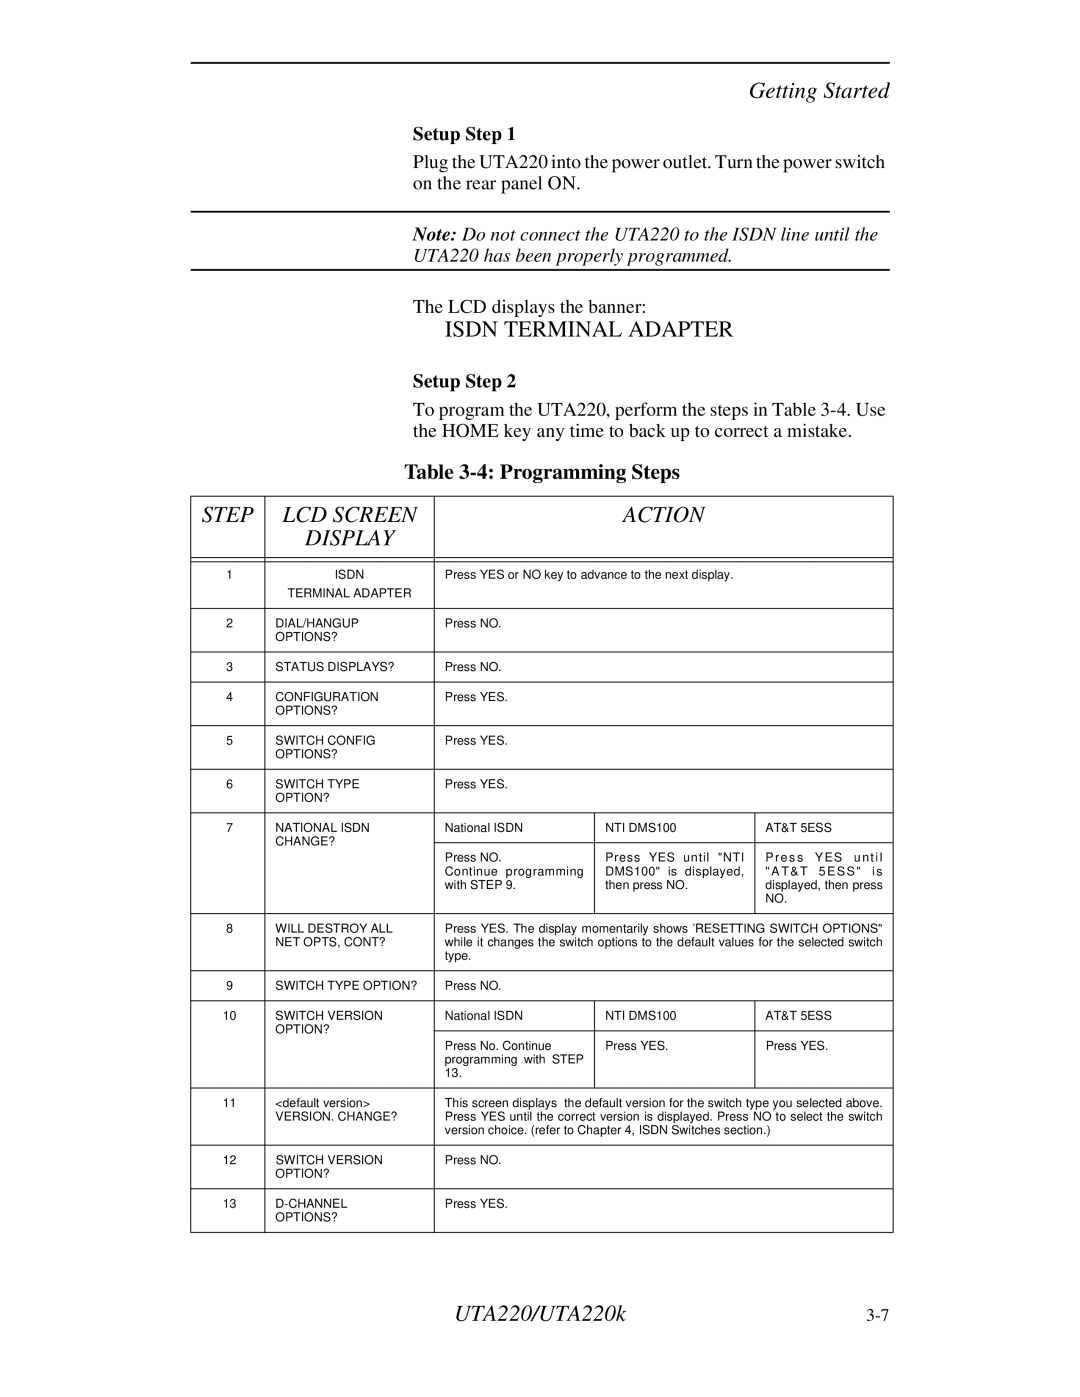
Setup Step 2
To program the UTA220, perform the steps in Table
Table
STEP | LCD SCREEN |
| ACTION |
|
| |
| DISPLAY |
|
|
|
|
|
|
|
|
|
| ||
|
|
|
|
| ||
1 | ISDN | Press YES or NO key to advance to the next display. |
|
| ||
| TERMINAL ADAPTER |
|
|
|
|
|
|
|
|
|
|
|
|
2 | DIAL/HANGUP | Press NO. |
|
|
|
|
| OPTIONS? |
|
|
|
|
|
|
|
|
|
|
|
|
3 | STATUS DISPLAYS? | Press NO. |
|
|
|
|
|
|
|
|
|
|
|
4 | CONFIGURATION | Press YES. |
|
|
|
|
| OPTIONS? |
|
|
|
|
|
|
|
|
|
|
|
|
5 | SWITCH CONFIG | Press YES. |
|
|
|
|
| OPTIONS? |
|
|
|
|
|
|
|
|
|
|
|
|
6 | SWITCH TYPE | Press YES. |
|
|
|
|
| OPTION? |
|
|
|
|
|
|
|
|
|
|
| |
7 | NATIONAL ISDN | National ISDN | NTI DMS100 |
| AT&T 5ESS | |
| CHANGE? |
|
|
|
|
|
| Press NO. | Press YES | until "NTI | P re s s | Y E S u nt i l | |
|
| |||||
|
| Continue programming | DMS100" is | displayed, | " A T & T | 5E S S " i s |
|
| with STEP 9. | then press NO. | displayed, then press | ||
|
|
|
|
| NO. |
|
|
|
|
|
| ||
8 | WILL DESTROY ALL | Press YES. The display momentarily shows ’RESETTING SWITCH OPTIONS" | ||||
| NET OPTS, CONT? | while it changes the switch options to the default values for the selected switch | ||||
|
| type. |
|
|
|
|
|
|
|
|
|
|
|
9 | SWITCH TYPE OPTION? | Press NO. |
|
|
|
|
|
|
|
|
|
| |
10 | SWITCH VERSION | National ISDN | NTI DMS100 |
| AT&T 5ESS | |
| OPTION? |
|
|
|
|
|
| Press No. Continue | Press YES. |
| Press YES. | ||
|
|
| ||||
|
| programming with STEP |
|
|
|
|
|
| 13. |
|
|
|
|
|
|
|
|
| ||
11 | <default version> | This screen displays the default version for the switch type you selected above. | ||||
| VERSION. CHANGE? | Press YES until the correct version is displayed. Press NO to select the switch | ||||
|
| version choice. (refer to Chapter 4, ISDN Switches section.) |
| |||
|
|
|
|
|
|
|
12 | SWITCH VERSION | Press NO. |
|
|
|
|
| OPTION? |
|
|
|
|
|
|
|
|
|
|
|
|
13 | Press YES. |
|
|
|
| |
| OPTIONS? |
|
|
|
|
|
|
|
|
|
|
|
|
UTA220/UTA220k |