Getting Started
Table
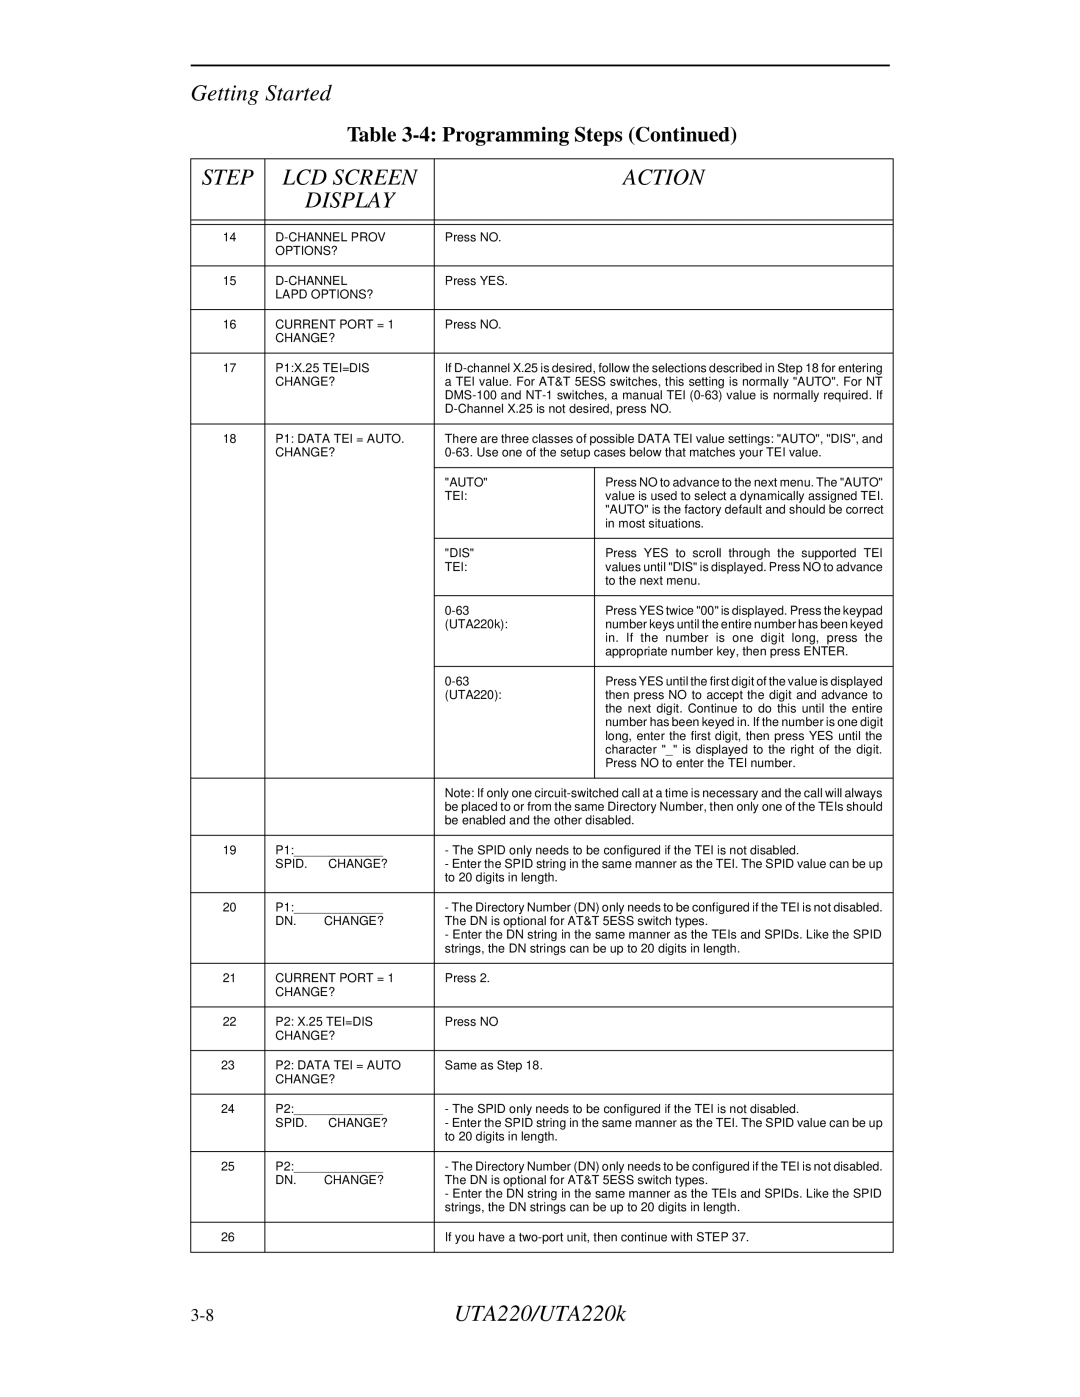
STEP | LCD SCREEN |
| ACTION | |
| DISPLAY |
|
| |
|
|
|
| |
|
|
|
| |
14 |
| Press NO. |
| |
| OPTIONS? |
|
| |
|
|
|
| |
15 | Press YES. |
| ||
| LAPD OPTIONS? |
|
| |
|
|
|
| |
16 | CURRENT PORT = 1 | Press NO. |
| |
| CHANGE? |
|
| |
|
|
| ||
17 | P1:X.25 TEI=DIS | If | ||
| CHANGE? | a TEI value. For AT&T 5ESS switches, this setting is normally "AUTO". For NT | ||
|
|
| ||
|
|
| ||
|
|
| ||
18 | P1: DATA TEI = AUTO. | There are three classes of possible DATA TEI value settings: "AUTO", "DIS", and | ||
| CHANGE? | |||
|
|
|
|
|
|
|
| "AUTO" | Press NO to advance to the next menu. The "AUTO" |
|
|
| TEI: | value is used to select a dynamically assigned TEI. |
|
|
|
| "AUTO" is the factory default and should be correct |
|
|
|
| in most situations. |
|
|
|
|
|
|
|
| "DIS" | Press YES to scroll through the supported TEI |
|
|
| TEI: | values until "DIS" is displayed. Press NO to advance |
|
|
|
| to the next menu. |
|
|
|
|
|
|
|
| Press YES twice "00" is displayed. Press the keypad | |
|
|
| (UTA220k): | number keys until the entire number has been keyed |
|
|
|
| in. If the number is one digit long, press the |
|
|
|
| appropriate number key, then press ENTER. |
|
|
|
|
|
|
|
| Press YES until the first digit of the value is displayed | |
|
|
| (UTA220): | then press NO to accept the digit and advance to |
|
|
|
| the next digit. Continue to do this until the entire |
|
|
|
| number has been keyed in. If the number is one digit |
|
|
|
| long, enter the first digit, then press YES until the |
|
|
|
| character "_" is displayed to the right of the digit. |
|
|
|
| Press NO to enter the TEI number. |
|
|
|
|
|
|
|
| Note: If only one | |
|
|
| be placed to or from the same Directory Number, then only one of the TEIs should | |
|
|
| be enabled and the other disabled. | |
|
|
| ||
19 | P1:_____________ | - The SPID only needs to be configured if the TEI is not disabled. | ||
| SPID. | CHANGE? | - Enter the SPID string in the same manner as the TEI. The SPID value can be up | |
|
|
| to 20 digits in length. |
|
|
|
| ||
20 | P1:_____________ | - The Directory Number (DN) only needs to be configured if the TEI is not disabled. | ||
| DN. | CHANGE? | The DN is optional for AT&T 5ESS switch types. | |
|
|
| - Enter the DN string in the same manner as the TEIs and SPIDs. Like the SPID | |
|
|
| strings, the DN strings can be up to 20 digits in length. | |
|
|
|
| |
21 | CURRENT PORT = 1 | Press 2. |
| |
| CHANGE? |
|
| |
|
|
|
| |
22 | P2: X.25 TEI=DIS | Press NO |
| |
| CHANGE? |
|
| |
|
|
|
| |
23 | P2: DATA TEI = AUTO | Same as Step 18. |
| |
| CHANGE? |
|
| |
|
|
| ||
24 | P2:_____________ | - The SPID only needs to be configured if the TEI is not disabled. | ||
| SPID. | CHANGE? | - Enter the SPID string in the same manner as the TEI. The SPID value can be up | |
|
|
| to 20 digits in length. |
|
|
|
| ||
25 | P2:_____________ | - The Directory Number (DN) only needs to be configured if the TEI is not disabled. | ||
| DN. | CHANGE? | The DN is optional for AT&T 5ESS switch types. | |
|
|
| - Enter the DN string in the same manner as the TEIs and SPIDs. Like the SPID | |
|
|
| strings, the DN strings can be up to 20 digits in length. | |
|
|
|
| |
26 |
|
| If you have a | |
|
|
|
|
|
UTA220/UTA220k |