AG- P
For your safety
FCC Note
Consignes de sécurité
Remarque
Information for Your Safety
Informations pour votre sécurité
Contents
Table des matières
Avant l’enregistrement
Standard Accessories
Accessoires standard
Commandes et composants
Controls and Components
Viseur m17
Microphone Socket MIC
Finder m17 Prise de micro MIC
Eyepiece ND Filter ND Filter m62
≠ Connecteur de sortie vidéo Video OUT m31
≠ Video Output Connector Video OUT m31
Audio Output CH1/CH2 Jack Audio OUT CH1/CH2 m31
Prise de sortie audio de canal 1/canal 2 Audio OUT L/R m31
LCD Monitor Open Lever m17 ∞ LCD Monitor m17
Audio REC CH1/CH2 Level Volume
REC START/STOP Button m19 Handle Zoom Switch m23
Levier d’ouverture du moniteur LCD m17 ∞ Moniteur LCD m17
2 Types of Power Supplies
Les deux types d’alimentation
Raccorder le fil d’alimentation secteur à une prise secteur
» Alimentation à partir de la batterie
Raccorder le fil d’alimentation secteur à La prise secteur
Retrait de la batterie
« Charge Lamp Charge
« Témoin de charge Charge
Preventing Accidental Erasure of Recordings
Inserting the Cassette
Insertion de la cassette
Prévention de l’effacement accidentel des enregistrements
« LP Mode
» Mode LP
180
Réglage de la courroie de poignée
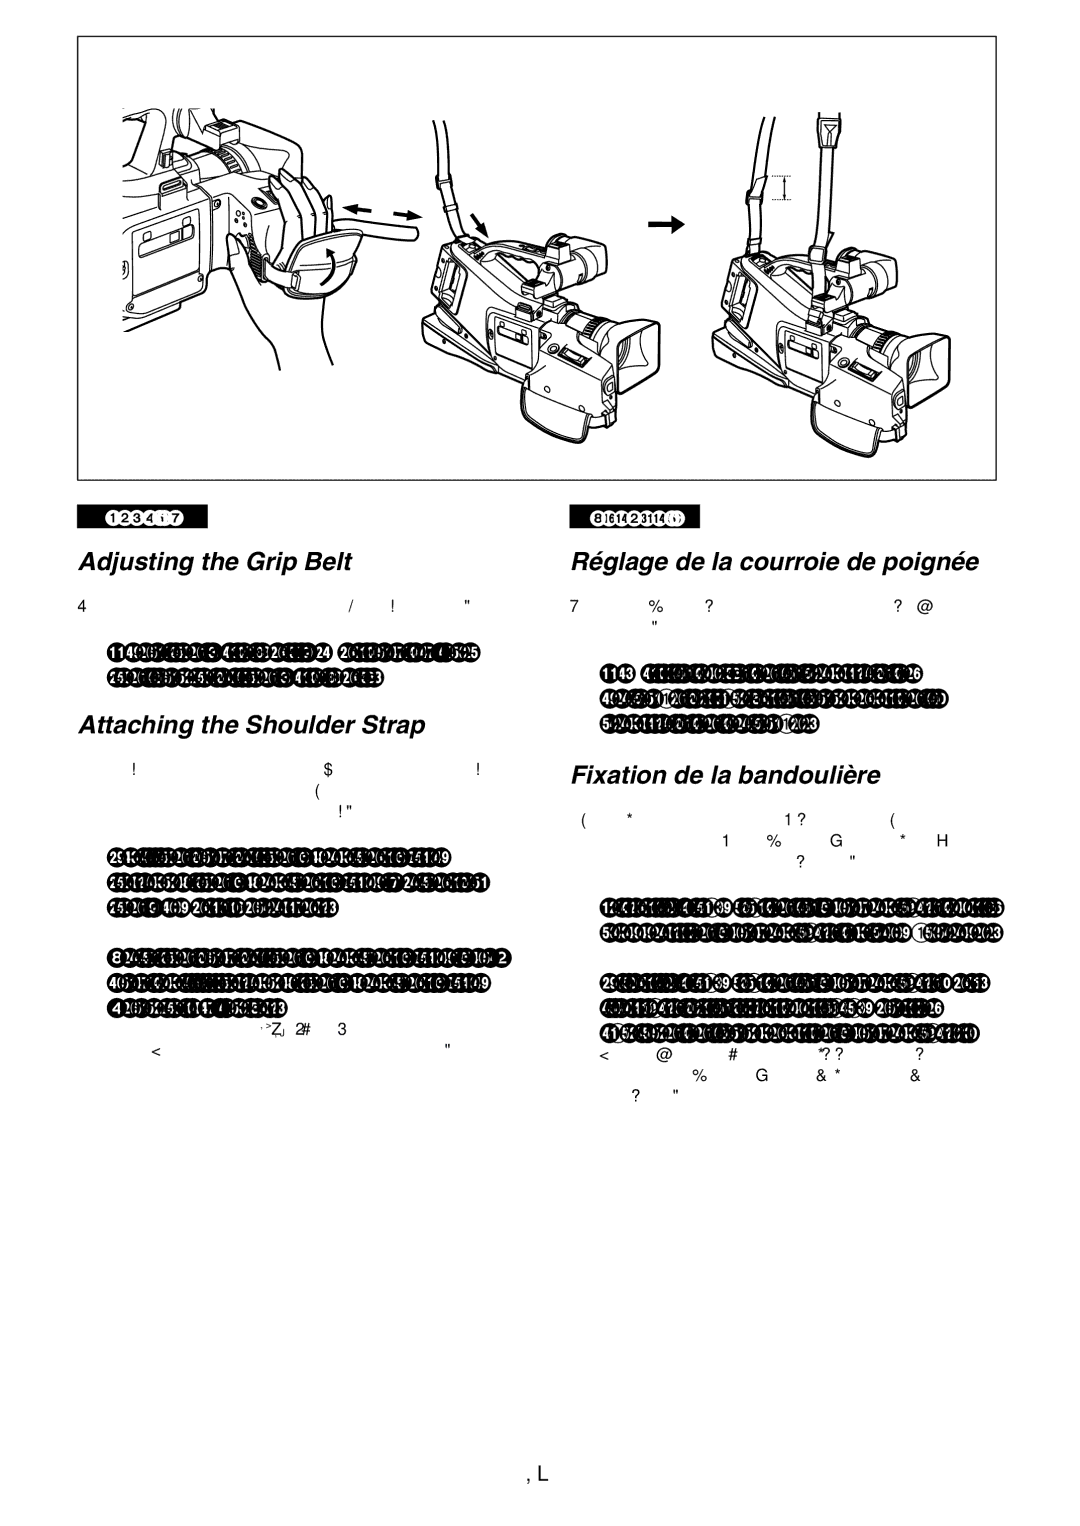
Adjusting the Grip Belt
Attaching the Shoulder Strap
Fixation de la bandoulière
Recording
Enregistrement
Vérification du bon déroulement de l’enregistrement
Checking If the Picture Is Recorded
Recording Backlit Scenes
Enregistrement de séquences à
Recording Yourself
Mirror Mode
Mode miroir
Enregistrement de soi-même
Set the Mode Selector to Manual
Mettre l’interrupteur de sélection de Mode sur Manual
Pour agrandir encore les sujets zoom numérique
Enlarging Your Subject or Widening the Recording Angle
Enlarging Your Subjects Even More Digital Zooming
Zooming In/Out
Photo
Annulation du mode grand écran
Enregistrement en mode grand écran
Mode grand écran
Appuyer sur la touche Menu
Recording Still Pictures
Recording with Minimised Camera
Enregistrement avec le moins de tremblement possible
Enregistrement d’images fixes
Making the Date/Time Indication Appear
Affichage de l’indication de date/heure
Searching for a Scene You Want to Play Back
Repérage d’une séquence que l’on désire visionner
Resuming Normal Playback
Playing Back in Slow Motion
Lecture au ralenti
Reprise de la lecture normale
Lecture d’images fixes et d’images avancées une par une
Using the Jog Dial Jog Playback
Playing Back Still Pictures and Advancing Them One by One
Press the Play Button E Press the Pause Button g
Playing Back on a TV
Lecture sur un téléviseur
Attaching the Lens Cap
After Use
Après l’utilisation
Fixation du capuchon d’objectif
Release the pressed Search Button
Viewing Recorded Scenes During Recording Pause
Visionnement de séquences enregistrées pendant la pause
Press the Start/Stop Button to start Recording
Searching for the End of the Recorded Part on a Cassette
Blank Search
Repérage d’espace vierge
Index Search
Index Search
Repérage d’index
Repérage d’index
Searching for Photoshot Pictures
Repérage d’images fixes
Searching for the Beginning of Recorded
Repérage du début de séquences enregistrées
During recording, keep the Fade Button Pressed
Fading In/Out
Ouverture/fermeture en fondu
Release the Fade Button B
Enregistrement en diverses
Set the Mode Selector Switch to Manual
Recording In Various Situations
Press the Menu Button
Low Light Mode
Sports Mode
Portrait Mode
Spot Light Mode
Recording with Special Functions
Enregistrement avec fonctions
Press the Push Dial to select Select
Canceling the Digital Function
Turn the Push Dial to select D.FUNCTION
Selecting the Desired Digital Function
Press the Start/Stop Button to pause Recording
» Wipe Mode
» Mode volet
Press the Start/Stop Button to start Recording again
» Mix Mode
Press the White BAL Button
Set the Mode Selector Switch to
Recording with Natural Colors Enregistrement aux couleurs
Appuyer sur la touche White BAL
Retour au mode réglage automatique de la balance des blancs
Adjusting the White Balance Manually
Returning to the Auto White Balance Adjustment Mode
Réglage manuel de la balance des blancs
Adjusting the Shutter Speed Manually
Réglage manuel de la vitesse d’obturateur
Adjusting the Iris F Number Manually
Réglage manuel du diaphragme
AE Lock
Recording with Fixed Brightness
Enregistrement avec luminosité fixe
Fonction verrouillage AE
Zebra Pattern
Other Convenient Functions
Autres fonctions utiles
Image zébrée
Other Convenient Functions
Recording Mode
Mode d’image
Autres fonctions utiles suite
» Adjusting the audio level manually
» Using the External Microphone
» Connecting an Audio Line Input
» Utilisation du microphone externe
Stopping Audio Dubbing
Adding New Sound on a Recorded Cassette
Ajout de nouveaux sons sur une cassette enregistrée
Arrêt du repiquage sonore
Playing Back the Sound Recorded with Audio Dubbing
Lecture des sons enregistrés avec le repiquage sonore
Remote Controller
Télécommande
Touches de zoom/volume sonore ZOOM/VOLUME
Zoom/Sound Volume Buttons ZOOM/VOLUME
Controls for Playback/Menu Setting Rewind/Review Button C
Recording Start/Stop Button REC/PAUSE m19
Index Search Button , m36
Slow Motion/Frame Advance Button E, O m29
Touche de lecture au ralenti/image par Image E, O m29
Touche de repérage d’index , m36
« Inserting the Button-type Battery
Remote Controller
Télécommande suite
» Insertion de la pile-bouton
Selecting the Remote Controller Mode
Sélection du mode de télécommande
Copying onto an S-VHS or VHS Cassette Dubbing
Copie sur une cassette S-VHS
Ou VHS repiquage
Using with Digital Video Equipment
ND Filter
Filtre ND
Using the Menu Screen
Utilisation de l’écran de menu
Turn the Push Dial to select the item To be set
Camera Mode Menu
Menu du mode caméscope
Menu Functions Fonctions des menus
Zebra Pattern Zebra m50 Wind Buffer WIND-CUT
Date and Time Indication DATE/TIME m27 Other Items Others
Image zébrée Zebra m50 Réducteur de souffle WIND-CUT
VCR Mode Menu
Menu du mode magnétoscope
Setting the Date and Time
Réglage de la date et de l’heure
Charging the Built-in Lithium Battery
Charge de la pile au lithium incorporée
Adjusting the LCD Monitor
Réglage du moniteur LCD
Précautions d’utilisation
Remarques relatives à l’adaptateur secteur et la batterie
»Optimum Use of the Battery
» Bon usage de la batterie
» Condensation
» Video Head Clogging and Remedy
» Remède à l’encrassement des têtes vidéo
» Precautions for Storage
» Précautions pour le rangement
» Oculaire grand format fourni
» Cleaning the Finder
» Large-sized Eyepiece supplied
» LCD Monitor/ Finder/ Lens Hood
» Digital Video System
Glossary
Glossaire
» Système vidéo numérique
» Focus
» Mise au point
Recording fast-moving subjects
Recording subjects behind glass covered with dirt or dust
Recording subjects in dark surroundings
Subjects with weak contrast
» White Balance Adjustment
» Réglage de la balance des blancs
» Color Temperature
» Température de couleur
» Code temporel
» Time Code
» Memory Stop Function
» Fonction arrêt mémoire
000.00
Indications on the LCD Monitor/in the Finder
Indications sur le moniteur LCD/dans le viseur
R045
Recording Mode M19, 22, 39, 45, 46, 47, 48
Recording Speed Mode m16
Mode de vitesse d’enregistrement m16
Audio Recording Mode m53
500 F16 0dB
Changement des indications
M000.00 REC
Changing the Indications
0h00m00s00f REC
Index m35
White Balance Mode m45
Mode balance des blancs m45
Search Number m37
Sound Volume m27
Program AE Mode m39
Mode programe AE m39
Volume sonore m27
Before Requesting Service Problems & Solutions
Avant de faire appel à un technicien problèmes & solutions
Editing
Normal Recording
Other Recording
Enregistrement normal
Indications
Indications
Playback Picture
Lecture image
Lecture son
Playback Sound
Others
Divers
Specifications Données techniques
13/16˝ W I 1-13/16˝ H I 4-5/8˝ D
Page
Page
Central Region
Executive Office
Southeast Region
Government Marketing Department