Wireless Camera Monitoring System
Operating Instructions
Main Features
Quick Setup
Recommended Accessories sold separately
How to Use This Documentation
Setup Guide
Feature Access Setting
Camera Compatibility
Important Safety Instructions
Page
FCC and Other Information
Environment
Routine care
If there is any trouble
Other
FCC RF Exposure Warning
Medical
Table of Contents
Setup Menu
Entering Characters 121 Other Features 122
Recording Images
Viewing Movies and Pictures
Error Messages 140 Troubleshooting the BL-WV10A 148
Appendix 160
Names and Locations
Main Unit
Front Panel
Rear Panel
During Normal Operation Indicator Color Description
Indicators
During Quick Setup Indicator Color Description
Indicator Color Description
Remote Control
Active range
Insert the batteries
While pulling the cover Insert the batteries
Names and Locations
Programming the remote control
Code Manufacturer
Panasonic Sanyo Quasar Fisher Magnavox
Sylvania Philips Zenith Hitachi Thomson Mitsubishi
Using the remote control
Enter
Connecting Cameras
Connecting cameras directly to the BL-WV10A
Up to 8 cameras can be registered to the BL-WV10A
To connect cameras directly to the BL-WV10A, see
Connecting cameras using a router
To connect to a router, see
Local and Remote Cameras
Remote Camera
Local Camera Remote Camera
Local Camera
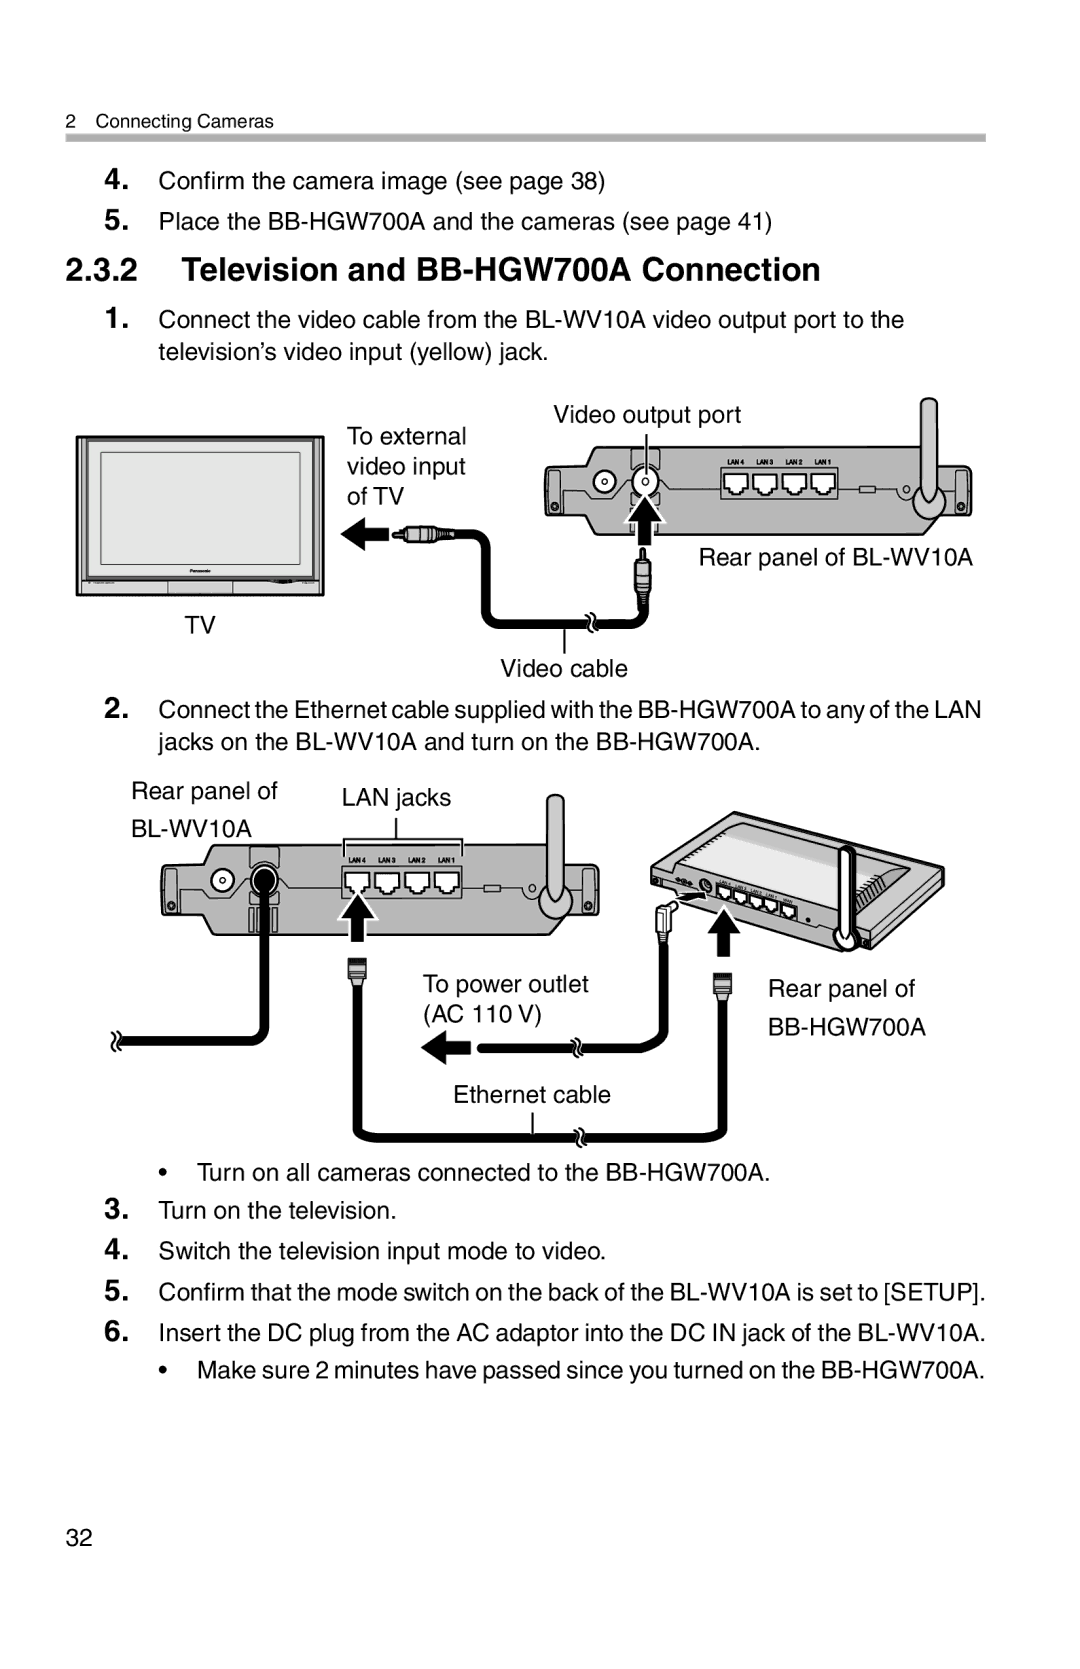
Television Connection
Connecting Cameras Directly to the BL
Connection Overview
Switch the television input mode to video DC in jack
To power outlet AC 110 DC plug AC cord
For assistance, please call
Ethernet cable
Quick Setup
On the bottom of the camera to Wired
For assistance, please call
Confirming the Camera Image
Connecting Cameras
Placing Cameras
Connecting Cameras Using an Optional BB- HGW700A
AC 110
To power outlet
Television and BB-HGW700A Connection
BB-HGW700A
Setting the User Name and Password
Quick Setup
BL-WV10A
Connecting Cameras
Confirming the Camera Image
Connecting Cameras
Current date and time
Placing the BB-HGW700A and the Cameras
Connecting Cameras Using a Router
Television and Router Connection
DC in jack To power outlet DC plug Router AC cord AC adaptor
Setting the Camera’s IP Address
Setting the User Name and Password
Connecting Cameras
Quick Setup
Rear panel LAN jacks
Connecting Cameras
Confirming the Camera Image
For assistance, please call
Placing the Router and the Cameras
See
Re-registering a Remote Camera as a Local
Viewing Camera Images
When Using a Computer and/or a Router
Displaying the Menu Screen
Panning/Tilting
Setting Cameras from the Computer
Home Position/Sensor Position/Preset Keys
Presets 1 to
Home position Enter
Sensor position
Select Yes and press Enter to confirm
Registering the Preset Keys
Registering the Home Position/Sensor Position
Viewing the home position
Viewing a preset position
Viewing the sensor position
Choosing a Camera from the Camera List
Press Camera List
Displaying the Multi-Camera Screen
Press
Viewing Camera Images
Sensor Alert Mode
Viewing Camera Images
Sensor Notification Screen
Changing the Buzzer Volume
Turning off the Flashing Sensor Indicator
Turning the buzzer on
Stopping the Buzzer
For Computer Users
Recording Images
Record Mode Resolution Image Refresh Interval
SD Memory Cards
640 x Sec
320 x Sec
Recording Images
HCM Series
16 MB
32 MB
64 MB
Standard Recording
Snapshot Recording
Timer Recording
Setup for Timer Recording
Recording Images
Setting Content
Select New and press Enter
Minute increments
Time in 15 minute increments
Sensr Sensor Records images from the camera during
Record Type Select the recording method
Specified
Recording Images
Setup for Continuous Sensor Recording
Screen Display when the Timer is On
Recording Images
Changing the Record Mode
Confirming, Changing and Erasing Timer Recording Programs
Confirming Timer Recording Programs
640 x Standard Sec About 30 min
320 x Favor Sec About 2 hr Motion
Recording Errors
Icon Causes and Solutions
Changing Timer Recording Content
Erasing a Timer Recording Setting
Erasing Continuous Sensor Recording Settings
Confirming Continuous Sensor Recording Settings
Changing Continuous Sensor Recording Settings
When Errors Occur
Viewing Movies and Pictures
Playing Movies
Pressing the Play Key
Selecting the Movie
Pausing Playback
Useful Tips for Movie Playback
Frame-by-frame Playback
Fast Forward/Rewind Playback
Viewing Movies Frame-by-Frame
Viewing Movie Information
Displayed as
Erasing All Movies
Erasing Recorded Movies
Erasing Movies
Viewing Pictures
Useful Tips for Viewing Pictures
Erasing Recorded Pictures
View a Slideshow
Viewing the Next or Prior Image
Erasing All Pictures
Setup Menu
General Setup
Camera Setup
Date and Time
When Connected to a Router
Date and Time
General Setup
Setting Description Security
Alarm
Volume
Security
Network Settings
Change the settings for the BL-WV10As network information
Security code must be 4 digits in length
Set the IP address for the DNS server
Camera Settings
Setting Description Starting Address
Admin User Name
Admin Password
Wireless Settings
Setting Description Wireless Mode
Wireless
Format
Setting Description Channel
Encryption
Key
MAC Address
Setup Menu
FTP Password
Sensor Settings
Setting Description FTP User Name
Status Settings
Setting Description Version
Registering a Camera Manually
Network
Setting Description Camera
AddressPort
Setting Description Proxy Server
Password Save
Password
User Name
108
Camera Setup
Local Camera Setup Screen Remote Camera Setup Screen
Camera Setup for Local Cameras
Camera Information Setting Description
AC Power
Frequency
Setting Description White Balance
Auto Return
Refresh Rate
Image Quality
Privacy Mode
Setting Description Privacy
Button Privacy button
That it cannot be turned on/off
Restart
Setting Description Initialize
Status Display
Camera Setup for Remote Cameras
Confirms settings on screen
Camera image will be displayed at low resolution
Camera Information
If you dont enter a port number, it will be set to
User Information
Setting Description User Name
Setting Description Confirm
Using the Sensor
Setting Description Sensor
When timer recording is set
When continuous sensor recording is set
When both timer and continuous sensor recording is set
Erasing a Camera
When the camera is used for Sensor Alert
Changing the Order of the Camera List
Viewing SD Memory Card Information
Formatting an SD Memory Card
Entering Characters
Other Features
Displaying Information While Monitoring
Icon Description Timer
Long display information
Alert
Antenna
Setting Description Quality
Extended display information
Scan
Control
Displaying Movie Information
Camera name Status
Elapsed and remaining playback time
For assistance, please call 125
Displaying Picture Information
Picture number/ Total number of pictures 126
Displaying Information While Recording
Long display information
Temporarily Disconnecting a Camera
When Two Events Occur Simultaneously
Resetting the BL-WV10A
Quick Setup will begin for the camera Rear panel
Adding Cameras
Adding Cameras
Changing the Cameras User Name
Default Settings for the BL-WV10A
Default Setting
Ssid Stealth Mode Enabled Channel
0.0
Specifications
Video Output Specification Video format
User Interface Specification
Reset button Mode switch
Indicator displays
Camera Viewer Specification Camera image
Display
Recording to
Playing from SD
When the Remote Control is Missing
Sequential Display Mode
This error appears when the firmware for a
Error Messages
Quick Setup Error Messages Causes and Solutions
Standard Operation Mode Error Messages
Error Message Causes and Solutions
This error is displayed if the start and end times
This error is displayed during Timer Recording
Previously set timer recording
Enter the administrator name and password
This sensor is used for
Automatic Display Mode Error Messages
144
SD Memory Card Error Messages
Entered
This error appears when the length of an entered
Troubleshooting the BL-WV10A
Common Issues
Issue Causes and Solutions
Television Screen and Images
Recording
16.4
Quick Setup
Camera switch set to wired?
Are the wireless settings for the BB-HGW700A
Configured to not use wireless options?
Configured for the 802.11a communications
Are you following the procedures shown
Connecting a camera?
If youre using the BB-HGW700A, is an Ethernet
Cable connecting it to the BL-WV10A?
Wireless
Indicators on the BL-WV10A
Connectivity
Camera Images, Screen Display
Connection channel overlaps that of another
Sensor
Where exposure to grease and/or steam is an
Issue
Where changes in temperature are extreme
Where the camera is blocked by glass or
Preamble
Appendix
GNU General Public License
Page
Page
For assistance, please call 163
Page
END of Terms and Conditions
For assistance, please call 165
How to Apply These Terms to Your New Programs
Page
GNU Lesser General Public License
Page
170
For assistance, please call 171
172
Page
174
Page
176
For assistance, please call 177
How to Apply These Terms to Your New Libraries
Index
179
Important Safety Instructions
Page
Page
For assistance, please call 183
PSQX3749ZB KK0505CH0
For product service
When you ship the product