Automatic Editing (deck-to-deck)
“Editing” refers to the work involved in using pre- recorded tapes to bring different contents together or delete unnecessary parts and bring together only the necessary parts.
The basic editing steps are as follows.
1 Using the REMOTE button, set the player to REMOTE and the recorder to LOCAL (ensure that the REMOTE LED is not lighted).
2 Select the editing mode (ASSEM or INSERT).
3 Register the edit points of the recorder and player.
4 Check and modify, if necessary, the edit points.
5 Preview the material before editing it.
6 Proceed with the editing.
7
Switch settings and adjustments
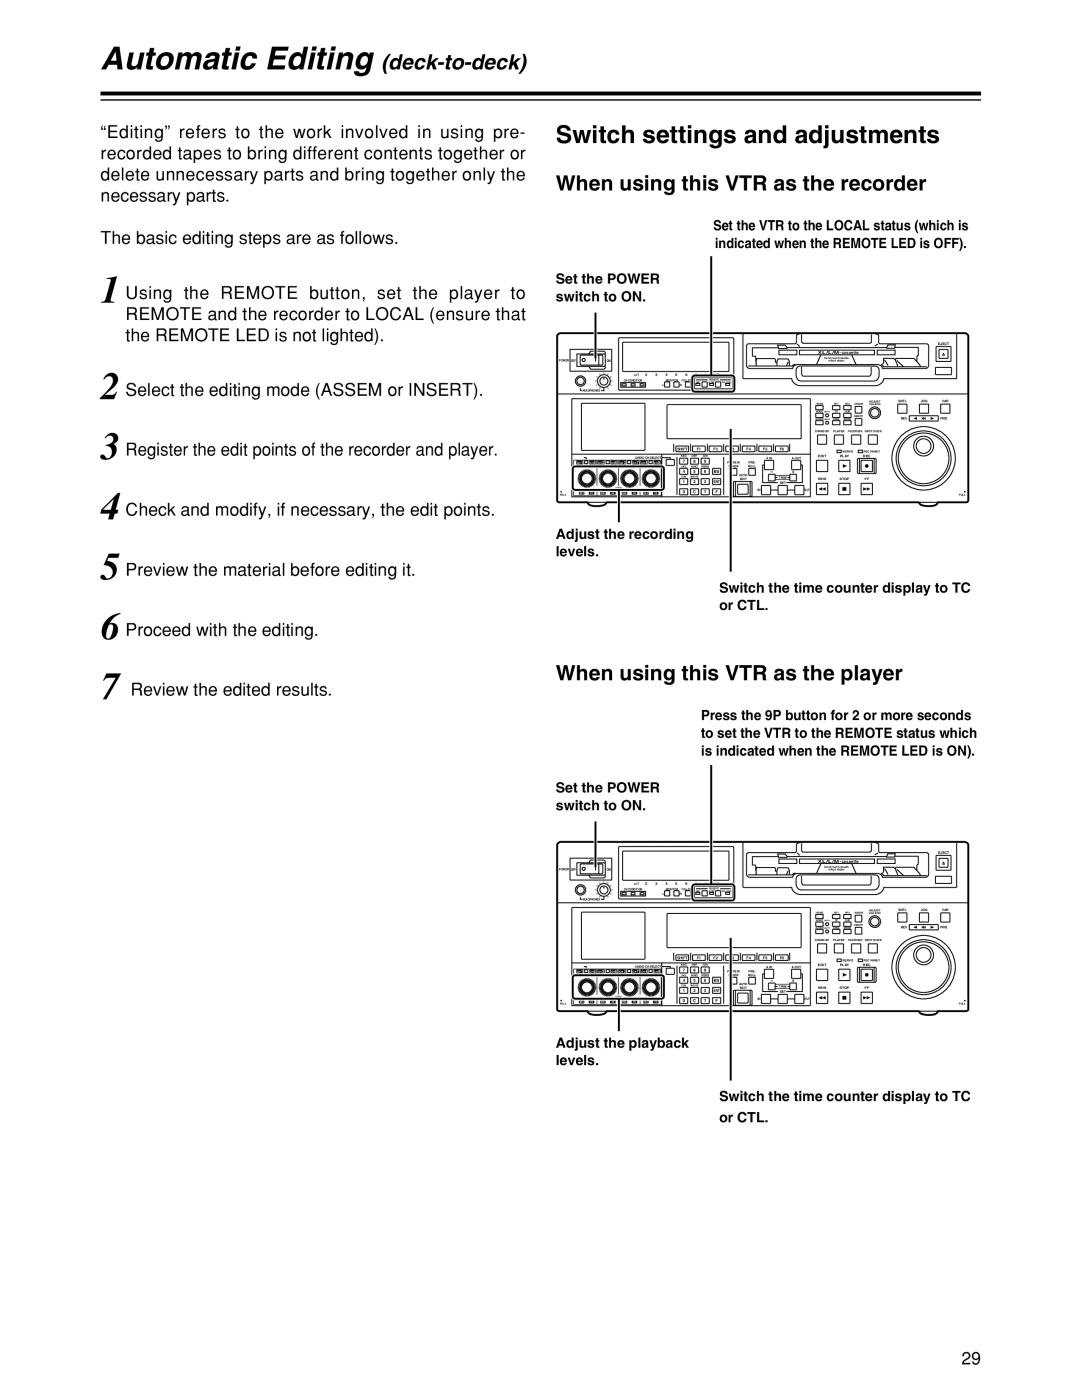
When using this VTR as the recorder
Set the VTR to the LOCAL status (which is indicated when the REMOTE LED is OFF).
Set the POWER switch to ON.
EJECT
|
|
|
|
|
|
|
|
|
|
|
|
|
|
|
|
|
|
|
|
|
|
|
|
| ||
POWER OFF |
|
|
| ON |
|
|
|
|
|
|
|
|
|
|
|
|
|
|
| Do not insert |
|
|
|
| ||
|
|
|
|
|
|
|
|
|
|
|
|
|
|
|
|
|
| without adapter |
|
|
|
| ||||
|
|
|
|
|
| CH1 | 2 | 3 | 4 | 5 | 6 | 7 | 8 | CUE |
|
|
|
|
|
|
|
|
|
|
|
|
|
|
|
|
| CH CONDITION |
| MONITOR | FULL/FINE 9P | REMOTE |
|
|
|
|
|
|
|
|
|
|
|
| |||||
|
|
|
|
| L | 50P |
|
|
|
|
|
|
|
|
|
|
| |||||||||
|
|
|
|
|
|
|
|
|
| R |
|
|
|
|
|
|
|
|
|
|
|
|
|
|
| |
| HEADPHONES |
|
|
|
|
|
|
|
|
|
|
|
|
|
|
|
|
|
|
|
|
|
|
| ||
|
|
|
|
|
|
|
|
|
|
|
|
|
|
|
|
|
|
|
| HOME | RF1 | RF2 ASSEM | ADJUST | SHTL | JOG | VAR |
|
|
|
|
|
|
|
|
|
|
|
|
|
|
|
|
|
|
|
|
|
|
| ||||
|
|
|
|
|
|
|
|
|
|
|
|
|
|
|
|
|
|
|
| VIDEO UNITY | TC | CUE |
|
|
|
|
|
|
|
|
|
|
|
|
|
|
|
|
|
|
|
|
|
|
|
|
|
| INSERT |
| REV |
| FWD |
|
|
|
|
|
|
|
|
|
|
|
|
|
|
|
|
|
|
|
| AUDIO UNITY | DIAG | MENU |
|
| ||
|
|
|
|
|
|
|
|
|
|
|
|
|
|
|
|
|
|
|
| STAND BY | PLAYER RECORDER | INPUT CHECK |
|
|
| |
|
|
|
|
|
|
|
|
|
| SHIFT | F1 |
| F2 | F3 | F4 | F5 | F6 |
|
|
| SERVO | REC INHIBIT |
|
|
| |
|
|
|
|
|
| AUDIO CH SELECT |
|
| ABC | DEF | GHI |
|
|
| A IN |
| A OUT | EDIT |
| PLAY | REC |
|
|
| ||
|
|
|
|
|
|
|
| 7 | 8 | 9 |
|
|
|
|
|
|
|
|
|
|
| |||||
| CH 1 | CH 5 | CH 2 | CH 6 | CH 3 | CH 7 | CH 4 | CH 8 |
|
|
| PREVIEW/ | PRE- |
|
|
|
|
|
|
|
|
|
| |||
|
|
|
|
|
|
|
|
|
|
| JKL | MNO | PQRS |
| REVIEW | ROLL |
|
|
|
|
|
|
|
|
|
|
|
|
|
|
|
|
|
|
|
|
| 4 | 5 | 6 | BS | AUTO |
|
|
|
|
|
|
|
|
|
| |
|
|
|
|
|
|
|
|
|
|
| TUV | WXYZ |
|
|
| TRIM |
| REW |
| STOP | FF |
|
|
| ||
|
|
|
|
|
|
|
|
|
|
| 1 | 2 | 3 | ENT |
| EDIT |
|
|
|
|
|
| ||||
|
|
|
|
|
|
|
|
|
|
|
|
|
| SET |
|
|
|
|
|
|
|
| ||||
|
|
|
| PUSH |
|
|
|
|
|
|
|
|
|
|
| IN |
|
| OUT |
|
|
|
|
|
| |
|
|
|
| LOCK |
|
|
|
|
| 0 | C | T | F |
|
|
|
|
|
|
|
|
|
| |||
FULL | REC | P8 | REC | P8 | REC | P8 | REC | P8 |
|
|
|
|
|
|
|
|
|
|
|
|
| FULL | ||||
Adjust the recording levels.
Switch the time counter display to TC or CTL.
When using this VTR as the player
Press the 9P button for 2 or more seconds to set the VTR to the REMOTE status which is indicated when the REMOTE LED is ON).
Set the POWER switch to ON.
EJECT
|
|
|
|
|
|
|
|
|
|
|
|
|
|
|
|
|
|
|
|
|
|
|
|
| ||
POWER OFF |
|
|
| ON |
|
|
|
|
|
|
|
|
|
|
|
|
|
|
| Do not insert |
|
|
|
| ||
|
|
|
|
|
|
|
|
|
|
|
|
|
|
|
|
|
| without adapter |
|
|
|
| ||||
|
|
|
|
|
| CH1 | 2 | 3 | 4 | 5 | 6 | 7 | 8 | CUE |
|
|
|
|
|
|
|
|
|
|
|
|
|
|
|
|
| CH CONDITION |
| MONITOR | FULL/FINE 9P | REMOTE |
|
|
|
|
|
|
|
|
|
|
|
| |||||
|
|
|
|
|
|
|
| L |
|
| R |
|
|
|
|
|
|
|
|
|
|
|
|
|
|
|
| HEADPHONES |
|
|
|
|
|
|
|
|
|
|
|
|
|
|
|
|
|
|
|
|
|
|
| ||
|
|
|
|
|
|
|
|
|
|
|
|
|
|
|
|
|
|
|
| HOME | RF1 | RF2 ASSEM | ADJUST | SHTL | JOG | VAR |
|
|
|
|
|
|
|
|
|
|
|
|
|
|
|
|
|
|
|
|
|
|
| ||||
|
|
|
|
|
|
|
|
|
|
|
|
|
|
|
|
|
|
|
| VIDEO UNITY | TC | CUE |
|
|
|
|
|
|
|
|
|
|
|
|
|
|
|
|
|
|
|
|
|
|
|
|
|
| INSERT |
| REV |
| FWD |
|
|
|
|
|
|
|
|
|
|
|
|
|
|
|
|
|
|
|
| AUDIO UNITY | DIAG | MENU |
|
| ||
|
|
|
|
|
|
|
|
|
|
|
|
|
|
|
|
|
|
|
| STAND BY | PLAYER RECORDER | INPUT CHECK |
|
|
| |
|
|
|
|
|
|
|
|
|
| SHIFT | F1 |
| F2 | F3 | F4 | F5 | F6 |
|
|
| SERVO | REC INHIBIT |
|
|
| |
|
|
|
|
|
| AUDIO CH SELECT |
|
| ABC | DEF | GHI |
|
|
| A IN |
| A OUT | EDIT |
| PLAY | REC |
|
|
| ||
| CH 1 | CH 5 | CH 2 | CH 6 | CH 3 | CH 7 | CH 4 | CH 8 |
|
| 7 | 8 | 9 |
| PREVIEW/ | PRE- |
|
|
|
|
|
|
|
|
|
|
|
|
|
|
|
|
|
|
|
|
| JKL | MNO | PQRS |
| REVIEW | ROLL |
|
|
|
|
|
|
|
|
|
|
|
|
|
|
|
|
|
|
|
|
| 4 | 5 | 6 | BS | AUTO |
|
|
|
|
|
|
|
|
|
| |
|
|
|
|
|
|
|
|
|
|
| TUV | WXYZ |
|
|
| TRIM |
| REW |
| STOP | FF |
|
|
| ||
|
|
|
|
|
|
|
|
|
|
| 1 | 2 | 3 | ENT |
| EDIT |
|
|
|
|
|
| ||||
|
|
|
|
|
|
|
|
|
|
|
|
|
| SET |
|
|
|
|
|
|
|
| ||||
|
|
|
| PUSH |
|
|
|
|
|
|
|
|
|
|
| IN |
|
| OUT |
|
|
|
|
|
| |
|
|
|
| LOCK |
|
|
|
|
| 0 | C | T | F |
|
|
|
|
|
|
|
|
|
| |||
FULL | REC | P8 | REC | P8 | REC | P8 | REC | P8 |
|
|
|
|
|
|
|
|
|
|
|
|
| FULL | ||||
|
|
|
|
|
|
|
|
|
|
|
|
|
|
|
|
| ||||||||||
Adjust the playback levels.
Switch the time counter display to TC
or CTL.
29