Digital Video Camcorder
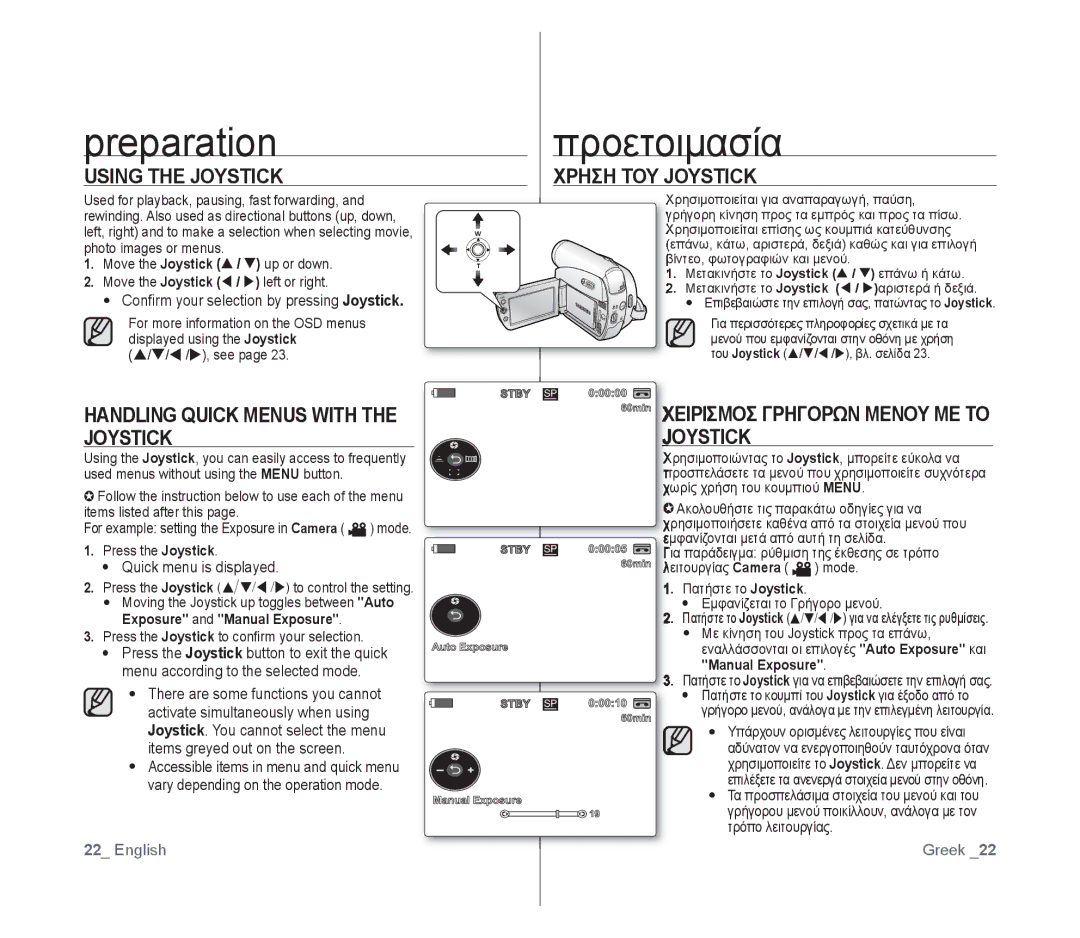
Ψηφιακή Βιντεοκάμερα
Βασικά χαρακτηριστικά της βιντεοκάμερας miniDV
Key features of your miniDV camcorder
Features of Your NEW Minidv Camcorder
Χαρακτηριστικα ΤΗΣ Βιντεοκαμερασ Minidv
Προφυλάξεις
Safety warnings
Precautions
Προειδοποίηση
Ρυθμιση ΤΗΣ Οθονησ LCD
Adjusting the LCD Screen
Σημειώσεις και οδηγίες για την ασφάλεια
Σημειωσεισ Σχετικα ΜΕ ΤΗΝ Οθονη LCD
Σημειωσεισ Σχετικα ΜΕ ΤΗ Βιντεοκαμερα
Servicing & Replacement Parts
Σερβισ ΚΑΙ Ανταλλακτικα
Αναμιγνύεται με άλλα συνηθισμένα απορρίμματα προς διάθεση
Contents
Περιεχόμενα
Οθονησ
Αρχικη Ρυθμιση
Ρυθμιση Μενου
Εγγραφησ
Contents Περιεχόμενα
Μονον Μεταφορα Δεδομενων ΜΕ ΤΟ Προτυπο Ieee
Maintenance
Troubleshooting Specifications
Μονον Συντηρηση
What is Included with Your Minidv Camcorder
Φακός
Front & Left View
Εμπροσ ΚΑΙ Αριστερη ΟΨΗ
Αισθητήρας τηλεχειριστηρίου μοντέλα VP-D392 i /D395i μόνον
Left Side View
Παρουσίαση της βιντεοκάμερας miniDV
Getting to know your miniDV camcorder
Αριστερη ΟΨΗ
Κάλυμμα υποδοχών υποδοχή DC IN, USB μοντέλο VP-D395i μόνον
Right & TOP View Δεξια ΚΑΙ Επανω ΟΨΗ
Κάλυμμα θήκης κασέτας Ιμάντας χεριού
Πισω ΚΑΙ Κατω ΟΨΗ
Υποδοχή AV Κουμπί Mode
Rear & Bottom View
Jacks
Μοντελα VP-D392 i /D395i Μονον
Using the Remote Control VP-D392 i /D395i only
Χρηση ΤΟΥ Τηλεχειριστηριου
Preparation Προετοιμασία
Using the Hand Strap & Lens Cover
Adjusting the Hand Strap
Attaching the Lens Cover
Τοποθετηση ΤΟΥ Φιλτρου Πυρηνα
Installing the BUTTON-TYPE Battery
Attaching the Core Filter
Τοποθετηση ΤΗΣ Μπαταριασ Τυπου Κουμπιου
Χρηση ΤΗΣ Μπαταριασ
Using the Battery Pack
Preparation
Ένδειξη φόρτισης
Charging indicator
Battery
Time
Amount of continuous recording time available depends on
Battery Level Display
Battery Pack Management
Χρόνος συνεχούς εγγραφής εξαρτάται από
Συνδεση ΣΕ Πηγη Ρευματοσ
Connecting a Power Source
Using a Household Power Source
Σημειώσεις σχετικά με την μπαταρία
Basic Minidv Camcorder Operation
Βιντεοκάμερας miniDV
OSD in Player Moder
Screen Indicators in Camera / Player Modes
Art
OSD in M.Player Mode
Screen Indicators in M.CAM / M.PLAYER Modes VP-D395i only
OSD in M. Cam Mode
Using the Display Button
Χρηση ΤΟΥ Κουμπιου Προβολησ
Handling Quick Menus with the Joystick
Using the Joystick
Χρηση ΤΟΥ Joystick
Χειρισμοσ Γρηγορων Μενου ΜΕ ΤΟ Joystick
Χειρισμοσ Γρηγορων Μενου ΜΕ ΤΟ Joystick
Quick Menu In Camera /Player modes
Quick Menu In M.Cam / M.Player modes VP-D395i only
Μενού συντομεύσεων στους τρόπους λειτουργίας
Αρχική ρύθμιση Ρύθμιση μενού συστήματος
Initial setting system menu setting
Setting the Clock Clock SET
Ρυθμιση ΤΟΥ Ρολογιου Clock SET
Ρυθμιση ΤΗΣ Λειτουργιασ Ασυρματου Τηλεχειρισμου
Player Camera ή Player
Press the Mode button to set Camera or Player
Setting the Beep Sound Beep Sound
Set the Select switch to Card or TAPE. VP-D395i only
Ρυθμιση ΤΟΥ Ηχου «ΜΠΙΠ» Beep Sound
Setting the Shutter Sound Shutter Sound
Ρυθμιση ΤΟΥ Ηχου Κλειστρου Shutter Sound
Camera / Player / M.Cam / M.Player.σελίδα
Selecting the OSD Language Language
Επιλογη ΤΗΣ Γλωσσασ ΤΩΝ Ενδειξεων Στην Οθονη Language
Viewing the Demonstration Demonstration
Ρυθμιση ΤΗΣ Γραμμησ Καθοδηγησησ Guideline
Setting the Guideline Guideline
Αρχική ρύθμιση Ρύθμιση μενού οθόνης
Example, you can adjust Ρυθμίσεις LCD Bright LCD Colour
Enables you to view what you are recording or
Are using the camcorder indoors or outdoors for
Πατήστε το κουμπί Mode για να επιλέξετε
Εμφανιση Ημερομηνιασ / Ωρασ Date / Time
Initial setting
Display menu setting
You can select the output path of the OSD On Screen Display
Setting the TV Display TV Display
Ρυθμιση ΤΗΣ Προβολησ ΣΕ Τηλεοραση TV Display
Basic recording
Βασικές ρυθμίσεις εγγραφής
Έναρξης/διακοπής εγγραφής
Έναρξης/διακοπής εγγραφής ανάλογα με τη χρήση
Recording with Ease for Beginners
Easy Q Mode Τροποσ Λειτουργιασ Easy Q
To cancel the Easy Q mode
Ευκολεσ Ρυθμισεισ Εγγραφησ ΓΙΑ Αρχαριουσ
Για μεγέθυνση
Zooming in and OUT Μεγεθυνση ΚΑΙ Σμικρυνση
To zoom
To zoom out
Zero Memory
Self Timer function works only in Camera mode.
Remote control maximum range is 4 to 5m 13 to17 ft
Πατήστε το κουμπί Self Timer Εμφανίζεται η ένδειξη
Πατήστε το κουμπί Mode για να επιλέξετε Camera
Ανασκοπηση ΚΑΙ Αναζητηση Εγγραφησ
Reviewing and Searching a Recording
Record Search Joystick
Αναζήτηση εγγραφής Joystick
To Stop Recording
Using the Fade on and OFF
To Start Recording
Για έναρξη της εγγραφής
Auto Focus / Manual Focus
Αυτόματη Εστίαση / ΜΗ Αυτόματη Εστίαση
Setting the Shutter Speed & Exposure
Ρυθμιση ΤΩΝ Shutter Speed ΚΑΙ Exposure
Advanced recording
Selecting the Record Mode & Audio Mode
REC Mode & Audio Mode
Auto
Cutting OFF Wind Noise Windcut Plus
Or Auto
Mode.
Real Stereo S Indicator is displayed
Real Stereo function works only in Camera
Στον τρόπο λειτουργίας Camera. σελίδα
When the Auto mode is selected, no indicator is displayed
Indicator of the selected mode is displayed
Σύνθετες ρυθμίσεις εγγραφής
Setting the Program AE Program AE
Settings Contents
Περιεχόμενα
Setting the White Balance White Balance
Ρυθμιση ΤΗΣ Ισορροπιασ Λευκου White Balance
Εγγραφή με νεφελώδη καιρό
Setting the white balance manually
Ρύθμιση της ισορροπίας λευκού μη αυτόματα
Select Custom WB
Visual Effect, then press the Joystick
Εφαρμογη Οπτικων ΕΦΕ Visual Effect
Applying Visual Effects Visual Effect
Mirror
Sepia
Negative
Emboss2
Setting the 169 Wide Mode 169 Wide
Wide, then press the Joystick
Using the Tele Macro Macro Χρηση ΤΟΥ Tele Macro Macro
Advanced recording
DIS menu to Off
Setting the Digital Image Stabilizer DIS
Ρυθμιση ΤΟΥ Σταθεροποιητη Ψηφιακησ Εικονασ DIS
No Tape
Using Back Light Compensation Mode BLC
Selecting the Digital Zoom
Zooming in and OUT with Digital Zoom
Digital Zoom
Επιλογή της λειτουργίας Digital Zoom
Tape Photo Recording
Using the Colour Nite C.NITE Χρηση ΤΟΥ Colour Nite C.NITE
Program AE, Mosaic, Mirror
Using the Light Light Χρηση ΤΟΥ Φωτισμου Light
VP-D392 i /D395i only Μοντελα VP-D392 i /D395i Μονον
Πατήστε το κουμπί Photo φωτογραφία
Εγγραφη Φωτογραφιασ ΣΕ Κασετα
Tape photo recording works only in Camera mode.
VP-D392i/D395i only
Photo Search, then press the Joystick
Αναπαραγωγή
Adjusting the Volume
Playback
Playing Back a Tape on the LCD Screen
Αναπαραγωγή/Παύση
Various Functions While in Player Mode
Playback/Pause
Picture Search Forward/Reverse
Forward frame advance
Reverse Playback VP-D392 i /D395i only
Αναπαραγωγή καρέ-καρέ Μοντέλα VP-D392 i /D395i μόνον
Reverse frame advance
Audio Dubbing VP-D392 i /D395i only
Μιξη Ηχου Μοντελα VP-D392 i /D395i Μονον
Αναπαραγωγη Μιξαρισμενου Ηχου Audio Select
Playback Αναπαραγωγή
Dubbed Audio Playback Audio Select
Insert the recorded tape and press the Menu
Audio Effect
ΕΦΕ Ηχου
Button Move the Joystick / up or down to select
Ρυθμιση ΤΗΣ ΕΙΣΟΔΟΥ/ΕΞΟΔΟΥ AV AV IN/OUT
Setting the AV IN/OUT AV IN/OUT
Connection Σύνδεση
AV In/Out, then press the Joystick
Αναπαραγωγη Κασετασ ΣΕ Οθονη Τηλεορασησ
Connecting to a TV that has Audio/Video Input Jacks
Tape Playing Back on a TV Screen
Playback the tape
Connecting to a TV that has no Audio/Video Input Jacks
Εισόδου ήχου/βίντεο
Σύνδεση με τηλεόραση που δεν διαθέτει υποδοχές
Αντιγραφη Κασετασ Βιντεοκαμερασ ΣΕ Βιντεοκασετα
When Copying is Complete
Όταν ολοκληρωθεί η αντιγραφή
Σύνδεση
Using the VOICE+ Function Χρηση ΤΗΣ Λειτουργιασ VOICE+
Connection
Press the Recording start/stop button
To record from a VCR
When Recording Copying is Complete
Recording Copying onto a Camcorder Tape
To record from a TV
VP-D395i only
Digital still camera mode
Using a Memory Card Usable Memory Card
Χρηση Καρτασ Μνημησ Χρησιμοποιησιμη
Movie image file
Image configuration file
Αρχείο διαμόρφωσης εικόνας
Αρχείο ταινίας
Μορφή εικόνας
File No., then press the Joystick
Setting the File Number File no
Ρυθμιση Τροπου Αριθμησησ Αρχειων File no
Taking a Photo Image Jpeg on the Memory Card
Digital still camera mode VP-D395i only
Ληψη Φωτογραφιασ Jpeg Στην Καρτα Μνημησ
Για προβολή μίας εικόνας
Viewing Photo Images Jpeg Προβολη Φωτογραφιων Jpeg
To view a Single Image
To view a Slide Show
VP-D395i only
Protection from Accidental Erasure
Delete Εικονων Delete
Using the Joystick Χρήση του Joystick
Deleting Photo Images and Moving Images
Διαγραφη Φωτογραφιων ΚΑΙ Κινουμενων
Digital still camera mode
Deleting All Images at Once
Ένδειξη Complete
Message All files will be deleted! Do
Deleted! Do you want to format?
Αποθήκευση κινούμενων εικόνων σε κάρτα μνήμης
Recording Moving Images Mpeg on a Memory Card
Εγγραφη Κινουμενων Εικονων Mpeg ΣΕ Καρτα Μνημησ
Saving moving images onto a Memory Card
English
Windows/windowsmedia/download/default.asp
Use the Zoom lever to adjust the volume in Stop mode
Image playback is not available when a Menu is
Download/default.asp
Βιντεοκάμερα μπορεί να κάνει ανάγνωση
Before operation
Προτού ξεκινήσετε
Μνήμης στη βιντεοκάμερα
Before operation
Προτού ξεκινήσετε
Removing the Print Mark
Marking Images for Printing Print Mark
Σημανση Εικονων ΓΙΑ Εκτυπωση Print Mark
Κατάργηση της σήμανσης εκτύπωσης
Σύνδεση με εκτυπωτή
Connecting To a Printer
Pictbridge TM VP-D395i only
Εκτυπωση Φωτογραφιων Χρηση ΤΟΥ Pictbridge TM
Date&Time
To cancel the image printing, press Joystick again. Cancel
Date/Time display type Off, Date, Time
Printed
Transferring IEEE1394 I.LINK DV Standard Data Connections
Ieee 1394 data transfer
Μεταφορά δεδομένων με το πρότυπο Ieee
4pin, 6pin. This camcorder has a 4pin jack
Recording with a DV Connection Cable
Εγγραφή με καλώδιο σύνδεσης DV
Χρηση ΤΗΣ Διασυνδεσησ USB
Using USB Interface
Διασύνδεση USB
Που παρέχεται με τη βιντεοκάμερα
English
USB Connect , then press the Joystick
Computer or Printer , then press the Joystick
Installing the Software DV Media PRO Programme
Εγκατασταση ΤΟΥ Λογισμικου Προγραμμα DV Media PRO
Using the Removable Disk Function
Connecting to a PC
Disconnecting the USB Cable
Συνδεση ΜΕ Υπολογιστη
This function works only in Camera mode.
Using the Web Camera Function
Χρήση της λειτουργίας κάμερας Web
Οθόνη προβάλλει σε λόγο πλευρών
After Finishing a Recording
Maintenance
Συντήρηση
Usable Cassette Tapes
Καθαρισμοσ ΚΑΙ Συντηρηση ΤΗΣ Βιντεοκαμερασ
Cleaning and Maintaining the Camcorder
Cleaning the Video Heads Καθαρισμός των κεφαλών βίντεο
Set Player
On TV colour systems
Using Your Minidv Camcorder Abroad
Power sources
Χρηση ΤΗΣ Βιντεοκαμερασ Minidv ΣΤΟ Εξωτερικο
Αντιμετώπισηπροβλημάτων
Troubleshooting
Troubleshooting
Αντιμετωπιση Προβληματων
Moisture Condensation
Symptom
Αντιμετώπισηπροβλημάτων
Συμπύκνωση υγρασίας
Setting Menu Items
Ρυθμιση ΤΩΝ Στοιχειων Μενου
Main Sub Menu Functions
Model Name VP-D391i/ VP-D3910/ VP-D392i /VP-D395i
Specifications
Προδιαγραφές
Ονομα Μοντελου VP-D391i/ VP-D3910/ VP- D392i/VP-D395i
United Kingdom
Tel 0818 717 Fax +44 0131 202
FOURLlS Trade Α.Ε.Β.Ε Κρυονερίου
145 68 Κρυονέρι, Αττικής Τηλ
Fourlis Trade Α.Ε.Β.Ε
Επικοινωνία με τη Samsung παγκοσμίως
Contact Samsung world wide
RoHS compliant
Συμβαтóтηα με тηv οδηγία RoHS