recording

aufnahme

Basic procedures to record a movie or photo image are described below and on the following pages.

RECORDING MOVIE IMAGES

You can record movie images in the Movie mode only. page 21

You can record movie images using the remote control. page 13

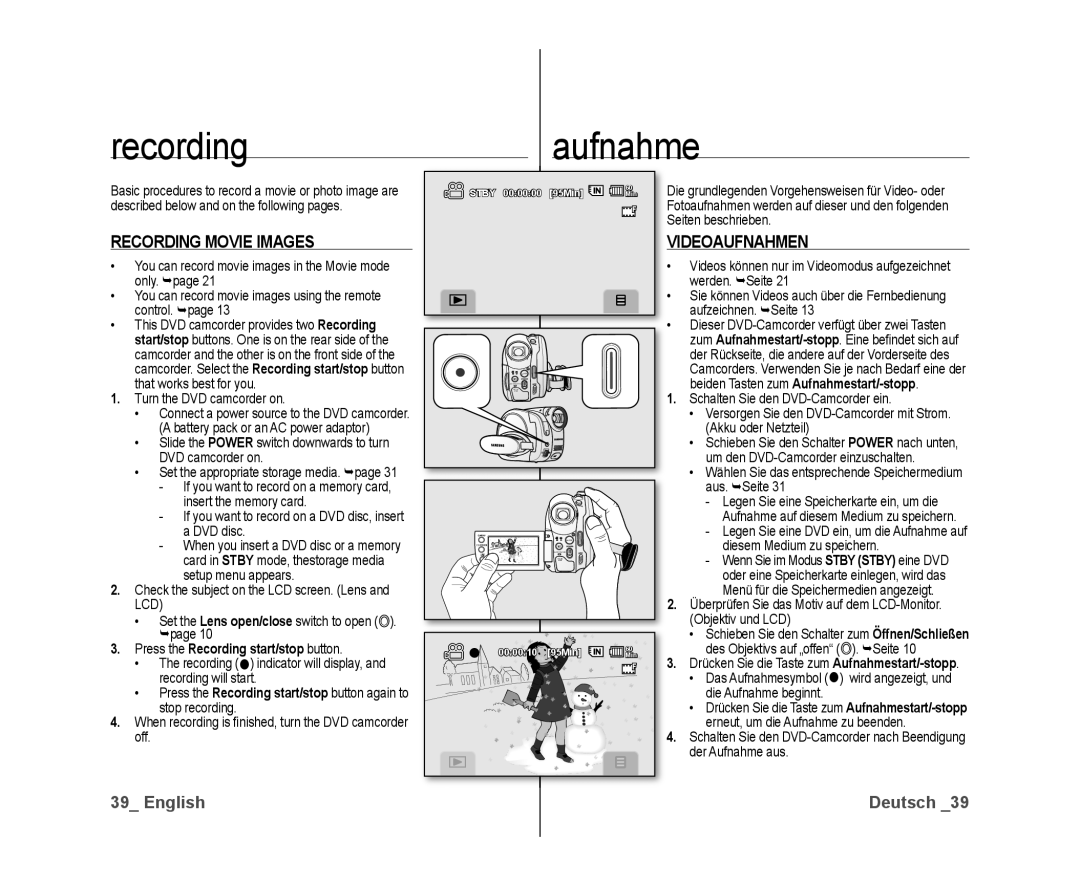
This DVD camcorder provides two Recording start/stop buttons. One is on the rear side of the camcorder and the other is on the front side of the camcorder. Select the Recording start/stop button

that works best for you.

1.Turn the DVD camcorder on.

Connect a power source to the DVD camcorder. (A battery pack or an AC power adaptor)

Slide the POWER switch downwards to turn DVD camcorder on.

Set the appropriate storage media. page 31

-If you want to record on a memory card, insert the memory card.

-If you want to record on a DVD disc, insert a DVD disc.

-When you insert a DVD disc or a memory card in STBY mode, thestorage media setup menu appears.

2.Check the subject on the LCD screen. (Lens and LCD)

Set the Lens open/close switch to open ( ). page 10

3.Press the Recording start/stop button.

The recording () indicator will display, and recording will start.

Press the Recording start/stop button again to stop recording.

4.When recording is fi nished, turn the DVD camcorder off.

STBY 00:00:00 [95Min]

60

Min

00:00:10

[95Min]

60

Min

Die grundlegenden Vorgehensweisen für Video- oder Fotoaufnahmen werden auf dieser und den folgenden Seiten beschrieben.

VIDEOAUFNAHMEN

Videos können nur im Videomodus aufgezeichnet werden. Seite 21

Sie können Videos auch über die Fernbedienung aufzeichnen. Seite 13

Dieser DVD-Camcorder verfügt über zwei Tasten zum Aufnahmestart/-stopp. Eine befi ndet sich auf der Rückseite, die andere auf der Vorderseite des Camcorders. Verwenden Sie je nach Bedarf eine der

beiden Tasten zum Aufnahmestart/-stopp.

1.Schalten Sie den DVD-Camcorder ein.

Versorgen Sie den DVD-Camcorder mit Strom. (Akku oder Netzteil)

Schieben Sie den Schalter POWER nach unten, um den DVD-Camcorder einzuschalten.

Wählen Sie das entsprechende Speichermedium aus. Seite 31

-Legen Sie eine Speicherkarte ein, um die Aufnahme auf diesem Medium zu speichern.

-Legen Sie eine DVD ein, um die Aufnahme auf diesem Medium zu speichern.

-Wenn Sie im Modus STBY (STBY) eine DVD oder eine Speicherkarte einlegen, wird das Menü für die Speichermedien angezeigt.

2.Überprüfen Sie das Motiv auf dem LCD-Monitor. (Objektiv und LCD)

Schieben Sie den Schalter zum Öffnen/Schließen des Objektivs auf „offen“ (). Seite 10

3.Drücken Sie die Taste zum Aufnahmestart/-stopp.

Das Aufnahmesymbol () wird angezeigt, und die Aufnahme beginnt.

Drücken Sie die Taste zum Aufnahmestart/-stopperneut, um die Aufnahme zu beenden.

4.Schalten Sie den DVD-Camcorder nach Beendigung der Aufnahme aus.

39_ English

Deutsch _39

Page 45
Image 45
Samsung VP-DX10/XEE Recording Aufnahme, Recording Movie Images, Videoaufnahmen, Press the Recording start/stop button

VP-DX10/HAC, VP-DX10/XER, VP-DX10/KNT, VP-DX10/UMG, VP-DX10H/XEF specifications

The Samsung VP-DX10 is a compact, versatile camcorder that represents an ideal blend of technological innovation and user-friendly design. This model caters to both novice and experienced videographers, offering an impressive assortment of features that enhance the recording experience.

One of the standout characteristics of the VP-DX10 is its ability to record in high-quality MPEG-2 format, ensuring that videos maintain excellent clarity and detail. The device supports DVD-RW/-R and -R DL formats, giving users flexibility in choosing their recording media. With a storage capacity of up to 8 hours and the ability to easily transfer videos to DVD, it streamlines the process of archiving memories.

In terms of imaging performance, the VP-DX10 is equipped with a 1/6-inch CCD sensor, providing a resolution of up to 800,000 pixels for clear and vibrant footage. The 34x optical zoom lens amplifies the camcorder’s capabilities, allowing for dynamic shooting from various distances. Alongside its optical prowess, the VP-DX10 incorporates digital image stabilization technology that minimizes shakiness, making it easier to capture smooth video even during movement.

The device's user-centered design includes a bright, swivel LCD screen, making it convenient to frame shots and play back recordings. Additionally, it features easy-to-navigate menus, enabling quick access to various settings and functions. The built-in USB connectivity allows for direct downloads to computers, facilitating hassle-free editing and sharing of videos.

Moreover, the VP-DX10 incorporates various shooting modes, including sports, portrait, and night modes, each tailored to specific scenarios, enhancing overall recording quality. The presence of a built-in flash and an advanced microphone improves audio-visual recordings, ensuring rich sound quality.

From intelligent battery management to enhanced connectivity options, the Samsung VP-DX10 is designed to meet the demands of modern videographers. Its combination of reliable performance and innovative features makes it a noteworthy choice in the compact camcorder market, appealing to users seeking both portability and quality.