Method 3: Using a DVD disc

When inserting a disc or closing the disc cover, do not apply excessive force. It may cause a malfunction.

You cannot open the disc cover while loading.

You can use a new 3 1/2 inch(8cm) DVD-RW, DVD+RW, DVD-R or DVD+R DL (Dual Layer) disc for movie recording. Photos can not be recorded onto a DVD disc. A DVD disc is available only in the movie mode.

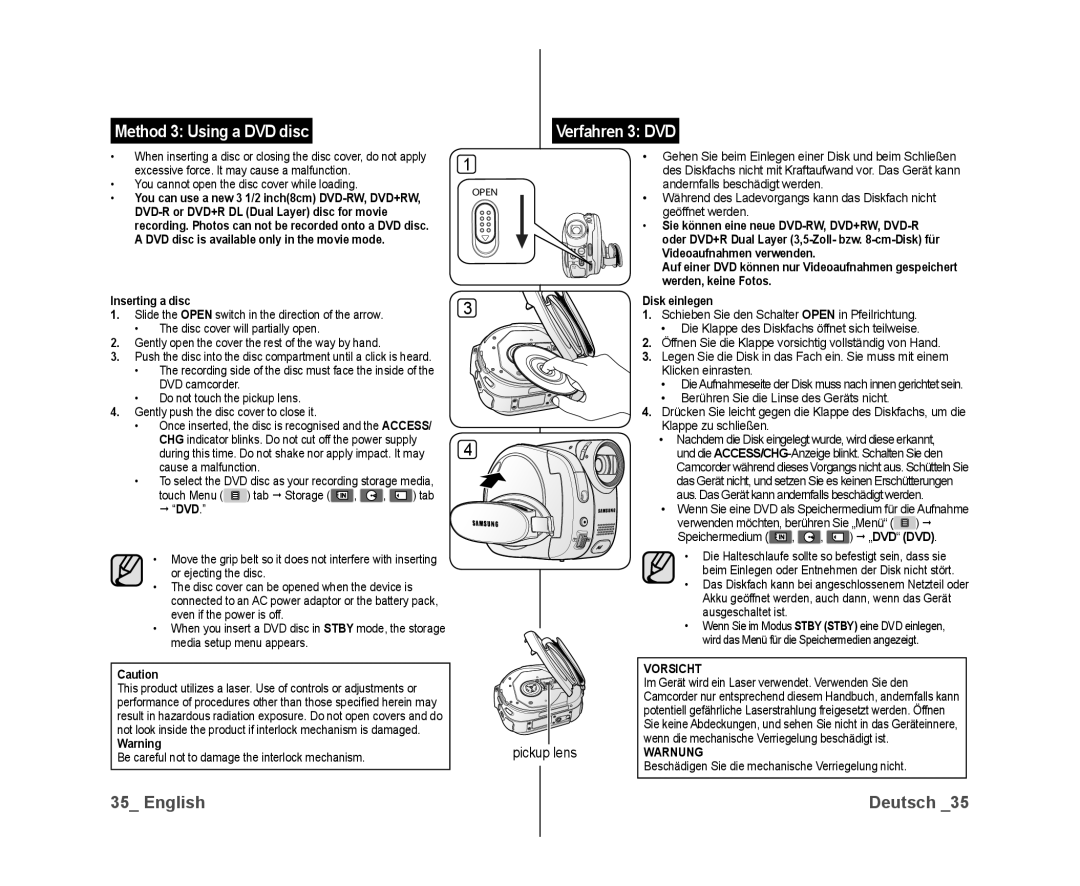
Inserting a disc

1.Slide the OPEN switch in the direction of the arrow.

The disc cover will partially open.

2.Gently open the cover the rest of the way by hand.

3.Push the disc into the disc compartment until a click is heard.

The recording side of the disc must face the inside of the DVD camcorder.

Do not touch the pickup lens.

4.Gently push the disc cover to close it.

Once inserted, the disc is recognised and the ACCESS/ CHG indicator blinks. Do not cut off the power supply during this time. Do not shake nor apply impact. It may cause a malfunction.

To select the DVD disc as your recording storage media, touch Menu ( ) tab Storage ( , , ) tab DVD.”

Move the grip belt so it does not interfere with inserting or ejecting the disc.

The disc cover can be opened when the device is connected to an AC power adaptor or the battery pack, even if the power is off.

When you insert a DVD disc in STBY mode, the storage media setup menu appears.

Caution

This product utilizes a laser. Use of controls or adjustments or performance of procedures other than those specified herein may result in hazardous radiation exposure. Do not open covers and do not look inside the product if interlock mechanism is damaged.

Warning

Be careful not to damage the interlock mechanism.

1

����

3

4

Verfahren 3: DVD

Gehen Sie beim Einlegen einer Disk und beim Schließen des Diskfachs nicht mit Kraftaufwand vor. Das Gerät kann andernfalls beschädigt werden.

Während des Ladevorgangs kann das Diskfach nicht

geöffnet werden.

Sie können eine neue DVD-RW, DVD+RW, DVD-R oder DVD+R Dual Layer (3,5-Zoll- bzw. 8-cm-Disk) für Videoaufnahmen verwenden.

Auf einer DVD können nur Videoaufnahmen gespeichert werden, keine Fotos.

Disk einlegen

1. Schieben Sie den Schalter OPEN in Pfeilrichtung.

• Die Klappe des Diskfachs öffnet sich teilweise.

2. Öffnen Sie die Klappe vorsichtig vollständig von Hand.

3. Legen Sie die Disk in das Fach ein. Sie muss mit einem Klicken einrasten.

• DieAufnahmeseite der Disk muss nach innen gerichtet sein.

• Berühren Sie die Linse des Geräts nicht.

4. Drücken Sie leicht gegen die Klappe des Diskfachs, um die Klappe zu schließen.

Nachdem die Disk eingelegt wurde, wird diese erkannt,

und die ACCESS/CHG-Anzeige blinkt. Schalten Sie den Camcorder während dieses Vorgangs nicht aus. Schütteln Sie das Gerät nicht, und setzen Sie es keinen Erschütterungen aus. Das Gerät kann andernfalls beschädigt werden.

• Wenn Sie eine DVD als Speichermedium für die Aufnahme verwenden möchten, berühren Sie „Menü“ ( ) Speichermedium (,,) DVD(DVD).

Die Halteschlaufe sollte so befestigt sein, dass sie beim Einlegen oder Entnehmen der Disk nicht stört.

Das Diskfach kann bei angeschlossenem Netzteil oder Akku geöffnet werden, auch dann, wenn das Gerät ausgeschaltet ist.

Wenn Sie im Modus STBY (STBY) eine DVD einlegen,

wird das Menü für die Speichermedien angezeigt.


VORSICHT


Im Gerät wird ein Laser verwendet. Verwenden Sie den


Camcorder nur entsprechend diesem Handbuch, andernfalls kann


potentiell gefährliche Laserstrahlung freigesetzt werden. Öffnen


Sie keine Abdeckungen, und sehen Sie nicht in das Geräteinnere,

pickup lens

wenn die mechanische Verriegelung beschädigt ist.

WARNUNG


Beschädigen Sie die mechanische Verriegelung nicht.

35_ English

Deutsch _35

Page 41
Image 41
Samsung VP-DX10/XER, VP-DX10/XEF, VP-DX10H/XEF, VP-DX10/XEO, VP-DX10/XEE Pickup lens, Inserting a disc, Vorsicht, Warnung

VP-DX10/HAC, VP-DX10/XER, VP-DX10/KNT, VP-DX10/UMG, VP-DX10H/XEF specifications

The Samsung VP-DX10 is a compact, versatile camcorder that represents an ideal blend of technological innovation and user-friendly design. This model caters to both novice and experienced videographers, offering an impressive assortment of features that enhance the recording experience.

One of the standout characteristics of the VP-DX10 is its ability to record in high-quality MPEG-2 format, ensuring that videos maintain excellent clarity and detail. The device supports DVD-RW/-R and -R DL formats, giving users flexibility in choosing their recording media. With a storage capacity of up to 8 hours and the ability to easily transfer videos to DVD, it streamlines the process of archiving memories.

In terms of imaging performance, the VP-DX10 is equipped with a 1/6-inch CCD sensor, providing a resolution of up to 800,000 pixels for clear and vibrant footage. The 34x optical zoom lens amplifies the camcorder’s capabilities, allowing for dynamic shooting from various distances. Alongside its optical prowess, the VP-DX10 incorporates digital image stabilization technology that minimizes shakiness, making it easier to capture smooth video even during movement.

The device's user-centered design includes a bright, swivel LCD screen, making it convenient to frame shots and play back recordings. Additionally, it features easy-to-navigate menus, enabling quick access to various settings and functions. The built-in USB connectivity allows for direct downloads to computers, facilitating hassle-free editing and sharing of videos.

Moreover, the VP-DX10 incorporates various shooting modes, including sports, portrait, and night modes, each tailored to specific scenarios, enhancing overall recording quality. The presence of a built-in flash and an advanced microphone improves audio-visual recordings, ensuring rich sound quality.

From intelligent battery management to enhanced connectivity options, the Samsung VP-DX10 is designed to meet the demands of modern videographers. Its combination of reliable performance and innovative features makes it a noteworthy choice in the compact camcorder market, appealing to users seeking both portability and quality.