AG-15D
9A10066900
Contents
Sommaire
Indice
Before Use
Memory Backup
Restoring factory settings
Read this before operation
Avant utilisation
Antes de comenzar
Connection FM antenna
FM Indoor Antenna
FM Outdoor Antenna
Raccordement des antennes FM
Conexión Antena de FM
How to connect
Connection AM antenna
AM Indoor Loop Antenna
Antenne-cadre AM intérieure
Raccordement des antennes AM
Conexión Antena de AM
Antena de cuadro de AM interior
Digital OUT terminal
Connection
Connection to audio/video components Digital in terminals
Audio IN/OUT jacks
Raccordements
Conexión
Video or Video jacks
AC Outlet switched
AC Power Cord
DVD, VCR, etc
Cordon d’alimentation CA
Prises S-VIDEO ou Video
Sortie AC commutée
Conectores S-VIDEO o Video
DVD
VCR VIDEO1
How to connect
Speaker Connections
Commet effectuez les raccordements
Raccordement des enceintes
Conexiones de altavoz
Conexiones
Positioning of the Speakers
Mise en place des enceintes
Emplazamiento de los altavoces
Remote Control Unit
Names of Each Control
Front Panel
Power indicator
Standby indicator
Speaker indicator
Tone Mode
Numeric buttons
Macro M1, M2, M3
Precautions concerning batteries
Battery Installation
Battery Replacement
Front Panel Display
Noms des commandes
Télécommande
Panneau avant
Function
Touches numériques
Afficheur du panneau avant
Remplacement des piles
Mise en place des piles
Précautions à observer concernant les piles
Nombres de los controles
Panel frontal
Mando a distancia
Use este botón para seleccionar un modo de sintonización
Indicador de modo de espera
Nota
Botones numéricos
Diodo luminoso
Cambio de pilas
Instalación de las pilas
Pantalla del panel frontal
Precauciones con las pilas
Remote Control Unit
How to use the Remote Control Unit
Buttons available for each device are listed on
Mando a distancia
Télécommande
Utilisation de la télécommande
Uso del mando a distancia
Entering a Setup Code
CD CD player TAPE/MD cassette tape deck or MD deck
Entrer un code de configuration
Introducción de un código de configuración Setup Code
CD reproductor de CD TAPE/MD platina de casete o MD
TV volume punch-through
Using a Punch-through Function
Receiver volume punch-through
TV channel punch-through
Uso de la función de control directo Punch-through
Control directo del volumen de TV
Utilisation de la fonction de substitution
Control directo del Receptor
Example
Macro Function
Press the operation buttons you want to program in order
Press the Enter button to store the macro
Fonction Macro
Función Macro
Speaker Configuration
Using a Macro
Speaker Setup
Configuration des enceintes
Configuración de altavoces
Press the Power switch
Unit enters standby mode, and the Standby indicator lights
Configuration des enceintes
Configuración de los altavoces
Subwoofer Setting
Speaker Size Setting
Ajuste del subwoofer
Réglage du caisson de basses
Réglage de taille des enceintes
Ajuste del tamaño de los altavoces
Surround Back Speaker Setting
Distance front, center, surround
Crossover Frequency
Fréquence de raccordement
Réglage de l’enceinte surround arrière
Distance avant, centre, surround
Ajuste del altavoz envolvente posterior
Balancing relative volume between speakers using Test Tone
Press the T.TONE button
Balance relativo entre altavoces con la prueba de sonido
Appuyez sur la touche T.TONE
Pulse el botón T.TONE
Speaker Configuration
Configuration des enceintes
How to store your channel level setting
How to call the stored setting
Cómo guardar el ajuste de nivel de canal
Mémorisation du réglage du niveau du canal
Rappel des réglages mémorisés
Cómo activar el ajuste almacenado
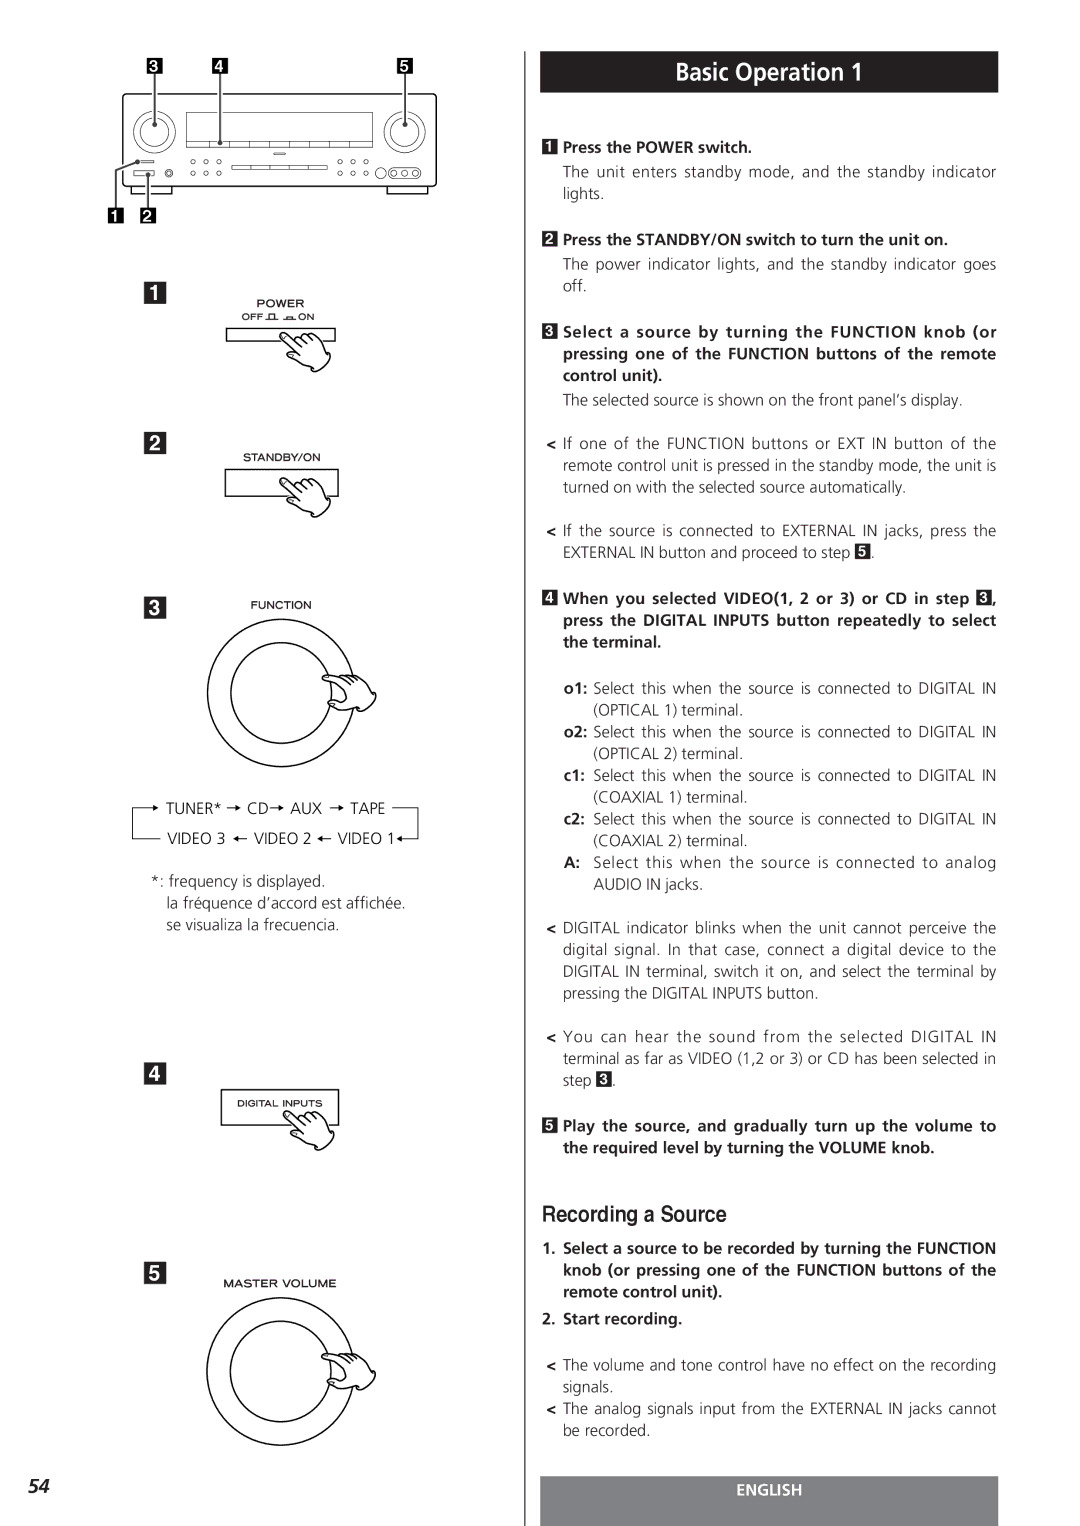
Basic Operation
Press the STANDBY/ON switch to turn the unit on
Power indicator lights, and the standby indicator goes off
Recording a Source
Enregistrement d’une source
Fonctionnement de base
Funcionamiento básico
Grabación de una fuente
Headphones
Speaker On/Off
Activación/desactivación de altavoces
Allumer/Eteindre les enceintes
Casque
Auriculares
Muting
External in 8 channel direct input
Cinema Equalizer
Dimmer
Coupure temporaire du son
Prises External in Input
Egaliseur Cinéma
Touche Dimmer
Sleep Timer
Tone Control
Sleep 10 20
Temporisation de veille
Desconexión programada Sleep Timer
Contrôle de tonalité
Control de tono Tone Control
Dubbing the audio and video signals separately
Dubbing from Video 2 or 3 to Video
Copie de Video 2 ou 3 à Video
Copia de Video 2 ó 3 a Video
Sélectionnez Video 2 ou 3 à l’aide du bouton
Select this only when the input signal is DTS
Surround Mode
IN-AUTO default
Select the desired surround mode by pressing the DSP button
Modo envolvente
Mode Surround
IN-AUTO mode par défaut
IN-AUTO estándar
Stereo
DSP procesador de señal digital
DTS 96/24
DTS DTS Digital Surround
DTS-ES Extended Surround
There are two formats for DTS-ES DTS-ES Discrete
DTS-ESExtended Surround
Il existe deux formats pour le DTS-ES DTS-ES Discrete
Existen dos formatos para DTS-ES DTS-ES Discrete
DTS NEO6 Cinema
Dolby Digital
Dolby Digital Surround EX
DTS NEO6 Music
Ce mode est optimisé pour les films
DTS NEO6 no funcionará con una fuente monofónica
Dolby Pro Logic IIx and Dolby Pro Logic
Movie mode
Music mode
Dolby Pro Logic
Dolby Pro Logic IIx et Dolby Pro Logic
Dolby Pro Logic IIx y Dolby Pro Logic
Dolby Virtual Speaker
Listening Modes
Modes d’écoute
Modos de escucha
Este modo es idóneo para música orquestal clásica, ópera
Dolby PRO Logic IIx Music parameters
You can adjust the parameters for Dolby PRO Logic IIx Music
Dimen dimension control
WID center width control
WID control de amplitud central
Dimen contrôle de dimension
WID contrôle de la largeur centrale
Dimen control de dimensión
DVS 3SPK 3-Speaker Layout
DVS 4SPK 4-Speaker Layout
DVS 5SPK 5-Speaker Layout
DVS 4SPK Configuration 4 enceintes
DVS 2SPK Configuration 2 enceintes
DVS 3SPK Configuration 3 enceintes
DVS 5SPK Configuration 5 enceintes
Dynr
Dynamic Range Compression
Dynr 0.0 off
Audio with partially compressed dynamic range
Compresión del margen dinámico
Bande audio avec gamme dynamique partiellement compressée
Audio con compresión parcial del margen dinámico
Tuner
Syntoniseur
Sintonizador
Manual Memory Presetting
Preset Tuning
FM Mode Button
How to select preset stations
Syntonisation préréglée
Presintonías
CT Clock Time
PS Programme Service name
PTY Programme Type
RT Radio Text
PTY type de programme
Appuyez sur la touche RDS
PS nom de la station
PS nombre del servicio de programación
TP search
RDS Search
RDS search
PTY search
Recherche de RDS
Búsqueda RDS
EON TA Traffic Announcement
While listening to a RDS station, press the EON PTY button
EON TA informations routières
EON TA mensajes de tráfico
Mientras escucha una emisora RDS, pulse el botón EON PTY
PTY Programs
Programmes PTY
Programas PTY por tipo
OSD On-Screen Display
Press the OSD button
Selected menu appears on the screen
Appuyez sur la touche OSD
OSD Affichage sur écran
OSD menús de pantalla
Pulse el botón OSD
Speaker Setup Auto
Speaker Setup Manual
Function Select
Réglage des enceintes Auto
Configuración de altavoces automática
Configuración de altavoces
Sélection de la fonction
How to call the stored setting
Surround Mode
How to store the setting in REF.1 or REF.2
Channel Level Trim
Modo Surround
Mode Surround
Niveau du canal
Nivel de canal
Speaker Setup Auto
Fréquence de coupure
Vérifiez les options Nombre d’enceintes disponibles
Caisson de graves
Altavoz de subgraves
If the test result isn’t reliable
Si le résultat de l’essai n’est pas concluant
Si el resultado de la prueba no es fiable
Digital indicator blinks
Troubleshooting
No power
Severe hum or noise is heard
Solución de problemas
Dépannage
Remote control doesn’t work
Maintenance
EPress the FM Mode button
Cannot view the on-screen display as it rolls rapidly
Entretien
Mantenimiento
Specifications
Caractéristiques techniques
Especificaciones
Code List / Code de réglage / Código de configuración
111
112
VCR
114
DVD
116
TAPE/MD
Function Table / Tableau de fonctions / Tabla de funciones
DVD
TAPE/MD VCR DVD Cable SAT
Teac Corporation
Model number Serial number 0704.MA-0900A