Brother PX-200 instruction manual Zipper Inserting, Gathering

Page 65

GUARNIZIONI E APPLICAZIONI

USO DE ACCESORIOS Y

APLICACIONES

USING ATTACHMENTS

AND APPLICA TIONS

A


Zipper Inserting


1


2


XL5100


XL5300 XL5200

Pattern

Stitch Length

Stitch Width

Foot


PX300

PX200

PX100


Straight


2.5


2

2

3

2-3

(Center needle

Zipper Foot


Stitch


position)


3

NOTE:


After selecting the pattern, set the stitch width dial to 2.5 to select the

B


center needle position.


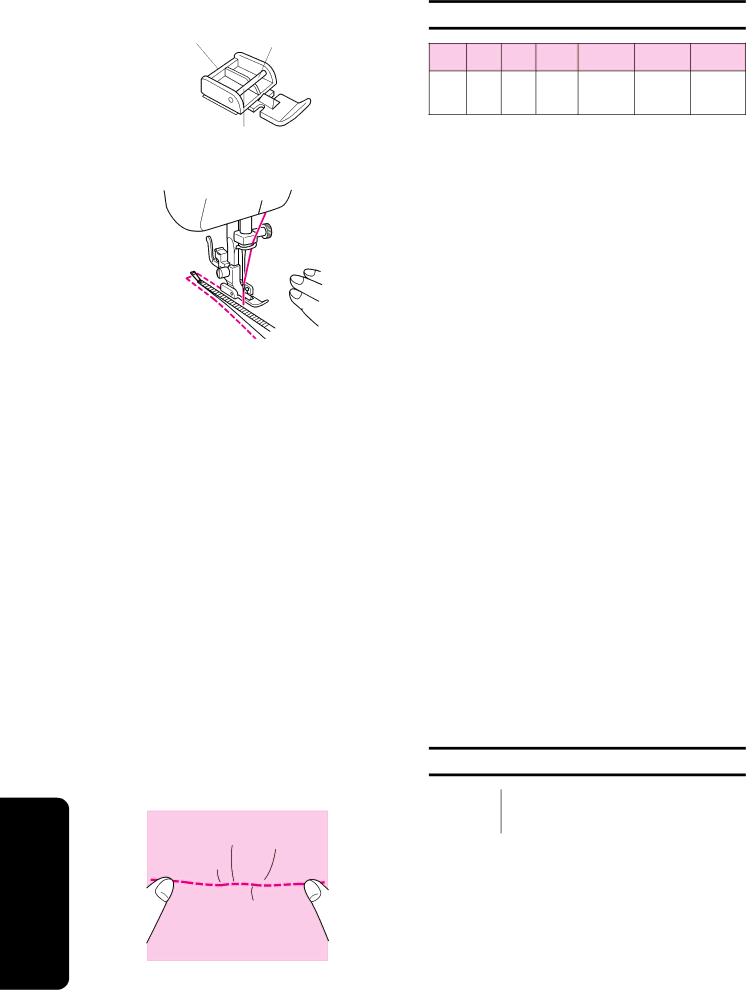
The zipper foot is used to sew various types of zippers and can easily be positioned on the right or left side of the needle.

When sewing the right side of the zipper, attach the presser foot holder to the left pin on the zipper foot. When sewing the left side of the zipper, attach the presser foot holder to the right pin on the zipper foot. (See fig. A.)

1. Set the pattern selection dial to the Straight Stitch. Set the stitch length between “2” and “3”.

2. Lower the presser foot lever and attach the presser foot holder to either the left or right pin on the zipper foot.

3. Fold the edge of the material 2 cm (3/4") and place the zipper un- der the folded portion.

4. For the XL5100, PX100, XL5200, PX200, XL5300 and PX300, use the stitch width dial to adjust the needle position.

Lower the needle into the notch on either the left or right side of the zipper foot.

5. Sew from the bottom of the zipper toward the top on both sides. The needle should be positioned on the zipper side of the foot for best results. (See fig. B.)

6. To sew the opposite side of the zipper, release the foot by raising the lever located at the back of the presser foot, move the zipper foot to the other side of the zipper, and continue sewing using the other side notch.

1 Zipper foot

2 Right pin for sewing the left side of the zipper 3 Left pin for sewing the right side of the zipper

Check for correct needle setting.

The wrong setting can cause the needle to break.

Gathering

XL5300

XL5200XL5100

Pattern

Stitch Length

PX300

PX200

PX100


2

2

3

Straight Stitch

4


1. Set the pattern selection dial to the Straight Stitch.

2. Loosen the tension of the upper thread (to about “2”) so that the lower thread lies on the underside of the material.

3. Sew a single row or multiple rows of straight stitches.

4. Pull the lower thread(s) to gather the material.

57

Image 65
Contents English Español Important Safety Instructions Conserve Este Manual DE Instrucciones Importanti Istruzioni DI Sicurezza Connecting Plugs and Main Power / Sewing Light Switch Contents Conozca SU Máquina DE Coser Índice DEL ContenidoConoscere LA Macchina DA Cucire SommarioMain power/sewing light switch Bobbin winding assemblySpool pin Stitch length dialParti Principali Elementos PrincipalesAccesorios AccessoriXL5100/PX100 Funcionamiento DE LA Máquina DE Coser Connecting PlugsFunzionamento Della Macchina DA Cucire Conexión de los enchufesInterruptor principal y de luz Main Power and Sewing Light SwitchesFoot Controller PedalInserción de la aguja Inserting the NeedleChecking the Needle Comprobación de la agujaChanging the Presser Foot Cambio del prensatelasSostituzione del piedino premistoffa Modelo a presiónConversión en modalidad de brazo Libre Converting to Free-Arm StylePara estabilizar la máquina Steadying the Machine Cucitura a braccio liberoDispositivi DI Controllo Distintos MandosSelector de puntadas Pattern Selection DialRecommended Widths and Lengths for Stitches XL5200/PX200 B-C-D XL5300/PX300 Anchos Y Largos DE Puntadas RecomendadosXL5200/PX200 1A-B-C-D XL5300/PX300 Ampiezze E Lunghezze DEI Punti ConsigliateXL5200/PX200 XL5100/PL100 Selettore della lunghezza del punto Stitch Length DialSelector de largo de puntada Puntada elástica Stretch StitchingCucitura con punti elastici Selección de la puntada elásticaSelettore dell’ampiezza del punto Stitch Width DialSelector del ancho de puntada Leva di cucitura di ritorno Palanca de retrocesoEnhebrado DE LA Máquina Procedure DI InfilaturaWinding the Bobbin Bobinado de la canillaInfilatura inferiore Lower ThreadingEnhebrado inferior Upper Needle Threading Infilatura superiore ago Enhebrado superior de la agujaNeedle threader Using the Needle ThreaderWhen the machine is equipped with a Enhebrador Palanca del enhebrador Sistema di infilatura rapido Is equipped with a quick thread-settingRaccolta del filo inferiore Drawing Up Lower ThreadPara sacar el hilo de la canilla Cucitura con ago gemello Twin-Needle SewingCostura con aguja doble Upper tension is too loose Thread TensionLower tension is too loose BobbinRegolazione della tensione del filo Tensión de los hilosTabla DE Combinaciones Entre TEJIDOS, Agujas Y Hilos Chart of Sewing FABRICS, Needles and Thread CombinationsFilo Tabella Delle Combinazioni DI TESSUTO, AGO E FiloPuntadas rectas Straight StitchingPunto diritto Para empezar a coserPara terminar las costuras fig. B Cambio de sentido de costura fig. aChanging Sewing Directions fig. a Finishing Sewing fig. BTopstitching and Stretch Materials Removing the Material From the MachinePara retirar el tejido de la máquina Puntadas en derecho y tejidos elásticosPunto zigzag Zigzag StitchingPuntadas zigzag Orli a punto invisibile Puntadas invisiblesBlindhem Stitching Punto orlo conchiglia Puntada alforza derefuerzoShell Tuck Stitching Remiendos Punto elasticoInserción de gomas elásticas Puntada de uniónPuntada festón Scallop StitchingUniversal Stitching Puntada universalRifinitura a sopraggitto Puntada por encima de la orillaOveredge Stitching Punto a piuma Puntada plumaFeather Stitching Puntada triple zigzag elástica Triple Zigzag Stretch StitchingDecorative Stitching Puntada decorativaMaking a Buttonhole on Stretch Fabrics fig. E Making a ButtonholeMaking a Buttonhole Esecuzione di asole Solo mod. XL5300, XL5200, PX300 e PX200 Para coser ojales Solo XL5300, XL5200, PX300 y PX200Cosido de ojales en tejidos elásticos fig. E Esecuzione di un’asola su tessuti elastici fig. EEsecuzione di asole Solo mod. XL5100 e PX100 Making a Buttonhole XL5100 and PX100 onlyPara coser ojales Solo XL5100 y PX100 Como Coser Step Sewn Portion Pattern How to SewPasos Parte Cosida Securing the Stitching and Cutting the Buttonhole Fase Lato cucito Punto Come cucirePara Completar las Puntadas y Cortar el Ojal Fissaggio della cucitura e apertura dell’asolaButtonhole Fine Adjustment Regolazione della densità dei punti Dell’asola Ajuste fino de los ojalesButton Sewing Cucitura di bottoni Costura de botonesGathering Zipper InsertingFruncido Inserción de cremallerasApplicazione di cerniere ArricciatureRammendo ZurcidoDarning Applicazioni AplicacionesAppliques Monogramas y bordados Monogramming and EmbroideringMonogrammi e ricami Preparación para monogramas y bordadosBordado MonogramasMonogramming EmbroideringSostituzione della lampadina Changing the BulbCambio de la bombilla Lubrificazione EngrasadoOiling Pulizia CleaningLimpieza Upper Thread Lower Thread Skipped Loop in Seam Fabric Performance ChecklistFabric does Póngase EN Contacto CON EL Servicio Técnico Local Listado de posibles incidenciasEL Tejido no Arrastra Bien Rompe Tabella di controllo del funzionamentoLA Macchina Rumorosa O Lenta Importante ImportanteRepacking the Machine Embalaje de la máquinaBobbin Threading Winding Bridging Stitch Buttonhole Sewing Aguja Tabella Delle Combinazioni DI Tessuto