Section 3: Operation
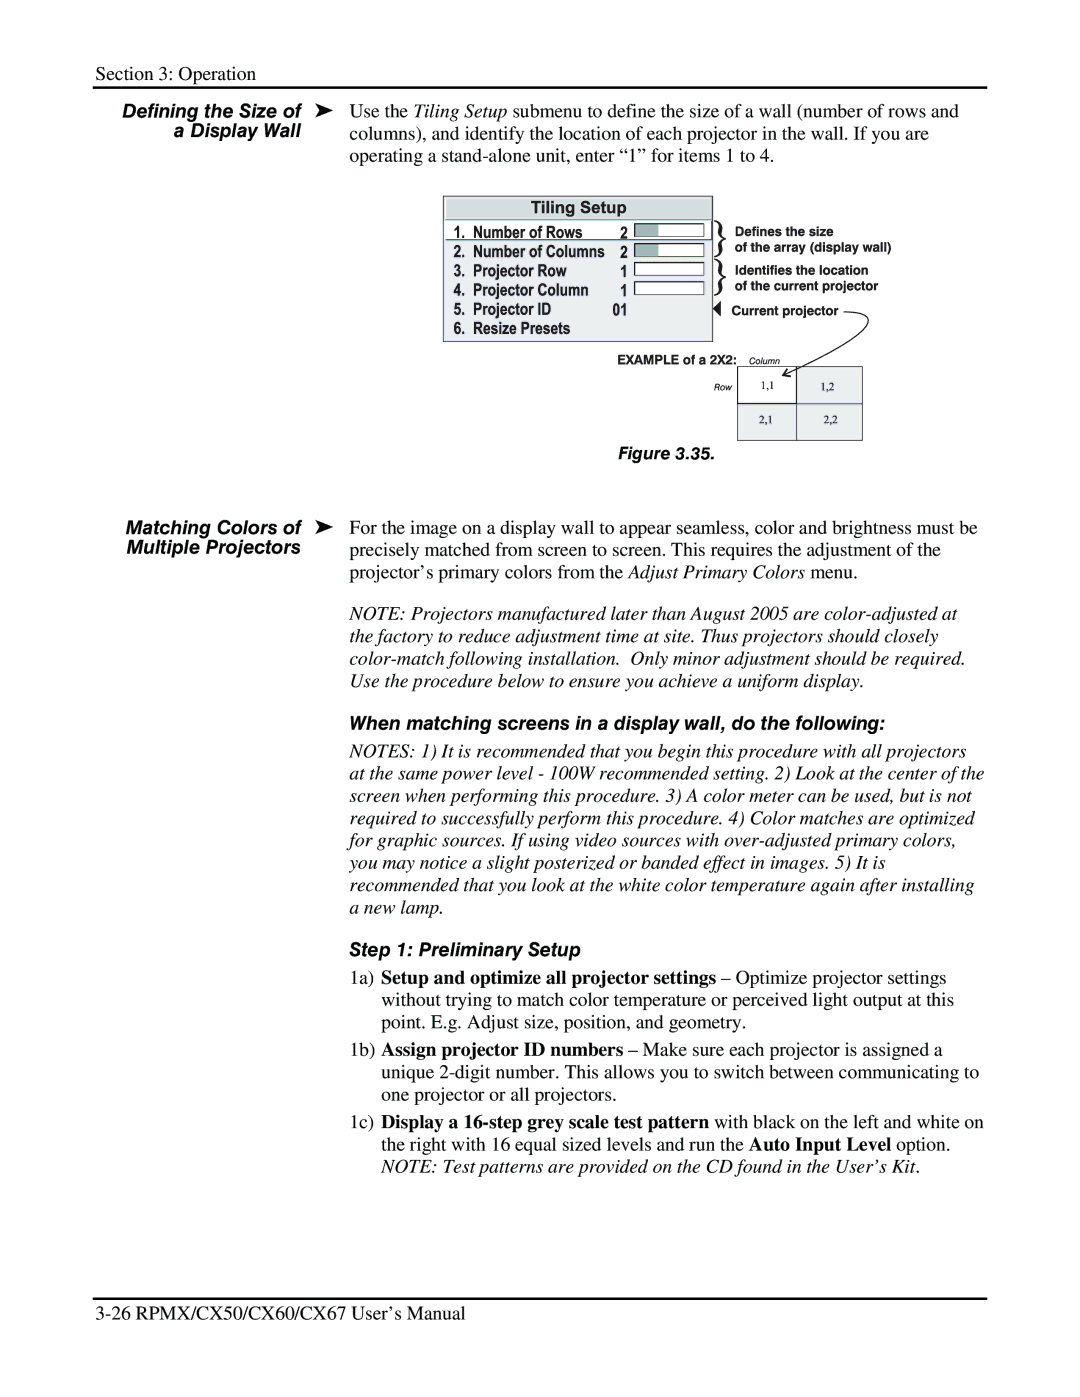
Defining the Size of | ' Use the Tiling Setup submenu to define the size of a wall (number of rows and | ||||||||||||||||
a Display Wall | columns), and identify the location of each projector in the wall. If you are | ||||||||||||||||
| operating a | ||||||||||||||||
|
|
|
|
|
|
|
|
|
|
|
|
|
|
|
|
|
|
|
|
|
|
|
|
|
|
|
|
|
|
|
|
|
|
|
|
|
|
|
|
|
|
|
|
|
|
|
|
|
|
|
|
|
|
|
|
|
|
|
|
|
|
|
|
|
|
|
|
|
|
|
|
|
|
|
|
|
|
|
|
|
|
|
|
|
|
|
|
|
|
|
|
|
|
|
|
|
|
|
|
|
|
|
|
|
|
|
|
|
|
|
|
|
|
|
|
|
|
|
|
|
|
|
|
|
|
|
|
|
|
|
|
|
|
|
|
|
|
|
|
|
|
|
|
|
|
|
|
|
|
|
|
|
|
|
|
|
|
|
|
|
|
|
|
|
|
|
|
|
|
|
|
|
|
|
|
|
|
|
|
|
|
|
|
|
|
|
|
|
|
|
|
|
|
|
|
|
|
|
|
|
|
|
|
|
|
|
|
|
|
|
|
|
|
|
|
|
|
|
|
|
|
|
|
|
|
|
|
|
|
|
|
|
|
|
|
|
|
|
|
|
|
|
|
|
|
|
|
|
|
|
|
|
|
|
|
|
|
|
|
|
|
|
|
|
|
|
|
|
|
|
|
|
|
|
|
|
|
|
|
|
|
|
|
|
|
|
|
|
|
|
|
|
|
|
|
|
|
|
|
|
|
|
|
|
|
| Figure 3.35. |
Matching Colors of | ' For the image on a display wall to appear seamless, color and brightness must be |
Multiple Projectors | precisely matched from screen to screen. This requires the adjustment of the |
| projector’s primary colors from the Adjust Primary Colors menu. |
| NOTE: Projectors manufactured later than August 2005 are |
| the factory to reduce adjustment time at site. Thus projectors should closely |
| |
| Use the procedure below to ensure you achieve a uniform display. |
| When matching screens in a display wall, do the following: |
| NOTES: 1) It is recommended that you begin this procedure with all projectors |
| at the same power level - 100W recommended setting. 2) Look at the center of the |
| screen when performing this procedure. 3) A color meter can be used, but is not |
| required to successfully perform this procedure. 4) Color matches are optimized |
| for graphic sources. If using video sources with |
| you may notice a slight posterized or banded effect in images. 5) It is |
| recommended that you look at the white color temperature again after installing |
| a new lamp. |
| Step 1: Preliminary Setup |
| 1a) Setup and optimize all projector settings – Optimize projector settings |
| without trying to match color temperature or perceived light output at this |
| point. E.g. Adjust size, position, and geometry. |
| 1b) Assign projector ID numbers – Make sure each projector is assigned a |
| unique |
| one projector or all projectors. |
| 1c) Display a |
| the right with 16 equal sized levels and run the Auto Input Level option. |
| NOTE: Test patterns are provided on the CD found in the User’s Kit. |