Manuals
/
Compaq
/
Computer Equipment
/
Personal Computer
Compaq
2100
manual
Active Desktop Screen
Models:
2100
1
26
192
192
Download
192 pages
34.84 Kb
23
24
25
26
27
28
29
30
Troubleshooting
Specifications
Install
Setting Notification Alarms
Symbols and Conventions
Connecting to AN ISP
Maintenance
Problem
Resetting Your Device
Diagnostics
Page 26
Image 26
A
CTIVE
D
ESKTOP
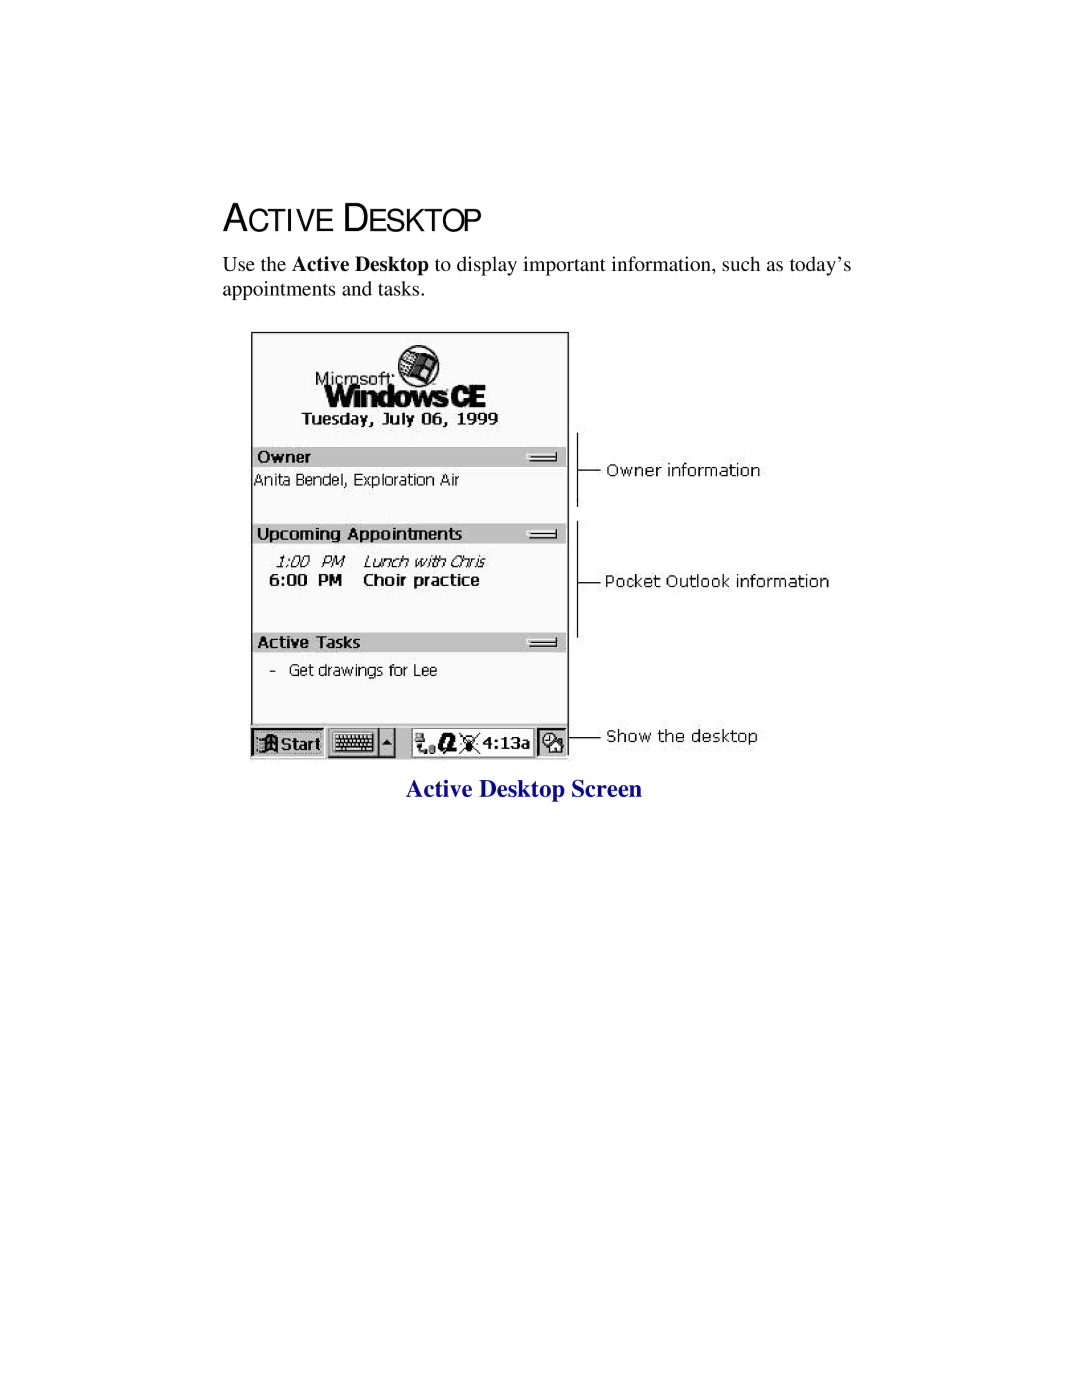
Use the
Active Desktop
to display important information, such as today’s appointments and tasks.
Active Desktop Screen
Page 25
Page 27
Page 26
Image 26
Page 25
Page 27
Contents
Aero 2100 Series Color Palm-size PC
Aero 2100 Series Color Palm-size PC
Table of Contents
Before YOU Begin
Finding Information
Name Location
Locating Information Quickly
To Find Information About Look Here
Outside of North America
Customer Registration
North America
Symbols and Conventions
Chapter
Introducing the Device
Item Component Function
Front Side Components
Front Side
Component Function
Recorder
Left Side Components
Left Side
TOP Edge Components
Top Edge
Bottom Edge Components
Bottom Edge
Back Side Components
Back Side
Back Side Components
Cradle Components AUTO-SYNC Cable
Standard Cradle
Using the Cradle
AC Adapter
Deluxe Cradle
Auto-sync Cable
Basic Operations
Using the Stylus
Using the Stylus
Programs
Program Description
Programs
Active Desktop
Active Desktop Screen
Display Properties Screen
Start Menu and Taskbar
Start Menu
Taskbar
Command BAR
Command Bar
Typing with the Keyboard
Typing and Writing on Your Device
Type with the keyboard
Write using character recognition
Input Panel
Using the Word Completion Function
Viewing Information
Finding Information Screen
Customizing Your Device
Display Properties Screen
Using the Light Bulb Icon
Adjusting the Backlight
Using the Power and Backlight Button
Icon Meaning
Using the Q Menus Backlight Control
Backlight Menu
Setting the Backlight Timeout
Using Power
Rechargeable Battery Pack
Changing the Battery Pack
Removing the Battery Compartment Cover
Checking the Battery Pack Charge
Inserting the Battery Pack
Low Rechargeable Battery Indicators
Power Properties Battery Tab Screen
Responding to a Low Battery Pack
Charging the Battery Using the AC Adapter Directly
Charging the Battery Pack
Battery Pack Inside the Palm-size PC
Charging the Battery Using the Cradle
Battery Charge Light
Using the Deluxe Cradle Charging Compartment
Charging the Battery Using the Deluxe Cradle
Useful Battery Life
Battery Disposal
Backup Battery
Backup Battery Compartment
Low Backup Battery
Changing the Backup Battery
Opening the Backup Battery Compartment Cover
Inserting a Backup Battery
CompactFlash Cards
Conserving Battery Power
Backlight
Active Synchronization
Automatic Power Off
Infrared Transmissions
Setting the Power Off Timeout
Using AC Power
Reset Button
Resetting Your Device
Performing a Normal Reset
Performing a Full Reset
Software Functions
Using the Asset Viewer
Asset Viewer Screen
Using the Qutilities and Q Menu
Menu Tab in QUtilities
Task Management
Menu
Volume Slider
Controlling Volume
Power
File Explorer
Backlight Control
Auto Run
Auto Run Tab
Diagnostics
Diagnostics Tab
CF Backup/Restore
Select Show all file types. Tap OK
Game Keys
Game Keys Tab
Setting Notification Alarms
Sound & Vibratory Alarm Status
Setting an Alarm in Calendar
Appointment Screen
Setting an Alarm in World Clock
World Clock Alarms Tab Screen
Setting a Password
Using File Explorer
File Explorer Screen
Navigating among Your Files
Organizing Your Files
Managing a Network Connection
Backup and Restore
Using CF BACKUP/RESTORE
Backing UP Data to a CF Card
CF Backup/Restore Utility Backup Tab Screen
CF Backup/Restore Utility Restore Tab Screen
Restoring Data from a CF Card
Pocket Outlook
This chapter describes the following features
Program Buttons
Program Buttons
Changing the Program Button Shortcuts
Program Button Description
Calendar Application
Calendar Screen
Appointment Screen
Contacts
Tap File then Make Meeting
Contacts Screen
Contact Details Screen
Task Details Screen
Tasks
Tasks Screen
Inbox
Synchronize Messages
Inbox Options Screen
Set up remote mail
Send e-mail remotely
Using Inbox with a Remote Connection
Receive messages
Inbox Message Screen
Inbox Screen
Send messages
Inbox New Message Screen
Voice Recorder
Voice Recorder Hardware Buttons
Using the Hardware Buttons
Make a recording
Do this
Play a recording
Navigate
Using the Screen Buttons
Voice Recorder Screen
Choosing a recording format
Settings and Organization
Adjusting memory
Organizing recordings
Organizing Recordings
Chapter
Entering Information
Creating a Note
Entering Information Using Note Taker
Writing and Drawing Using Note Taker
Writing and Drawing
Editing and Formatting a Note
Editing And Formatting a Note
Adding Space in a Note
Saving and Organizing Your Notes
Saving your notes
Saving a Note
Organizing your notes
Organizing Your Notes
Picture Viewer
Using Picture Viewer
Picture Viewer Screen
Getting Images from a Desktop Computer
Viewing Images Stored on a CompactFlash Card
Audibleplayer
AudiblePlayer Screen
Using AudiblePlayer
Installing AudibleManager
Purchasing Audio Programs
Tap and Hold
Using the Software Buttons
Button
Using the Hardware Buttons
AudiblePlayer Menus
Additional Playback Time
Controls
Infrared Feature
Setting up Infrared on the Palm-size PC
Connecting to Activesync with Infrared
Setting up Infrared on the Computer
Connecting To Your Desktop Computer
File Transfer with Another PALM-SIZE PC
Guidelines for Using IR Transfer
Compactflash Cards
Software
Operating Guidelines
Inserting a CompactFlash card
Inserting a Compactflash Card
Removing the CompactFlash slot cover
Removing a Compactflash Card
Running a Program Stored on a Compactflash Card
Page
Microsoft Activesync
Channels
Channel Icon on the Taskbar
Viewing Channel Content
Personalizing Channels
Mobile Desktop Components
Getting Connected Remotely
Connecting to AN ISP
Select StartàProgramsàCommunicationàConnections
Connecting to a Network
Getting Help on Connecting Remotely
Using CompactFlash memory
Upgrading the memory module
Upgrading the memory module involves these steps
Making a Full Backup
Removing the Batteries Disconnecting AC Power
Removing the Existing Memory Module
Removing the Memory Compartment Cover
Removing the Memory Module
Installing a NEW Memory Module
Memory Module Connector
Inserting the Memory Module
Restoring the BACKED-UP Data
Using JOT Character Recognizer
Input Method Menu
Using Jot Character Recognizer
Areas of the Input Panel
Symbols
Number Area of the Input Panel
Natural Character SET
Help Writing Characters
Options
Using the letter areas
Editing
Using the Number Area
Stroke options
Period Comma
Writing Accented Letters
Using the Symbol Panel
Char Stroke Options
Char
Char Stroke Options
Simplified Uppercase Character SET
Editing
Character Stroke options
Undo Paste Cut Carriage Return
Writing Accented Letters
Comma Apostrophe Dash Underscore
Symbols
Symbols
Char Stroke Options
Tips & Troubleshooting
Infrared Communications Troubleshooting
Problem Possible Cause Solution
Infrared Communications Troubleshooting
Partnership Troubleshooting
Screen and Stylus Troubleshooting
Screen and Stylus Troubleshooting
StartàSettingsà
System Response Troubleshooting
Problem
System Response Troubleshooting
Memory Troubleshooting
Memory Module for more Information
Memory Troubleshooting
Battery and Power Troubleshooting
Conserving Battery
Amber battery AC adapter has
Routine Maintenance
Routine Care
Travel Guidelines
International Travel
Shipping Guidelines
System
Hardware Specifications
System Specifications
Operating Environment
Physical Specifications
Physical Specification Metric
Operating Environment Metric
Appendix B
Icon Reference
Battery Icons
Connection Icons
Other Icons
Regulatory Agency Identification Numbers
Accessories Series Number
Regulatory Notices
Modifications
Cables
Canadian Notice
Avis Canadien
Battery Warning
European Union Notice
Top
Page
Image
Contents