EKR-KB1
US FCC Part 15 Class B Verification Statement
Index
Video Management
Communication problems between keyboard and receiver
MNNCEKRKB10439
116
115
MNNCEKRKB10439
Checking the markings
Contents of the package
Opening a nd checking the package
Opening the package
Equipment that can be connected to the EKR-KB1 keyboard
Description Specifications
Digital video recorder
Keys and connectors
Telemetry receivers and domes
Second function keys
Dip switch
RS485 and system types
Setup Description Example
Standard connection cable
More than two devices on the same line
One control keyboard per line
Menu items
Keyboard setup
Keys
Selecting and inserting values
Accepting requests for cameras
Accepting requests for cameras and assigning receivers
Assigning the telemetry lines
Modifying t he list
Default setting
Accepted cameras menu
Assign receivers menu
MNNCEKRKB10439
Accepting the request for monitors
Accepting requests for functions
Accepting the request for multiplexers
Joystick calibration and test
Buzzer
Password
Autotest of serial channels
Autotest procedure
Macro Protocol special functions
Special functions featured by Macro protocol
Description
Direct selection of a camera
Video ma nagement
Description of the display
Video fundamental concepts
Everfocus DVR Control
DVR Mode
DVR Mode procedures
Selecting the previous/next camera
Views
Telemetry mode
Defining the views
Requesting the views
Receivers associated with the cameras
Erasing the customised views
Video matrix Eneo EKR-32/8
Video device setup
Connection
Video matrix Videotec SM328A
Connexion
Video matrix Eneo EKR-8/4 and EKR-16/4
Video matrix Videotec SM84A and SM164A
Switcher settings
Switchers Videotec SM42A and SM82A
Video matrix Linxs LXRPS84A and LXRPS164A
Keyboard setting
Video device setup
Switchers Linxs LXRPS42A and LXRPS82A
Video device setup
Matrix settings No setting is necessary Keyboard settings
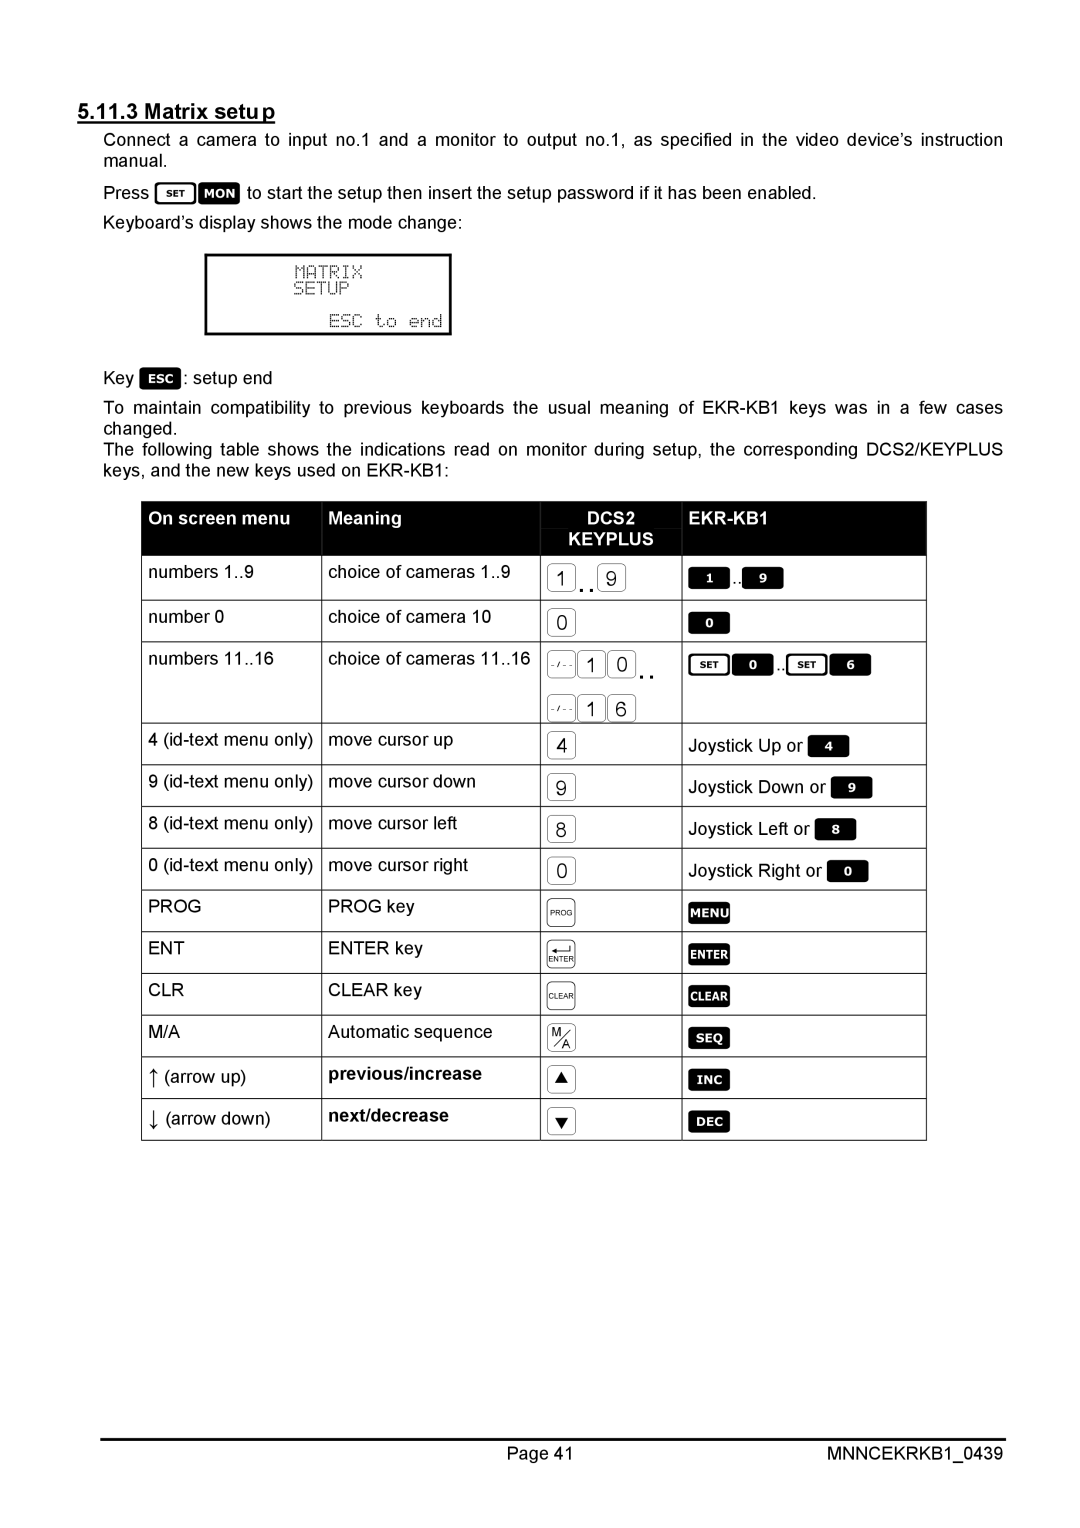
Matrix setup
Video matrix Videotec SW328
DB9
Video matrix Videotec SW164OSM
Baudrate Dip
Next/decrease
Previous/increase
Video multiplexer Eneo
Multiplexer settings
Direct connection
Dedicated functions
Video multiplexer Javelin
Dedicated functions
SP16C
Video multiplexer Videotec SP16C
Dedicated functions
Selecting a monitor connected to the video matrix
Controlling the multiplexer using a video device
Selecting a monitor connected to the multiplexer
Materials and reference documents
Setting up the multiplexer
Setting up the keyboard
Sony vide o multiplexer
OSM Configuration
Configuration
Multiplexer functions
Other functions
DVR
Sony DVR
Special Copy menu
Special Search menu
Video recorder functions
Ademco multiplexer
Sanyo multiplexer
multi quad plus still live vcr
Indications on the display
Choice of protocol
Connections
DVR Configuration
DVR settings
Everfocus DVR
MNNCEKRKB10439
Common telemetry operations
Communication problems between keyboard and receiver
Changing the active receiver
Typographical conventions
Special codes
Reference material and documents
Dome setup
Dome settings
Elbex Dome
Movement limits
Preset, scan, home
Dome movement
Autopan
Auto scan control
Timers
Preset positions
Alarm positions
Digital zoom
Lenses
Functions
Speed
Auto slow shutter
Camera Switchover color ↔ b/w
Other lenses functions
Auxiliary Relays
Other functions
Backlight Compensation
Elmo Dome
Setup
Direct setup
OSM Setup
Sequences and Cruise
Eneo Fastrax II Dome
Setting up the dome
Material and reference documents
Autoscan, Patrol and Pattern
Eneo Pan & Tilt
Configuring the pan & tilt
Configuring the pan & tilt
Configuring the keyboard
Standard Patrol
Patrol
Random Patrol
Positioning limits
Ernitec Saturn Dome
Patrol setup
Preset, scan, patrol and home
Other special codes
Return position
JVC TK-C675 Dome
Preset, home, scan
Other commands and special codes
Added functions
Dome settings
JVC TK-C676 Dome
Hardware connection to the dome
Zoom e focus
Black & White mode
Important protocol note Connection
Panasonic Dome
Autopan functions for WV-CS850 model
Limit movement for WV-CS850 model
Patrol Setup for the WV-CS850 model
Patrol setup for WV-CS600 model
Shutter and Electronic sensitivity setup
Automatic electronic sensitivity
Autoflip
Lenses and flip
12.14 Relè only W V-CS850 model
off
Other functions only WV-CS850 mode
Pelco Dome
Pattern
Relays and alarms
Zone
Speed Fact ors
Samsung Dome
Preset, scan, home, patrol
autofocus on 1÷4 activate/deactivate toggle relay
Santec Dome
Preset, scan, home
Sensormatic / American Dynamics Dome
Relays
Pattern and apple peel
VPhase delay
Autopan, patrol, tour
Star Dome
Groups
Swing
Tour
Insert the group number to be modified from 0 to
Exposure Control
Other setups
VCL Dome
Insert the tour number
Autopan and tour
Camera set up
DTRX3 DTRX1 Dtrxdc Dtmrx Microdec
Videotec and Linxs receivers
Videotec and Linxs receivers with Videotec protocol
Receiver settings
Reference material
washer on wiper on
Videotec Receivers with Macro protocol
Extended patrol
Autofocus on, off Autoiris on, off
Maintenance
Specifications
Inhaltsverzeichnis
Videosteuerung
Kommunikationsprobleme zwischen Tastatur und Empfänger
MNNCEKRKB10439
Wartung
MNNCEKRKB10439
Überprüfung der Kennzeichnung
Öffnung der Verpackung und Inhaltskontrolle
Inhalt der Verpackung
Öffnen der Verpackung
An die Tastatur EKR-KB1 anschließbare Geräte
Beschreibung Eigenschaften
Digital- Videorecorder
Tasten und Steckverbindungen
Telemetrieempfänger und Domes
Zweitfunktionstasten
Konfiguration Beschreibung Beispiel
RS485 und Anlagentypen
Standard-Anschlußkabel
Mehr als zwei Einrichtungen an derselben Leitung
Eine Tastatur je Leitung
Menüoptionen
Konfigurierung der Tastatur
Tasten
Auswahl und Eingabe von Werten
Displayanzeige Untermenü
Maskierte Bestätigung des Passwortes
Zuordnung der Telemetrieleitungen
4 Änderung des Verzeichnisses
Werkseinstellung
2 Menü für die Kamera-Aktivierung
3 Menü für die Zuordnung von Empfängern
MNNCEKRKB10439
2 Änderung des Verzeichnisses
Freigabe der Monitoransteuerung
Anmerkungen zu den Empfängerzuordnungen
Hinweismeldung
Freigabe der Funktionsanwahl
Freigabe der Multiplexeransteuerung
Werkseinstellungen
Kalibrierung und Joystick- Test
Passwort
Buzzer Summer
Hinweis- und Fehlermeldungen
Autotestprozedur
Autotest der seriellen Kommunikationskanäle
Beschreibung
Protokoll Macro Sonderfunktionen
Sonderfunktionen für das Protokoll Macro
Direkte Anwahl einer Videokamera
Videosteuerung
Beschreibung des Displays
Video Grundkonzepte
Vorgänge im Modus DVR
Auswahl der vorhergehenden / nachfolgenden Kamera
Steuerung von digitalen Videorekordern Everfocus
Modus DVR
Ansichten
Aufrufen der Ansichten
Den Videokameras zugeordnete Empfänger
Entfernung benutzerdefinierter Ansichten
Anschluß
Eneo Vide omatrix EKR-32/8
Einrichtung der Videoeinrichtung
Videotec Videomatrix SM328A
Eneo Vide omatrix EKR-8/4 und EKR-16/4
Videotec Videomatrix SM84A und SM164A
Einrichtung des Umschalters
Videotec Umschalter SM42A und SM82A
Videomatrix LXRPS84A und LXRPS164A Linxs
Konfiguration der Videoeinrichtung
Umschalter LXRPS42A und LXRPS82A Linxs
Konfiguration der Videoeinrichtung
Einrichtung der Matrix
Videotec Videomatrix SW328
KB1 OUT
Videotec Videomatrix SW164OSM
Weitere Informationen enthält das zugehörige Handbuch
DCS2 EKR-KB1 Keyplus
Direktverbindung
Eneo Vide o-Multiplexer
Einrichtung des Multiplexers
Dedizierte Funktionen
Javelin Video-Multiplexer
Dedizierte Funktionen
Videotec Video-Multiplexer SP16C
Dedizierte Funktionen
Auswahl eines mit der Videomatrix verbundenen Monitors
Steuerung des Multiplexers mit einer Videoeinrichtung
Auswahl eines mit dem Multiplexer verbundenen Monitors
Verweis auf weitere Materialien und Dokumente
Video-Multiplexer Sony
Einstellung der Bedientastatur
Konfiguration OSM
Sonderfunktionen
Multiplexerfunktionen
Sonstige Funktionen
Einrichtung des DVR
DVR Sony
Sondermenü Copy
Sondermenü Search
Funktionen des Videoaufzeichnungsgerätes
Einrichtung der Bedientastatur
Multiplexer Ademco
Multiplexer Sanyo
Sequenz Alarmreset Seite
Displayanzeigen
Wahl des Protokolles
Funktionstasten
DVR Everfocus
Konfigurieren des DVR
Einstellungen des DVR
MNNCEKRKB10439
Normale Steuerung der Telemetriebefehle
Kommunikationsprobleme zwischen Tastatur und Empfänger
Wechsel des aktiven Empfängers
Spezialcodes
Anmerkungen zur Telemetriesteuerung
Typografische Schreibweisen
Einstellungen der Domekamera
Dome Elbex
Wichtige Anmerkung zu den Protokollen
Konfiguration der Domekamera
Feste Geschw indigkeit
Steuerung der Domekamera
Bewegung der Dome
Bewegungsendpunkte
Aktivierung
Timer-Funktionen
An den Preset-Positionen
An den Alarmpositionen
Digital-Zoom
Optiken
Funktionen
Geschwindigkeit
12.6 PIP
Camera Switchover Farbe ↔ b/w
Sonstige Funktionen
Hilfsrelais
Sonstige Optikfunktionen
RS485B
Domekamera Elmo
Verweis auf andere Materialien und Dokumente
RS485A
Direkte Konfigurierung
Konfigurierung OSM
Sequenzen und Cruise
Einstellung der Domekamera
Eneo Fastrax II Domekamera
Autoscan, Patrol und Pattern
Konfigurieren des Schwenk-Neige-Kopfes
Schwenk-Neige-Kopf Eneo
Einstellungen des Schwenk-Neige-Kopfes
Patrol Standard
Patrol Random
Positionierungsgrenzen
Einrichtung Dome
Domekamera Ernitec Saturn
Konfigurierung Patrol
Preset, scan, Patrol e home
Sonstige Spezialcodes
8 Rückkehrposition
Konfigurierung
Domekamera JVC TK-C675
RS485B Einrichtung der Domekamera
Sonstige Befehle und Spezialcodes
Domekamera JVC TK-C676
Black & White Modus
Andere Funktionen
Wichtige Anmerkungen zu den Protokollen
Domekamera Panasonic
Begrenzung des Bewegungsbereichs beim Modell WV-CS850
Autopan-Funktionen für das Modell WV-CS850
Konfigurierung Patrol beim Modell WV-CS850
Konfigurierung Shutter und Electronic sensitivity
Konfigurierung Patrol beim Modell WV-CS600
Patrol Sequenz Auto
Relais nur Modell WV-CS850
Optiken und Flip
Sonstige Funktionen nur Modell WV-CS850
Domekamera Pelco
Relais und Alarme
Geschwindigkeitsstufen
Domekamera Samsung
Start Autopan Unterbrechung Autopan
Pattern
Domekamera Santec
Preset, scan, home
RS485B Einichtung der Domekamera
Domekamera Sensormatic / American Dynamics
Relais
Pattern e apple peel
Autoflip Autofocus Fernreset der Domekamera
Domekamera Star
Gruppen
Unterbrechung einer Gruppensequenz
Sonstige Konfigurationen
Steuerung Exposure
Autopan und tour
Domekamera VCL
Kameraeinrichtung
Aktivierung Washer Aktivierung Wiper
Empfänger Videotec und Linxs
Einrichtung des Empfängers
Empfänger Videotec und Linxs mit Protokoll Videotec
Unter Positionen wird die Patrol-Sequenz festgelegt
Anmerkungen
Empfänger Videotec mit Protokoll Macro
Unter Positionen wird die Patrol-Sequenz bestimmt
Patrol erweitert
Relais
Wartung
Technische Eigenschaften
Page
Copyright by Videor Technical 09/04