ZET1R Four mural simple ZET2R Four mural double
ZET1R Single Wall Oven ZET2R Double Wall Oven
ZET1R Horno de pared simple ZET2R Horno de pared doble
Introduction
Contents
How to
Write down the model & serial numbers
Before using your wall oven
If you need service
If you received a damaged wall oven Save time & money
Important Safety Notice
Safety Precautions
SELF-CLEANING Oven
Is in use and hot
Features of Your Wall Oven
Design information
Touch screen, touch pads and time of day display
Introduction to the Oven Controls
Display. Shows the time of day
Baking pans/sheets
Pan placement
Oven air flow Aluminum foil
Preheating
Before You Begin
Full extension oven racks
Baking and Roasting
How to set the oven for baking or roasting
Cancel
Change TIME-TEMP
Timed Cooking
Timed cooking immediate start and automatic stop
Automatic stop
Timed cooking delayed
Touch Delay Start
Touch ADD Bake Option
Close the door. Always broil with the door closed
How to set the oven for broiling
Broiling
Touch High Broil or LOW Broil
Quantity Rack
Broiling guide
Second Side Food Or Thickness Position Time min Comments
Temperature probe
Using the Probe for Roasting
Proper placement of the probe
Oven will turn on immediately and stay on until the oven is
How to set the oven for roasting when using the probe
Turned off
Cookware for convection cooking
Using the Convection Oven
Convection fan
Adapting recipes
Convection roasting tips
How to set the oven for convection baking or roasting
Convection Baking or Roasting
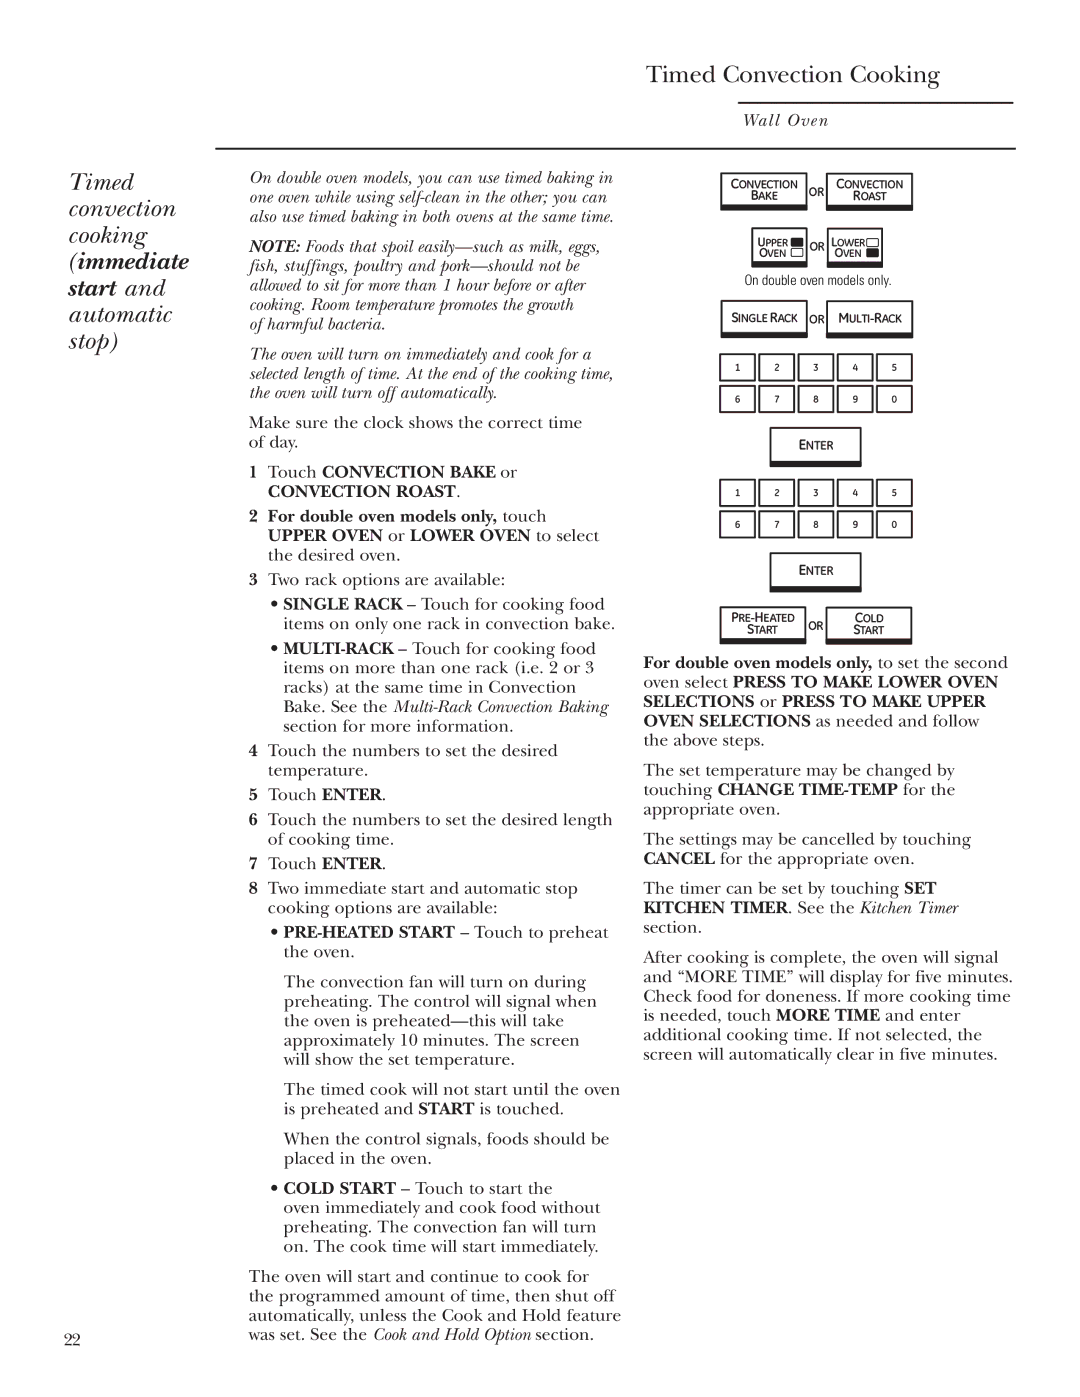
Touch Convection Bake or
Convection Roasting with the Probe
How to set the oven for convection roasting with the probe
Touch Convection Roast
Meats Minutes/Lb
Convection roasting guide
Convection Roasting
Internal Temp
Timed convection cooking immediate start and automatic stop
Timed Convection Cooking
Make sure the clock shows the correct time of day
Timed convection cooking delayed
Create a recipe
Favorite Recipes
USE Recipe
To set the kitchen timer
Kitchen Timer and Control Lockout
Control lockout
Self-Cleaning Oven
Before a clean cycle
To set the second oven, there are two options available
How to set the oven for cleaning
Immediately after setting the first oven
From the home screen
Self Clean
How to delay the start of cleaning
Three self clean time options are available
To recall the remaining time or the start time set, touch
After a clean cycle
Option-Proof
Proofing
LOW
Option-Warm
Warming
MED
Option-Warm
Tips
Touch BAKE, Convection Bake or Convection Roast as desired
Option-Two Temps
Two temps
Touch PRE-HEATED Start or Cold Start
Dehydrate
Options-Cook & Hold and Dehydrate
Cook and hold
Touch Dehydrate
Delayed start and automatic stop
Option-Delay Start
Touch BAKE, Convection Bake or Convection Roast as desired
Sabbath
Feature- How to set
Help feature
Options-Sabbath and Help
Do it yourself
Options-Settings
Adjust the oven thermostat
To set the clock
Hour shut-off
Fahrenheit or celsius temperature selection
Clock blackout
Language
Auto Recipe Conversion
Display color
Sound on/off
Sound volume
Touch Settings Touch SOUND/VOLUME
Touch Done
Sound/volume default
Timer signal
Kitchen timer signal
Touch Default Touch OK Touch Done
Oven heating elements Broiler pan and grid
Care and Cleaning
If food has burned on, sprinkle the grid with
Oven racks
Repeat for the right slide mechanism of the rack
Do not lift the door by the handle
Lift-off oven door- removal
Probe
To remove the door
To remove
Oven lights
To replace
Stainless steel surfaces on some models
To clean the door
Control panel
Painted surfaces on some models
During both the cooking and cleaning functions
Problem Solver
Oven temperature is too high to set a self-clean operation
Soil and reset the clean cycle
Temperature TOO HOT or TOO Cold Oven Door will
Problem Possible Cause Display Wakes UP
Clock and Timer
Not Open After Clean Cycle
Registration Ownership Product Consumer
Model and serial numbers
This manual. You will
Ownership Registration
Page
Consumer Services
Service at today’s prices
Limited ONE-YEAR Warranty
Warranty
From the Date Original Purchase
Contenu
Service à la clientèle
Information pour le client
Entretien et nettoyage
Inscrivez les numéros
Si vous avez besoin de service d’entretien ou de réparation
Avant d’utiliser votre four mural
De modèle et de série
Ou s’y agripper
Par un réparateur qualifié
Ou d’incendie
Four Autonettoyant
Les éléments du four
64-66
Caractéristiques de votre four mural
Renseignements descriptifs
75, 76, 84, 87
Introduction aux commandes du four
’heure clignote à l’écran après une panne de courant
Moules de cuisson/ plaques à pâtisserie
Écoulement d’air du four Le papier d’aluminium
Conseils de cuisson
Préchauffage
Avant d’utiliser votre four
Régler une cuisson ou un rôtissage
Comment
Cuisson et rôtissage
Appuyez sur la touche Cuisson
Cuisson et rôtissage minutés
Cuisson à minuterie mise en
Arrêt Automatique
Deux options de réglage de départ différé sont disponibles
Papier d’aluminium
Grillage
Appuyez sur Gril à Temp Élevée ou Gril à Temp BAS
Guide de grillage
Côté min Commentaires
Utilisation de la sonde pour la cuisson
Sonde thermique
Utilisation de la sonde pour la rôtissage
Comment régler un rôtissage avec la sonde thermique
Pour adapter vos recettes
Utilisation du four à convection
Casseroles pour la cuisson par convection
Papier et plastique
Deux options de grille sont disponibles
Comment régler une cuisson ou un rôtissage par convection
Convection
Four double seulement, sélectionnez
Entrer
Rôtissage par convection avec la sonde thermique
Du temps
Viande
Rôtissage par convection
Temp. du four
Cuisson et rôtissage par convection minutés
Convection
Cuisson et rôtissage par convection minutés mise en
Supprimer une recette sauvegardée
Recettes préférées
Créer une recette
Sauvegarder ET Débuter LA Cuisson
Pour régler la minuterie
Minuterie et verrouillage des commandes
Verrouillage des commandes
Pour annuler la ou les minuterie, appuyez sur
Four autonettoyant
De votre cuisine
Pour choisir le four
Four autonettoyant
Four mural Appuyez sur Autonettoyage
Trois options d’autonettoyage sont disponibles
Trois options d’autonettoyage sont disponibles
’autonettoyage
Appuyez sur Autonettoyage
Débuter L’AUTONETTOYAGE Appuyez
Après ’autonettoyage
Autonettoyage
Par des cycles d’allumage-extinction durant la Fermentation
Option-Fermentation
Appuyez sur Options
Du four n’est pas suffisamment élevée pour garder
Réglage du four pour conserver les aliments chauds
Pour réchauffer les bols et plats de service
Option-Chaud
Pour rendre les aliments ramollis plus croutillants
Conseils
Appuyez sur Options Appuyez sur Deux Temp
Option-Deux températures
Deux températures
Appuyez sur Départ Après Préchauffage ou Départ à Froid
Cuisson et conservation au chaud
Options-Cuisson et maintien et déshydrater
Déshydrater
Départ différé et arrêt automatique
Option-Départ différé
Départ Après Préchauffage Appuyez sur
Options-Sabbat et Aide
Aide
Pour régler l’horloge
Réglage de la commande de température- faites-le vous- même
Options-Réglages
Appuyez sur Régler L’HEURE
Température en degrés Fahrenheit ou Celsius
Arrêt automatique 12 heures
Dissimulation de l’horloge
Appuyez sur Arrêt Automatique 12 H
Langue
Utilisation de la conversion Auto Recipe auto-recette
Couleur de l’affichage
Appuyez sur SON MARCHE/ARRÊT
Volume
Son marche/arrêt
Appuyez sur OK Appuyez sur OK à nouveau Appuyez sur Prêt
Son et volume par défaut
Signal de la minuterie
Signal de la minuterie de cuisine
LA Minuterie
Entretien et nettoyage
Éléments chauffants du four
Si des aliments brûlés se trouvent sur la grille
Grilles du four
Répétez pour le mécanisme de glissement droit de la grille
Ne soulevez jamais la porte par sa poignée
Enlèvement de la porte du four en la soulevant- enlèvement
Sonde
Enlèvement de la porte
Pour remplacer
Ampoules du four
Pour retirer
Remarque
Surfaces peintes sur certains modèles
Tableau de commande
Pour nettoyer la porte
Vous ne devez ni frottez ni nettoyez le joint de
Solutions de problèmes
Économisez du temps et de l’argent
Économisez du temps et de l’argent
101
102
Service à la clientèle
Pièces et accessoires
Garantie
Partir de la date d’achat original
Garantie Limitée D’UN AN
Cuidado y limpieza
Introducción
Información para los clientes
Servicio al cliente
Si recibe un horno de pared dañado Ahorre tiempo y dinero
Antes de utilizar su horno de pared
Anote los números de modelo y serie
Si necesita servicio técnico
Aviso Importante DE Seguridad
Los controles ni ninguna otra pieza del horno
La cara y los ojos
Antes de realizar cualquier tarea
108
El horno o provocar heridas personales graves
Las paredes del horno
109
114-116
Funciones de su horno de pared
110
125, 126, 134, 137
Tecla CLEAR/OFF BORRAR/ Apagar
Introducción a los controles del horno
111
Papel de aluminio
Flujo de aire del horno
Consejos para el horneado
Precalentamiento
Para horno
Antes de comenzar
Parrillas
De extensión
Cómo
Configurar el horno para hornear o asar
Cancelar
Hornear y asar
Iniciar
Horneado y asado por tiempo
Inicio CON PRECALENT. Toque para precalentar el horno
Programar Contador DE Tiempo
Toque Agregar Opción DE Horneado
Horneado y asado por tiempo Cómo configurar un inicio
Postergado y una parada automática
Toque Encendido Diferido
Toque Asado Alto o Asado Bajo
Cómo configurar el horno para asar a la parrilla
Asar a la parrilla
Toque Iniciar
Guía para asar a la parrilla
118
Ubicación apropiada de la sonda
Sonda de temperatura
Utilización de la sonda para asar
Temperatura elimina las conjeturas acerca de
No guarde la sonda dentro del horno
120
Papel y plástico
Uso del horno de convección
Cómo adaptar recetas
Metal y vidrio
Necesario y siga los pasos anteriores
Horneado o asado por convección
Consejos para el asado por convección
Coloque la rejilla sobre la asadera
Toque Asar CON Convección
Asado por convección con la sonda
La comida es de 200º F 93º C Toque Aceptar
123
Carnes Minutos/Lb
Asado por convección
124
Carne
125
Horneado y asado con convección por tiempo
Toque Hornear CON Convección o Asar CON Convección
Toque Agregar Opción DE Horneado Toque Encendido Diferido
126
Inicio CON PRECALENT. Toque para seleccionar precalentar
Edite una receta guardada Use una receta guardada
Recetas favoritas
Cree una receta
Borre una receta guardada
Bloqueo de controles
Contador de tiempo y control bloqueado
Para programar el contador de tiempo
128
Antes de un ciclo de limpieza
Horno autolimpieza
129
Toque Autolimpieza
Seleccione Oprima Para SELEC. Opciones Horno Inferior u
Oprima Para SELEC. Opciones
Toque Limpieza LIGERA, Limpieza Normal o Personalizar
131
Cómo posponer el inicio de la limpieza
La puerta del horno debe estar cerrada y todos
Después de un ciclo de limpieza
Fermentar
Cuando haya finalizado el fermentación, presione Cancelar
Opción Fermentar
Toque Options Opciones Toque Fermentar
La comida en el modo calendar por más de 2 horas
Opción Caliente
Para que ítems duros queden crocantes
Para calentar tazones y platos para servir
Consejos
Una segunda temperatura con un segundo tiempo de cocción
Opción Dos temp
Dos temp
Toque Inicio CON PRECALENT. o Inicio EN Frío
Deshidratar
Cocinar y calentar
Opciones Cocinar y calentar y deshidratar
137
Comienzo demorado Detención Automática
Opción Comienzo demorado
138
Asado común
Modo Sabático- Cómo programar un horneado
Opción Modo Sabático y ayuda
Función de ayuda
Ajuste del termostato del horno ¡Hágalo usted mismo
Opciones Configuraciones
Toque Options Opciones Toque Configuración
Para ajustar el reloj
Apagado del reloj
Apagado automático 12 Hr
Selección de temperatura en grados Fahrenheit o Centígrados
Toque ENGLISH, Français o Español
Idioma
Color de la pantalla
Toque Aceptar
Encender/ apagar sonido
Volumen del sonido
143
Señal del
Opciones Configuraciones
Sonido/volumen predeterminado
Contad. cocinar
Luego de asar a la parrilla, retire la asadera
Asadera y rejilla
Cuidado y limpieza
Si se han pegado alimentos, salpique la rejilla
Nota no rocíe con Pam ni otros sprays lubricantes
Parrillas para hornos
Repita para el mecanismo deslizante derecho de la parrilla
146
No levante la puerta de la manija
Puerta extraíble del horno- extracción
Sonda
Para quitar la puerta
Para retirar
Cuidados y Limpieza
Luces del horno
Para volver a colocar
Superficies pintadas en algunos modelos
Para limpiar la puerta
Panel De control
No refriegue ni limpie la junta de la puerta
Solución de problemas
Problema Causa Posible
Solución de problemas
151
Notas
152
Producto de propiedad de consumidor del Inscripción
153
Inscripción del consumidor de propiedad de producto
154
Servicios al cliente
155
Garante en los Estados Unidos General Electric Company
Garantía
Garantía POR UN AÑO
Garante en Canadá Mabe Canada Inc