Hp scanjet 4400c series 5400c series scanners User’s manual
Warranty
Copyright information
Trademark credits
Front panel and accessories comparisons
Front panel and accessories comparisons Back to TOC
Front panel and accessories comparisons
HP Scanjet 4400c scanner
HP Scanjet 4470c scanner
HP Scanjet 5400c scanner
HP Scanjet 5470c scanner
HP Scanjet Automatic Document Feeder ADF
HP Scanjet 5490c scanner
Front panel and accessories comparisons Back to TOC
Front panel and accessories comparisons
Glossary Index
Printing this information
Viewing the product tour
Getting started
Using the HP Precisionscan Pro software
Where do I start?
Using the scanner buttons
Using another program
Selecting and preparing items
Items for the scanner glass
Items for the ADF
Items for the XPA
Completing your first scan
To load the item in the scanner
To complete your first scan using the scanner buttons
Copy
Back to TOC
Frequently asked questions
How can I reduce the time it takes to scan?
What is the difference between zooming and resizing?
Should I change the resolution?
What is the difference between screen and print quality?
How can I reduce the file size?
Getting started Back to TOC
Scanning from scanner buttons
Overview of scanner buttons
Scanning from scanner buttons Back to TOC
Back to TOC Scanning from scanner buttons
Scanning quickly with scanner buttons
Scanning to the HP Precisionscan Pro software
To scan to the HP Precisionscan Pro software
Scanning to another program
To scan directly to another program
Sending a scan to a website
To place a scan on a website
Scanning for photo reprints
To create a photo reprint
To view the HP Photo Printing Quick Reference Guide
Sending a scan using e-mail
Supported e-mail programs
Unsupported e-mail programs
To e-mail a scan from the scanner
Done
Selecting original type for e-mail
Naming e-mail attachments
Printing copies
To print copies from the scanner
Changing settings for buttons
To change settings for buttons or update destinations
Utilities, and click HP Scanjet Button Options
Mail tab options
To restore default E-mail button options
List of options for scanner buttons
Destination
Document
Original type
Photo
Prompt for e-mail attachment name
Power Save
Cancel some models only
General tab options
Scanning from scanner buttons Back to TOC
Scanning from HP Precisionscan Pro
Overview of the HP Precisionscan Pro software
Finding help for using the software
Starting the HP Precisionscan Pro software
Scanning from HP Precisionscan Pro
Performing a new scan
To start a new scan
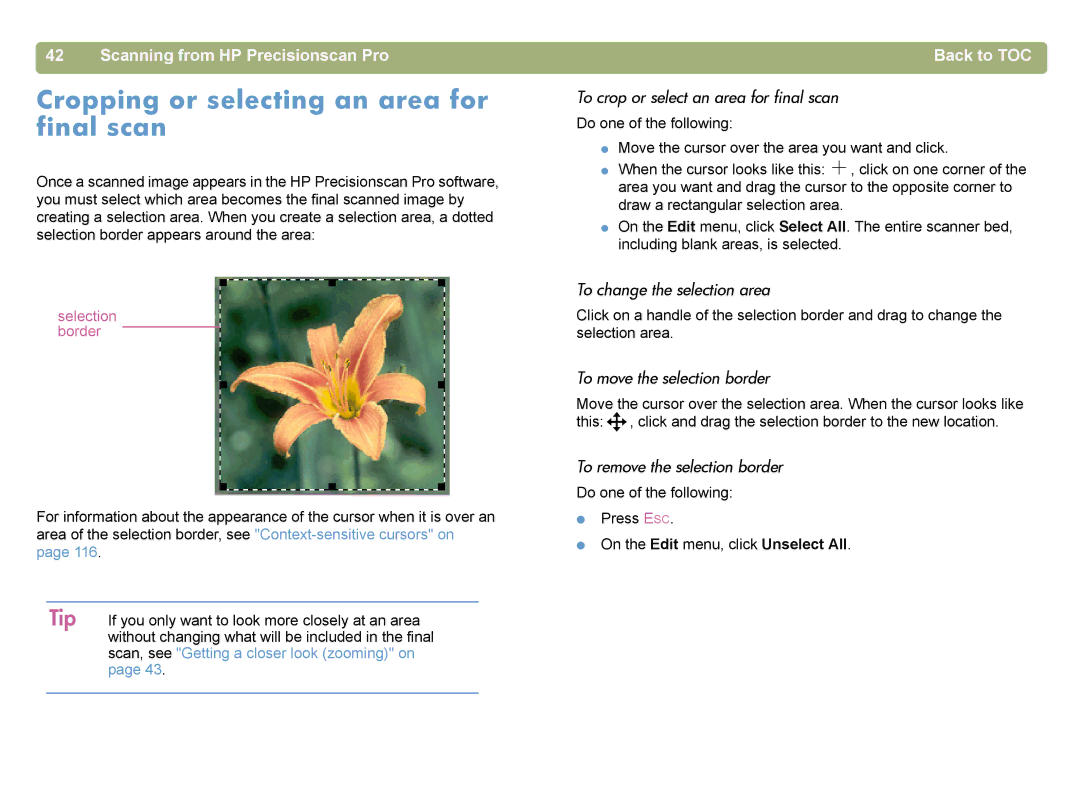
To change the selection area
Cropping or selecting an area for final scan
To crop or select an area for final scan
To move the selection border
To zoom
Getting a closer look zooming
Selecting output type
To zoom out
To reset output type
List of output types
Making optional adjustments, basic
Resizing output dimensions
To resize an image
To reset resolution
Changing resolution
To change resolution
On the Tools menu, click Change Resolution
To rotate an image
Rotating an image
Mirroring reversing an image
To mirror reverse an image
To reset all adjustments
Resetting all adjustments
To reset sharpen levels
Sharpening an image
Making optional adjustments, advanced
Inverting the image
To invert the image
Changing midtones
To return to the default settings
On the Advanced menu, click Adjust Exposure
To lighten the image overall
To decrease detail in lighter areas
Changing highlights
To increase detail in lighter areas
To choose a value as the highlight value
To decrease detail in darker areas
Changing shadows
To increase detail in darker areas
To select a value as the shadow value
Checking for clipped areas
To view and change clipped light highlight areas
To view and change clipped dark Shadow areas
Setting pixel output levels
Scanning from HP Precisionscan ProBack to TOC
To change output levels
Viewing RGB values and pixels
Back to TOC Scanning from HP Precisionscan Pro
To view the RGB values and pixels
Changing the hue
On the Advanced menu, click Adjust Color
About the histogram
To change the hue
Changing the saturation
To increase saturation
To decrease saturation
Changing the black and white threshold
To reset black and white threshold
On the Advanced menu, click Adjust Black & White
To change black and white threshold
To reset to the default colors
Descreening images
To descreen images
Completing the final scan
Sending to a program
To send to a program
To return the image to a Twain program
Returning the image to a Twain program
Saving to a file
To save to a file
List of file types
Image file formats
Text or text-and-image file formats
Printing
Placing a scan on a website
To print
Dragging-and-dropping into another program
Setting the scanned image as wallpaper
Copying and pasting into another program
To copy and paste into another program
To drag-and-drop to the Windows Desktop or a folder
Dragging-and-dropping to the Windows Desktop or a folder
Scanning to CD
To scan to CD
Other features and tips
Tips for best image quality
To save settings
Saving settings
Setting preferences
To use settings
Scanner tab options
Resolution tab options
Selection Area tab options
Text tab options
Controls tab options
Resolution per color
Scanning from other programs Twain
Bit readout 0-255- sets the controls to use 8 bits of tonal
Scanning from other programs WIA
To scan from other programs Twain
To scan from other programs WIA
What to expect from OCR programs
Scanning from HP Precisionscan Pro Back to TOC
Using accessories
Using accessories
Scanning from the ADF
To scan from the ADF
Scanning from the XPA
Scanning slides
To scan slides
HP logo here
Scanning negatives
To scan negatives
Using accessories
To lighten slides or negatives overall
Making optional adjustments for slides or negatives
Adjusting midtones for slides or negatives
To darken slides or negatives overall
Adjusting highlights for slides or negatives
Adjusting shadows for slides or negatives
Viewing RGB values and pixel color
To view RGB values and pixel color
Using accessories Back to TOC
Troubleshooting and maintaining
Checking the basics
Starting troubleshooting
Troubleshooting and maintaining
Scanner or software is not working
Resolving scanner messages
ADF Paper Jam
Windows Me
Windows 98
Click Properties
Windows NT 4.0 and Windows
Scanner is scanning items very slowly
Resolving image-quality issues
To view the Online User’s Manual
Resolving issues with scanned images
Scanned images are too light or too dark
Image is completely black or completely white
Resolving issues with printed copies
Image is too big or too small
Copies are too light
Resolving issues with slides and negatives
Colors are incorrect, or the image is too light or too dark
Resolving issues with editable text
Scanned text is not editable
Resolving issues sending to destinations
To make text editable for a recipient, scan the item to
Cable might be loose. Check that the interface cable is
Change settings for buttons or update destinations on
Resolving issues with accessories
Resolving issues with the XPA
Resolving issues with the ADF
Troubleshooting and maintaining 101
Clearing jams from the ADF
To clear jams at the start of a
Troubleshooting and maintaining 103
To clear jams at the end of a
Troubleshooting and maintaining 105
Cleaning and maintaining
Cleaning the scanner glass
To clean the scanner glass
Cleaning the XPA
Cleaning the ADF glass
To clean the ADF glass
Uninstalling the software
Other resources, support, and specifications
Troubleshooting and maintaining 107
108 Troubleshooting and maintaining Back to TOC
Using software commands and controls
Back to TOC 109
Using keyboard shortcuts and the menus
Using software commands and controls Back to TOC
Using software commands and controls 111
Help Contents Search What’s This?
Using software commands and controls 113
HP Precisionscan Pro tool and information bars
Toolbar
On the Tools menu, click Change Resolution or Sharpen
Using software commands and controls
To add Change Resolution and Sharpen tools to the toolbar
Adding tools to the toolbar
Using software commands and controls 115
Status bar
Context-sensitive cursors
Selection area cursor
117
Glossary
Automatic document feeder
Automatic resolution
Automatic cropping
Bit depth
Clipped pixels
Configure
Click
Converted text
Crop
Default settings
Display resolution
Density
Drop-down list or menu
Drag
Drag-and-drop
Editable text
Focus
Flowed text
Framed text
Front panel
HP Scanjet Copy Utility
Highlights
Histogram
HP Precisionscan Pro software
Interpolation
Interpolated resolution
Interface connection
Invert
Midtones
Optical resolution
Maximum pixel depth
Moiré
Output
Output dimensions
Original
Output type
Resolution
Power Save
Printer resolution
Posting scans
Right-click
Screen resolution
Rich text format
Rotate tool
Sharpen
Settings
Shadow
Slide holder
Tone
Thresholding
Tiff compressed
Toolbar
Windows bitmap
Web palette
Width
Windows metafile
Index
135
Back to TOC 136
Back to TOC 137
See also images
Back to TOC 138
OCR
Back to TOC 139
Back to TOC 140
Back to TOC 141
Back to TOC 142