Manuals
/
IBM
/
Computer Equipment
/
Computer Drive
IBM
x Series 200
manual
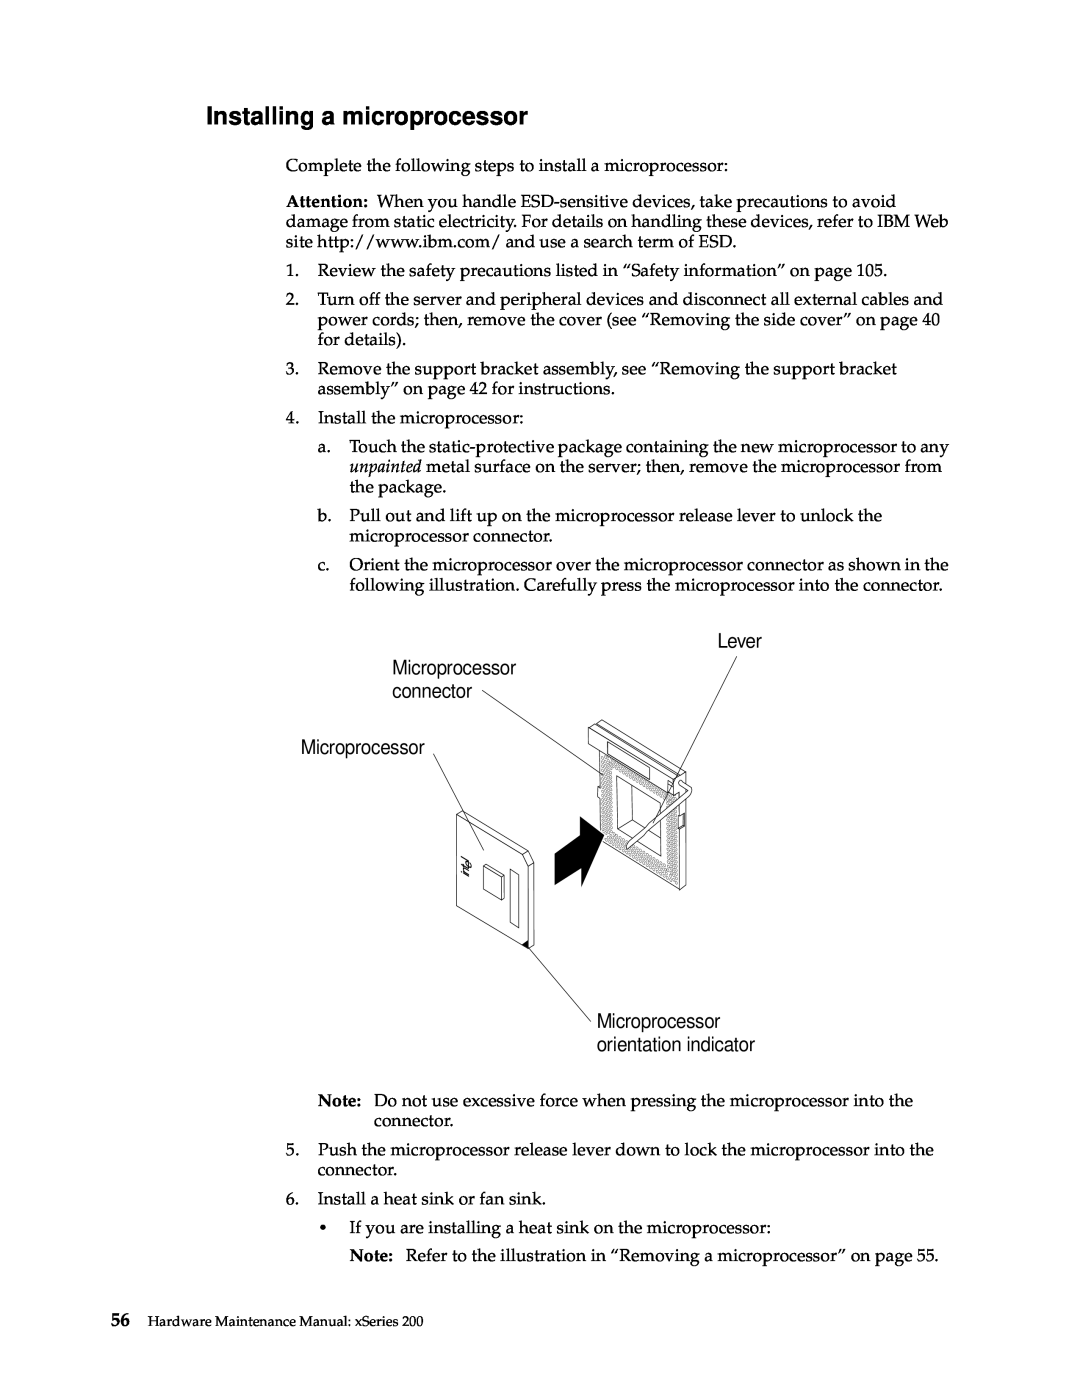
Installing a microprocessor, Microprocessor connector, Lever
Models:
x Series 200
1
64
152
152
Download
152 pages
50.59 Kb
61
62
63
64
65
66
67
68
Install
Parts list
Error codes
Password
Diagnosing errors
Server controls and indicators
Connecting external options
Maintenance
Configuring the server
Network connection problems
Page 64
Image 64
Page 63
Page 65
Page 64
Image 64
Page 63
Page 65
Contents
Hardware Maintenance Manual
xSeries
Page
Hardware Maintenance Manual
Second Edition May
Important safety information
About this manual
Online support
Contents
Diagnostics
Configuring the server
Installing options
FRU information service only
Symptom-to-FRU index
Parts listing
Related service information
General checkout
1. IS THE SYSTEM PART OF A CLUSTER?
2. IF THE SYSTEM IS NOT PART OF A CLUSTER
3. DID YOU RECEIVE BOTH OF THE CORRECT RESPONSES?
Features and specifications
General information
Table 1. Features and Specifications
Reliability, availability, and serviceability
Auto-restart initial program load IPL power supply
Server controls and indicators
Turning on the server
Hard disk drive activity light Power-on light Power control button
Ethernet speed 100 Mbps CD eject button CD-ROM drive activity light
Turning off the server
Diagnostics
Diagnostic tools overview
POST error messages
POST
Diagnostic programs and error messages
Small computer system interface messages some models
Table 2. SCSI messages
Repeating long beeps
Text messages
Using the diagnostics CD
Starting the diagnostic programs
Downloading the diagnostics program
Diagnostic error message tables
Power checkout
Using the diagnostic diskette
1. Insert the IBM Enhanced Diagnostics CD
Recovering BIOS
Replacing the battery
Clearing CMOS
Do not
Dispose of the battery as required by local ordinances or regulations
Throw or immerse into water Heat to more than 100 C 212 F
Repair or disassemble
Diagnosing errors
Temperature checkout
Network connection problems
Troubleshooting the Ethernet controller
Ethernet controller troubleshooting chart
Table 3. Ethernet troubleshooting chart
problem
Ethernet controller
Suggested Action
20 Hardware Maintenance Manual xSeries
Ethernet controller messages
Novell NetWare or IntraNetWare system ODI driver teaming messages
Table 4. NetWare driver messages for the Ethernet controller
22 Hardware Maintenance Manual xSeries
NDIS 4.0 Windows NT driver messages
24 Hardware Maintenance Manual xSeries
Error code
Ethernet teaming messages
This section displays the messages associated with Ethernet teaming
Page
Ethernet controller
28 Hardware Maintenance Manual xSeries
Configuring the server
Using the Configuration/Setup Utility program
Starting the Configuration/Setup Utility program
Choices available from the Configuration/Setup main menu
30 Hardware Maintenance Manual xSeries
System summary
Product data
Devices and I/O ports
Frequency Control
Using passwords
Using the SCSISelect utility program some models
Starting the SCSISelect utility program
Choices available from the SCSISelect menu
Configure/View Host Adapter Settings
Boot Device Options
34 Hardware Maintenance Manual xSeries
SCSI Disk Utilities
Installing options
System and PCI extender board options connectors
Expanded view of the xSeries
System and PCI extender board
System board internal cable connectors
36 Hardware Maintenance Manual xSeries
System board external connectors
Installing options
System board switches and jumpers
Before you begin
System reliability considerations
Working inside the server with the power on
Handling static-sensitive devices
Removing the side cover
Moving the stabilizing feet
40 Hardware Maintenance Manual xSeries
Removing the bezel
Cover-release latch Key lock
Removing the support bracket assembly
42 Hardware Maintenance Manual xSeries
Working with adapters
Adapter considerations
AGP slot PCI slot PCI slot PCI slot PCI slot PCI slot
Expansion slot cover Adapter retaining bracket Adapter
Installing an adapter
Adapter support bracket
Installing a SCSI or ServeRAID adapter some models
Installing internal drives
Internal drive bays
48 Hardware Maintenance Manual xSeries
Bay Bay Bay Bay Bay Bay Bay
Preinstallation steps all bays
Installing a drive in bay 2 or
7. Install the drive
Installing a hard disk drive in bay 5, 6, or
Installing memory modules
52 Hardware Maintenance Manual xSeries
DIMM connector DIMM connector DIMM connector Retaining clip
Removing and installing a microprocessor
54 Hardware Maintenance Manual xSeries
Lever Microprocessor connector Microprocessor Heat sink
Removing a microprocessor
Heat sink retainer Microprocessor orientation indicator
Installing a microprocessor
Microprocessor connector
Lever
Microprocessor
b. Align and place the heat sink on top of the microprocessor
Installing a security U-bolt
58 Hardware Maintenance Manual xSeries
Completing the installation
Installing the cover
Updating the server configuration
Connecting external options
I/O connector locations
Installation procedure
Input/output ports
Power cord connector Mouse Keyboard Parallel Serial A Serial B
Ethernet USB USB Line out Line in Mic MIDI Video
Table 7. Mouse connector pin-number assignments
Table 8. Keyboard connector pin-number assignments
Mouse port
Keyboard port
Parallel connector
Serial connectors
Table 9. Parallel connector pin-number assignments
Ethernet connector
Table 10. Serial connectors pin-number assignments
66 Hardware Maintenance Manual xSeries
The requirements for effectively using IEEE 802.1p tagging are
Universal Serial Bus connectors
Table 11. Ethernet RJ-45 connector pin-number assignments
MIDI connector
Audio connectors
Table 12. USB connector pin-number assignments
Video connector
Ultra 3/160 SCSI connector some models
Table 13. MIDI connector pin-number assignments
Table 14. Video connector pin-number assignments
Domain name validation to negotiate compatible data transfer speeds with each device
Table 15. 68-pin SCSI connector pin-number assignments
72 Hardware Maintenance Manual xSeries
Power supply
FRU information service only
Hard disk drive cage
Rear fan
74 Hardware Maintenance Manual xSeries
System board
FRU information service only
CD-ROM drive
76 Hardware Maintenance Manual xSeries
Floppy disk drive
Button kit
Guide assembly / speaker
78 Hardware Maintenance Manual xSeries
Bezel release latch
Top/side cover
80 Hardware Maintenance Manual xSeries
Handle assembly
Adapter retainer
82 Hardware Maintenance Manual xSeries
To remove the adapter retainer, do the following
4. Remove all adapter cards see “Installing an adapter” on page
5. Rotate the adapter retainer to the open position
84 Hardware Maintenance Manual xSeries
Symptom-to-FRU index
Beep symptoms
86 Hardware Maintenance Manual xSeries
Symptom-to-FRU index
No beep symptoms
88 Hardware Maintenance Manual xSeries
Diagnostic error codes
90 Hardware Maintenance Manual xSeries
Error Code/Symptom
Error symptoms
92 Hardware Maintenance Manual xSeries
Installation program
Setup and Installation CD
The Operating System
POST error codes
In the following error codes, X can be any number or letter
Setup
Action
Error Code/Symptom
96 Hardware Maintenance Manual xSeries
Error Code/Symptom
98 Hardware Maintenance Manual xSeries
Processor board LEDs
Undetermined problems
ServeRAID
Parts listing
14 13
System
Keyboards
Power cords
104 Hardware Maintenance Manual xSeries
12J5120
12J5122
Safety information
Related service information
General safety
Electrical safety
Safety inspection guide
Handling electrostatic discharge-sensitive devices
Safety notices multi-lingual translations
Grounding requirements
To Connect
Do not
To Disconnect
Use safe practices when lifting
Importante
PERIGO
CUIDADO
PRECAUCIÓN
114 Hardware Maintenance Manual xSeries
≥ 18 kg 37 lbs ≥ 32 kg 70,5 lbs ≥ 55 kg 121,2 lbs
Related service information
116 Hardware Maintenance Manual xSeries
Related service information
118 Hardware Maintenance Manual xSeries
Related service information
120 Hardware Maintenance Manual xSeries
Related service information
122 Hardware Maintenance Manual xSeries
Notice n
Connexion
124 Hardware Maintenance Manual xSeries
Déconnexion
≥ 18 kg
≥ 32 kg
126 Hardware Maintenance Manual xSeries
Wichtig
VORSICHT
Kabel anschlieβ en
Kabel lösen
128 Hardware Maintenance Manual xSeries
ACHTUNG
ACHTUNG
Avviso
ATTENZIONE
ATTENZIONE
ATTENZIONE
ATTENZIONE
Related service information
134 Hardware Maintenance Manual xSeries
Related service information
Declaración
Para la conexin
Para la desconexiín
138 Hardware Maintenance Manual xSeries
≥ 55 kg 121,2
PRECAUCIÓN
Send us your comments
Thank you for your response
Problem determination tips
Notices
Trademarks
Page
0406P8517
IBM@
Part Number 06P8517
06P8517
Top
Page
Image
Contents