Instructions
How to forcibly eject a disc
How to reset your unit
Information For U.S.A
Contents
How to change the control panel angle
How to detach/attach the control panel
How to enter the various menus
Control panel
How to change the display information and patterns
Installing the lithium coin battery CR2025
Remote controller RM-RK300
= USB* =CD-CH*/iPod*/D. player
~ Turn on the power
To turn off the power
To drop the volume in a
Moment ATT
To tune in to a station manually
When an FM stereo broadcast is hard to receive
Manual presetting
Enter the Mode menu see
Memory
Select a preset number
Listening to a preset station
Store the station
Playing from an SD card
Playing a disc in the unit
To stop play and eject the disc
About MP3 and WMA tracks
Playing from a USB memory
About the CD changer
To fast-forward or reverse the track
Confirm the selection
Enter the Mode menu see Select a list type
Select a disc/folder/file from the list
Starts playback
Selecting the playback modes
Prohibiting disc ejection
Intro
Repeat Plays repeatedly
Adjust the effect level
Precise settings for the DSP modes
Selecting the DSP modes DSP
DSP modes
Sound modes
Selecting preset sound modes
Select the distance between
Enter the BBE menu see Select the effect level
Enter the EQ menu see Select a band
Storing your own sound modes
Select the band width Q
Band2
Activating crossover network
⁄ Finish the procedure
To adjust reproduced frequency level-X-Over
To adjust subwoofer output- S.woofer
To adjust the input level of each source-Vol Adj
Hz 200.0Hz Rear HPF
Off
Indications Items Settings, reference Demo
Anime
Clock H 12 0
Sirius ID*3
Indications Items Settings, reference
Scroll*4
Auto
Ext In*5
Indications Items Settings, reference Beep
Ext
Tel Muting
Selecting the graphic theme
Selecting timer for the dimmer
Sources
To erase the entire title
Activate your Sirius subscription after connection
Listening to the satellite radio
Check your Sirius ID, see
Activate your XM subscription after connection
Listening to the XM Satellite radio
Searching for category/channel
Storing user channels in memory
Listening to a user preset channel
Checking the XM Satellite radio ID
While selecting XM1, XM2, or XM3, select Channel
List
Selecting a channel from the list
Selecting a category from the list
Select Category
To pause*1 or stop*2 playback
⁄ Adjust the sound as you want. See pages 15
Preparations
Select the desired menu
Selecting a track from the menu
Repeat play
Random play
How to handle discs
How to clean the connectors
Moisture condensation
How to handle SD card
To keep discs clean
To play new discs
Tuner operations
Inserting a disc
General
Playing a CD-R or CD-RW
Playing an MP3/WMA discs
Playing MP3/WMA tracks from an SD card or a USB memory
Changing the source
Setting the sound modes-SEL
Ejecting a disc
Selecting the DSP modes-DSP
Satellite radio operations
Title assignment
IPod or D. player operations
Sound mode
Preset frequency level settings for each sound mode
Available characters
Symptoms Remedies/Causes
Troubleshooting
Tracks are recorded on the disc
Changer
Sounds Symptoms Remedies/Causes
Satellite radio
Radio
Playback stops
Specifications
USB
Call
Liste des pièces pour l’installation et raccordement
Precautions on power supply and speaker connections
Remarques
Extracción de la unidad
Removing the unit
Retrait de l’appareil
Nota
Si ha instalado el sistema de altavoces de 3 vías en su
Si vous avez installé un système d’enceintes à 3 voies
No sound from the speakers
Fuse blows
Sound is distorted
Noise interfere with sounds
Importante
JVC DLP
CD Receiver
Important for Laser Products
Contents
How to detach/attach the control panel
Control panel
Remote controller RM-RK300
FM/AM =CD* =SD* =USB* = CD-CH*/iPod*/D. player* or EXT-IN
To drop the volume in a moment ATT
Storing stations in memory
English
Disc/SD card/USB memory operations
Playing from a USB memory
Ex. When Folder is selected on step
Selecting the playback modes
Prohibiting disc ejection
After making sure No Eject? is selected
Sound adjustments
Selecting preset sound modes
Adjusting Parametric EQ
English
To adjust subwoofer output- S.woofer
Time Set
24Hours Scroll*1
Ext In*2
Indications Items Settings, reference Bright
Set the dimmer end time 24Hours 0
Selecting timer for the dimmer
Discs External Up to 16 characters
IPod/D. player operations
Enter the main menu
Selecting a track from the menu
Moisture condensation
How to clean the connectors
Disc/SD card/USB memory operations
More about this unit
General
Playing MP3/WMA tracks from an SD card or a USB memory
Title assignment
General settings PSM
Available characters
Used for recording
Disc cannot be played back
CD changer
Memory playback
Sounds
IPod/D. player playback
IPod nano
Front/Rear Per channel Output
Allowable Operating Temperature 0C to +40C
Having Trouble with operation?
Will be seriously damaged
Parts list for installation and connection
When using the optional stay / ‡¡ËՄȵ«¬÷- ¥·‡≈Õ‰¥È
Installation IN-DASH Mounting
Typical connections / √‡ËÕ¡µËÕ·ªµ
√‡ËÕ¡‚¥¬„ȉøøÈ
≈À√·Õ¡æ≈‘ø¬‡ÕÕ√χ∑Ëπ-πÈ
This unit does not work at all. * Have you reset your unit?
‘ ¬- ß/æ‘Ÿ ¬≈ß/´- «øŸ‡Õ√
Connecting subwoofer / √µËÕ«Ÿ‡øÕ√
§·π-π
Instructions Buku Petunjuk
English
Contents
How to detach/attach the control panel
Control panel
Remote controller RM-RK300
Getting started
Radio operations
Storing stations in memory
Listening to a preset station
Disc/SD card/USB memory operations
Playing from a USB memory
Other main functions
Prohibiting disc ejection
Sound adjustments
Activating BBE Digital
Adjusting Parametric EQ
English
To adjust subwoofer output- S.woofer
General settings PSM
Indications Items Settings, reference Bright
Selecting the graphic theme
Title assignment
IPod/D. player operations
Selecting a track from the menu
Operations
Disc/SD card/USB memory operations
General
Playing MP3/WMA tracks from an SD card or a USB memory
Title assignment
Available characters
Troubleshooting
Disc cannot be played back
English
IPod nano
Specifications
Section
Ada Masalah dengan cara Pengoperasian?
Peringatan
Memindahkan alat penerima
Pemasangan BINGKAI-DALAM Dash
Typical connections / Ciri khas sambungan-sambungan
Electrical Connections SAMBUNGAN-SAMBUNGAN Listrik
Sekring meledak
Power tidak dapat dihidupkan
Tidak ada suara dari speaker
Suara terdistorsi
Penting
Connecting subwoofer / Menyambungkan subwoofer
Other external component / Komponen eksternal lainnya
GET0365-005A
English
Contents
How to detach/attach the control panel
Control panel
Remote controller RM-RK300
Getting started
Radio operations
Storing stations in memory
Listening to a preset station
Disc/SD card/USB memory operations
Playing from a USB memory
Other main functions
Prohibiting disc ejection
Sound adjustments
Activating BBE Digital
Adjusting Parametric EQ
English
To adjust subwoofer output- S.woofer
General settings PSM
Indications Items Settings, reference Bright
Selecting the graphic theme
Title assignment
IPod/D. player operations
Selecting a track from the menu
Operations
More about this unit
General
Playing MP3/WMA tracks from an SD card or a USB memory
Title assignment
Available characters
Troubleshooting
Disc cannot be played back
English
IPod nano
Specifications
USB
EN, CT
0206DTSMDTJEIN EN, CT
�JVC
�!�
Typical connections
Power cannot be turned on
Connecting the external amplifiers and/or subwoofer
This unit does not work at all
Speaker connections for 3-way network speaker system
Connecting subwoofer
�Changer �21
Connecting the external components
�Ext �21
KD-SH1000
English
Programme
Time countdown indicator
5up / ∞down buttons
Remote controller RM-RK300
Source button Selects the source 5up / ∞down buttons
See also General settings PSM on pages 23
Storing stations in memory
Enter the Mode menu see Select a preset number
Listening to a preset station
Storing your favorite programme types
Searching for your favorite FM RDS programme
What you can do with RDS
PTY codes
PTY Standby Reception
Using the standby receptions
TA Standby Reception
To activate the PTY Standby Reception
What is RDS Radiotext
Using the message service
Network-Tracking Reception
Automatic station selection
Playing from an SD card
Control panel goes
Selecting a disc/folder/track on the list
Current folder Ex. When Folder is selected on step
Prohibiting disc ejection
Precise settings for the DSP modes
Using the equalizer-EQ
Adjusting Parametric EQ
To adjust fader and balance-Fad/Bal
~ Enter the SEL menu see Select a setting item
Fad fader
Bal balance
To adjust subwoofer output- S.woofer
24H/12H 12Hours
Clock H 23 1
CLK Adj
Scroll
PTY Stby
Indications Items Settings, reference Dimmer
AF-Reg
AF Reg
Ext In*4
Displayed only when DAB tuner is connected
Select Theme from the PSM menu
To cancel the title entry without registration, press Menu
To go to the next or previous tracks
Selecting a track from the menu
Start searching for an ensemble
What is DAB system?
Storing DAB services in memory
To search for your favorite service
⁄ Select a service either primary or secondary to listen to
When surrounding sounds are noisy
Announcement Standby Reception
Reception
Announcement types
To show the Dynamic Label Segment DLS information
Select an announce type Finish the procedure
To deactivate the Announcement Standby Reception
Tracing the same programme- Alternative Frequency Reception
Maintenance
FM RDS operations
Disc/SD card/USB memory operations
English
IPod or D. player operations
DAB tuner operations
FM/AM/RDS
General
MP3/WMA
Do not pull out or attach the USB memory repeatedly
DAB
KHz to 1 620 kHz
USB
Vous avez des Problèmes de Fonctionnement?
0106DTSMDTJEIN EN, FR
Retrait de l’appareil
Installation Montage Dans LE Tableau DE Bord
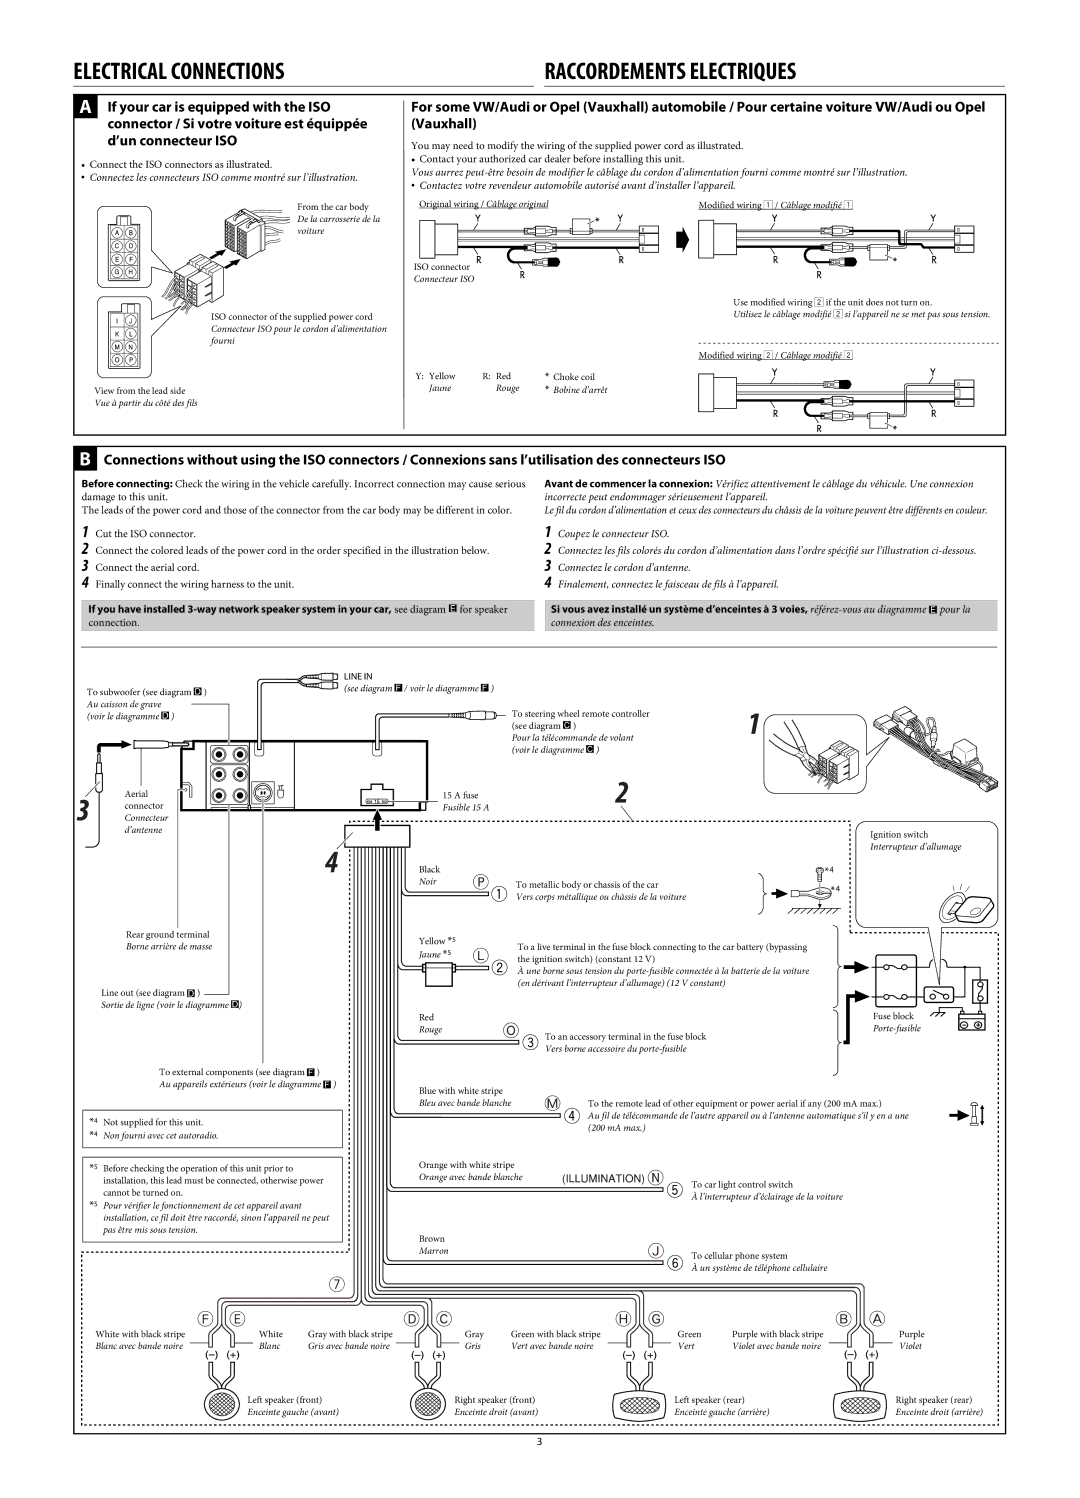
Electrical Connections Raccordements Electriques
Troubleshooting EN CAS DE Difficultes
Voies hautes fréquences/moyennes fréquences/extrêmes graves
Other external component / Autre appareil extérieur
Руcckий Deutsch English
English
Contents
How to enter the various menus
Control panel
Remote controller RM-RK300
Basic operations
Radio operations
Storing stations in memory
Listening to a preset station
PTY Preset List appears
PTY Standby Reception
Programme Search
Disc/SD card/USB memory operations
Playing from a USB memory
Other main functions
Prohibiting disc ejection
Precise settings for the DSP modes
Using the equalizer-EQ
Adjusting Parametric EQ
Activating crossover network
To adjust subwoofer output- S.woofer
General settings PSM
DAB AF*3
Selecting timer for the dimmer
Title assignment
IPod/D. player operations
Selecting a track from the menu
DAB tuner operations
To tune in to an ensemble manually
Reception
To show the Dynamic Label Segment DLS information
Maintenance
More about this unit
General
English
DAB tuner operations
Troubleshooting
Playback
Wma to non-MP3 or WMA tracks
DAB
Specifications
USB
Для получения информации о перезагрузке Вашего устройства
Обратитесь на соответствующую страницу
Precautions on power supply and speaker
Удаление устройства
Removing the unit Ausbau des Geräts
Hinweis
Примечание
Автомобиль оснащен разъемом ISO
Elektrische Anschlüsse
Неиспользованными
For amplifier only
JVC-усилитель
Die Sicherung brennt durch
Wichtig
Внешнее устройство
Тюнер DAB JVC