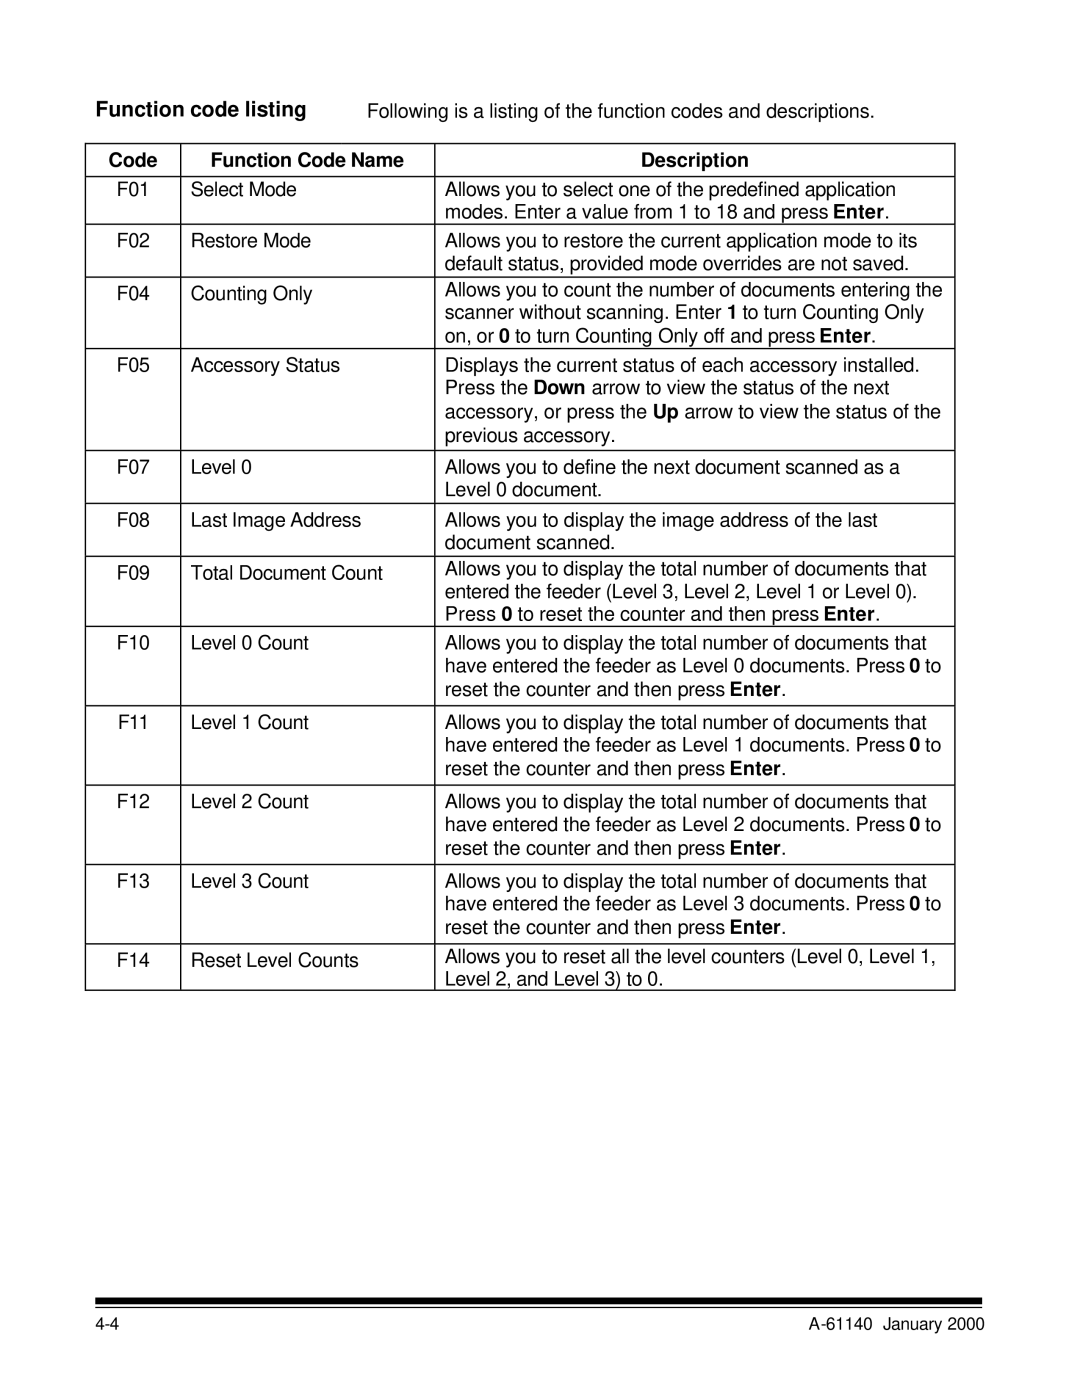
Document Scanner
User’s Guide
A-61140 Part No. 1E8149
IMPORTANT Equipment shall be installed by qualified personnel
Taiwan Japan
Acoustic Emission
ElectroMagnetic Compatibility Statements
United States
Congratulations
Footswitch Workstation Endorser
Bar Code Reader Document Printer front and/or rear Patch Reader
1 Introduction
Scanner features
Scanner options
Front View - Document Scanner
Scanner components
For European units only
Rear View - Document Scanner
Status display
Control panel
Function
indicators
Key/Indicator
Operating keys and
Keys/Indicators
Operating keys and indicators
Function
Turning on the scanner
2 Getting Started
Selecting the language display Calibrating the scanner
Document sizes
Preparing documents for scanning
Unsuccessful calibration
Document orientation
gap semi-automatic feeder
Adjusting the feed and separator roller
4. Press Run
Adjusting the separator roller to scan thick documents
Adjusting the side guides
Adjusting the feed shelf position semi
automatic feeder only
Adjusting the exit hopper side guides and end stop
∙ Standard position ∙ 10 from standard position
Overview
3 Operating the Scanner
Setting Levels
Setting image levels Selecting a mode
Temporary operating values
Feeding documents using the semi- automatic feeder
Feeding documents manually
Feeding thick documents
Feeding documents using the automatic feeder
4 Function Codes
Using function codes
Index/Image Address
Setup
Function code summary
Application Modes
Bar Code Reader
Footswitch
Document Printers
Description
Function code listing
Code
Function Code Name
Function Code Name
Code
Description
Description
Enter
Code
Function Code Name
Enter
Code
Function Code Name
Description
Cleaning tasks Cleaning materials Replacement parts
5 Maintenance
Cleaning the imaging guides
Daily maintenance procedures
6. Dry the imaging guides with a dry, lint-free cloth
10. Close the side access door
CAUTION Open and close the doors slowly
Cleaning the feed and separator rollers semi- automatic feeder
6. Clean the surface of the feed roller assembly with a dry cloth
To clean the feeder module and separator roller
Cleaning the feeder module and separator roller automatic feeder
Cleaning the separator roller
To clean the paper path
CAUTION Open and close the doors slowly
Weekly maintenance procedures
Vacuuming inside the scanner
Vacuuming the horizontal transport area
Page
5-12
Vacuuming inside the side access door
1. Turn the power off 2. Open the side access door
3. Open the upper access door
Cleaning the cabinet
Changing the lamps
Replacement procedures
CAUTION Lamps are fragile. Do not force the lamp into place
10. Close the side access door
Replacing the imaging guides
5. Grasp and hold the new lower imaging guide by the green handle and carefully slide it into place. Make sure the grooves fully engage the track
8. Close the side access door
Replacing the feeder module
Replacing the feeder module and separator roller
Replacing the separator roller
Ordering replacement parts Ordering cleaning materials
Chapter 2, Getting Started Chapter 3, Operating the Scanner
Chapter 7, Troubleshooting
Service Errors
6 Operator Messages
Controlled power- down sequence
Code
Operator message listing
Message Displayed
Description/Action Required
Message Displayed
Code
Description/Action Required
Message Displayed
Code
Description/Action Required
Document Image Manager referred to as SABRE
Code
Message Displayed
Message Displayed
Code
Description/Action Required
Message Displayed
Code
Description/Action Required
Message Displayed
Code
Description/Action Required
Probable Cause
7 Troubleshooting
Trouble and remedy chart
Trouble
Probable Cause
Trouble
Remedy
Trouble
Clearing the
document path
The document path
Clearing documents
CAUTION Open and close the doors slowly
The feeder area
CAUTION Open and close the doors slowly
Horizontal transport plate, lower belt module and lower turn areas
A-61140 January
5. Remove all jammed documents
4. Remove all jammed documents
Vertical transport plate and imaging guide areas
1. Turn off the power switch 2. Open the side access door
To clear the vertical transport plate and imaging guide areas Area B
6. Close the side access door
Removing non-jammed documents
Document exit and upper turn roller areas
Supply
8 Accessories
Supplies
Imaging Station Lamps
United States and Canada
Parts and tools
Part/Tool
Order Number
Using the Bar Code Reader
Code Type
Bar code types
Available
Start/Stop
Before you begin
Enabling bar code reading Enabling the bar code confirmation tone
Performing a bar code test
CAUTION Open and close the doors slowly
Using the Evaluate option
4. Lift the release bar to raise the front scan module
Rear imaging guide
Front imaging
guide
Vertical transport plate
Transparent adhesive tape
Document and surrounding text
Front image guide surface facing the rear of the
Bar code should face the front of the scanner
11. Replace the imaging guide with the bar code attached to it
BC Type = Not found
Message
Message
BC Type = Please Wait
Reflectance Fields Grades A through F
Dimensional Fields Pass or Fail
either dimensional or reflectance fields
Evaluating test results
A Pass
Table 1 - Bar Code Grades
Grade
Field
Code Made Easy, A-61099
Problem Type
Table 2 - Common Causes of Low Bar Code Ratings
Cause
Message
Using the Display option
Bar code was not read
Message
This display gives the decoded value of the bar code read including the *, representing the start character is greater than 15. To see the remaining value, press Enter until all characters have been displayed
Message
Using the Read Rate option
Action
Using the Footswitch
Enabling the confirmation tone Footswitch Pressed actions
Footswitch Pressed
Action
Footswitch Released actions
Footswitch Released
Footswitch Pressed
Patch types
Using the Patch Reader
Patch code placement Printing patches
Patch Reading function codes
CAUTION Open and close the doors slowly
Cleaning the Patch Reader
Changing the horizontal read position
IMPORTANT Do not remove the cable tie from the Patch Reader
Using the Document Printer
Rear Document
Front and rear Document Printer overviews
Front and Rear Document Printer Mounting Plate Views
Front Document
Changing the vertical start print position
Vertical start print position
Horizontal print position
CAUTION Open and close the lower access door slowly
Front print positions
IMPORTANT When repositioning the front Document Printer, be sure the cable magnet is secured to the front Document Printer mounting plate not on the Patch Reader mounting plate, so the printer flat cable does not interfere with the optical path between the front imaging guide and the front scan module
Function codes Using the Print Test function
Front Document Printer
Cleaning the ink cartridge
CAUTION Open and close the doors slowly
6. Raise the holding bar up from the ink cartridge and carriage
13. Slide the ink cartridge back into the carriage
Rear Document Printer
12. Slide the ink cartridge back into the carriage
Replacing the front Document Printer ink cartridge
Replacing the ink cartridge
CAUTION Open and close the doors slowly
6. Raise the holding bar
Press spring clips Cable magnet not shown
Replacing the rear Document Printer ink cartridge
Mode
Appendix A Basic Concepts
Modes
Enabled
Image addresses
Assigning an image address
Using the Next key
Enter
Using Function Code F92
Image address formats
Indexing schemes
Single level indexing
Page
Two level indexing
each document is defined as follows
Page…
Three level indexing
1-40
Three level offset indexing
Controlling document level changes
Checking the meters
Special considerations
Printed on recycled paper
DOCUMENT I M A G I N G
EASTMAN KODAK COMPANY Document Imaging Rochester, New York
A-61140 2/2000 Eastman Kodak Company Printed in U.S.A