Manuals
/
NEC
/
Car Audio and Video
/
Car Satellite Radio System
NEC
NEAX1000IVS
system manual
Inch Rack-Mounting Installation
Models:
NEAX1000IVS
1
21
160
160
Download
160 pages
40.43 Kb
18
19
20
21
22
23
24
25
Specification
Install
Trunking Diagram
If GND Signal GND has to be
Symbol Description
Connecting Covers
System Configurations
Issue
Assembly of SN716 Deskcon
Battery Connection
Page 21
Image 21
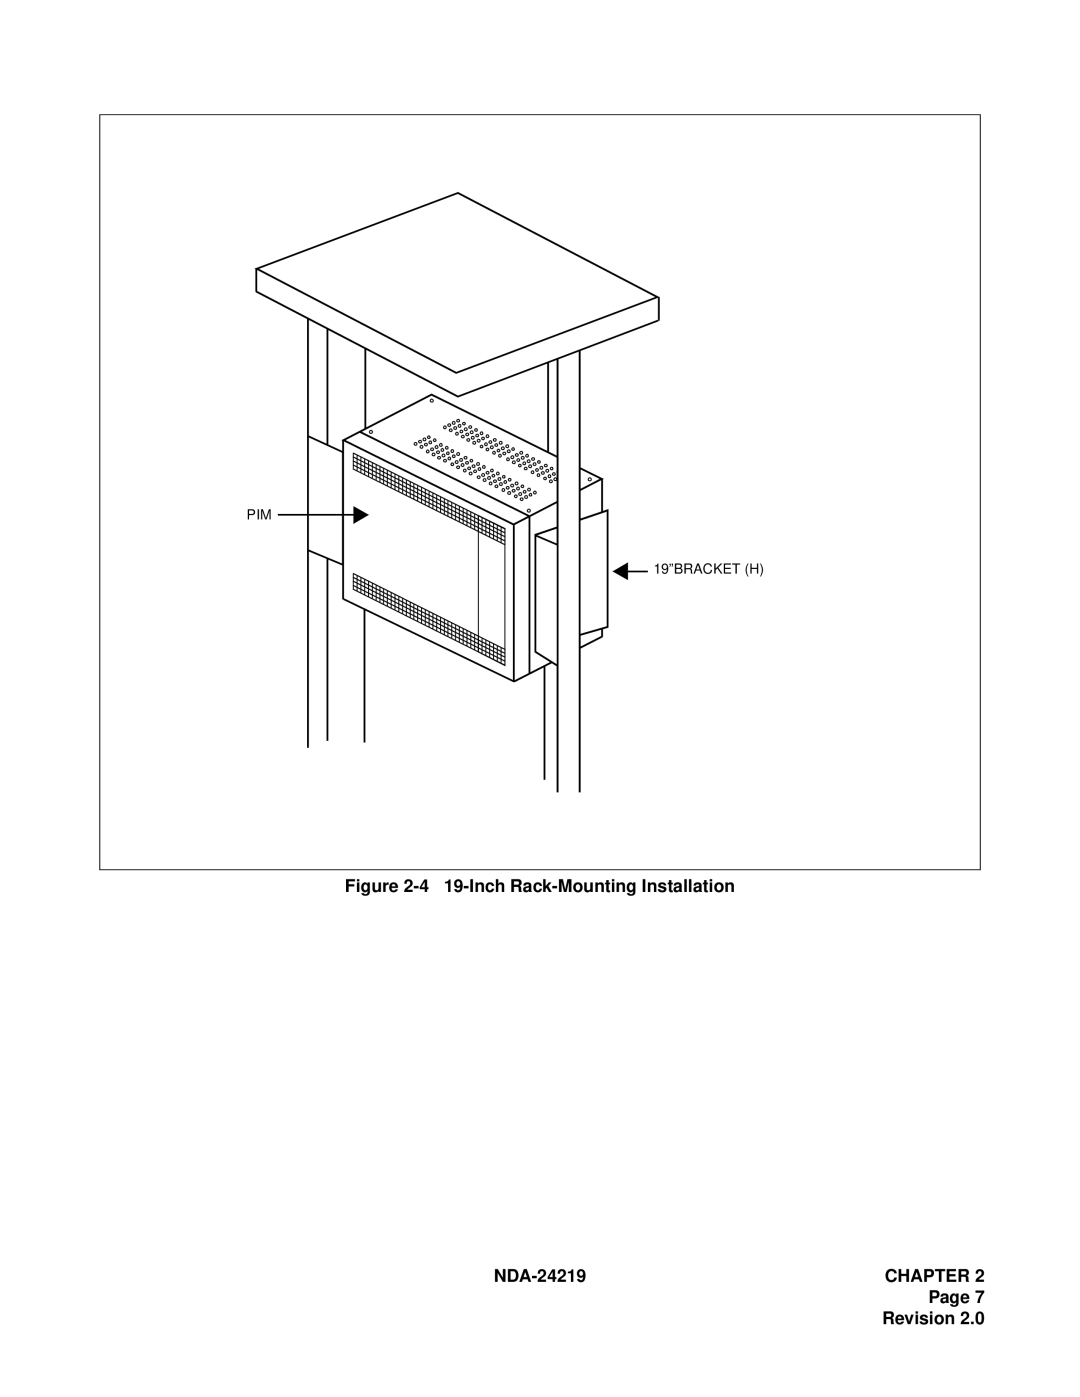
PIM
19”BRACKET (H)
Figure
2-4
19-Inch
Rack-Mounting
Installation
NDA-24219
CHAPTER 2
Page 7
Revision 2.0
Page 20
Page 22
Page 21
Image 21
Page 20
Page 22
Contents
NEC America, Inc
Issue
Liability Disclaimer
NEAX1000 IVS
Table of Contents
NDA-24219 Revision
NDA-24219TABLE of Contents Page iii Revision
List of Figures
NDA-24219LIST of Figures
List of Figures
List of Tables
List of Tables
FCC Part 15 Requirements
Regulatory Requirements
FCC Part 68 Registration Company Notification
Japan USA
Location of FCC Compliance Labels
Service Requirements
Direct-Inward Dialing did Calls
Regulatory Information
Regulatory Information on Single-Line Analog Telephones
Hearing Aid Compatibility
Industry Canada CS-03
Safety Considerations
Safety Certifications
NDA-24219REGULATORY Information Page xi Revision
This page is for your notes
Purpose
Reference Manual
NDA-24219CHAPTER
Scope of Installation Procedures
HOW to Follow this Manual
This manual covers the installation shown in Figure
Chapter
1shows a typical trunking diagram for the PBX
Trunking Diagram
Symbol Description
PIM Configuration
System Configurations
Wall-Mounting Installation
Installation Methods
19-Inch Rack-Mounting Installation
Desktop Installation
3shows the functional outline of installation hardware
Functional Outline of Installation Hardware
Functional Outline of Equipment
Functional Outline of Modules
Functional Outline of Circuit Cards Control Circuit Card
4shows the functional outline of each control circuit cards
Card Name Functional Functional Outline
Application Circuit Cards
Line/Trunk Circuit Cards
PN-DK00
PN-4DITB
PN-4DLCA
PN-4DLCM
Terminal Type Card Type Cable Length Remarks
Standard PN-2DLCB / 2DLCN
SN610 Attcon PN-2DLCC
Long PN-4DLCF
Standard Deskcon
Power supply does not supply ringing voltage
Circuit Card Installation Conditions
Circuit Card Mounting Slots
PZ-PW86/PW112 mounting slot
Installation Conditions
Grounding Requirements
Precautions
Static Electricity Guard
Static Electricity Guard
NDA-24219CHAPTER
Removing/Inserting Circuit Cards
Procedure Circuit Card Condition Insert Remove
Er area may result in exposure to hazard voltages
Procedure Flowchart
Procedure
Static-Sensitive Caution Label
Unpacking Procedure
Unpacking Main Equipment
Confirming Equipment Layout
Marking
Locate and mark the wall mounting points as shown in Figure
Drilling
Install anchor bolts as shown in Figure
WALL-MOUNTING Installation
Wall Type Recommended Fastener
Screwing PIM to Wall
Connecting Covers
Connecting AC Cord to PIM
Inch RACK-MOUNTING Installation
Connecting Rubber Foot to PIM
Desktop Installation
GND Note
AC Power Cabling
GND Note
If GND Signal GND has to be
GND Signal GND Has To be
PWR CNT CA-C Cable Connection between PIMs
AC Power Cable Wiring
Connection of PWR CA-A Cables
Mounting BUS Cards
Battery Connection
Yuasa
Matushita
Installation Date
Battery Replacement Table
Internal Battery Connection
Internal Battery Connection
From Cable Module Connection Number Destination
MDF Cable
PIM0 LTC0 MDF
LTC1
Cable Running to External MDF
LTC Connector Card Slot Number Remarks
Cable Connection to MDF
Connect the cables to the MDF referring to -1and Table
PN-M03
SPN-4RSTB-911
3shows the LTC connector pin arrangement PIM0
PIM1
2shows the cross connections on the MDF for LTC0 and LTC1
MDF Cross Connections
NAP-200-007 Sheet 6/55 Termination of Cables on MDF
NAP-200-007 Sheet 7/55 Termination of Cables on MDF
YL-GN RB0 GN-YL TB0 YL-BR RA1 BR-YL
YL-OR RA0 OR-YL
YL-SL RB1 SL-YL TB1 VI-BL RA0 BL-VI
VI-OR RB0 OR-VI TB0 VI-GN RA1 GN-VI
MDF Cross Connection for 4 Line C.O. Trunk Card PN-4COT
O. Trunk Line C.O. Trunk PN-4COT see Figure
MDF Cross Connection for 8 Line C.O. Trunk Card PN-8COT
Line C.O. Trunk PN-8COT see Figure
Tie Line Trunk 4W E&M Trunk PN-2ODT see Figure
NAP-200-007 Sheet 12/55 Termination of Cables on MDF
2W E&M PN-2ODT see Figure
NAP-200-007 Sheet 14/55 Termination of Cables on MDF
MDF Cross Connection for 2 Line did Trunk Card PN-AUCA
Did Trunk Line did Trunk PN-AUCA see Figure
MDF Cross Connection for 4 Line did Trunk Card PN-4DITB
Line did Trunk PN-4DITB see Figure
Single Line Telephone Standard Line PN-8LC see Figure
11 MDF Cross Connection for Single Line Telephone Long Line
Long Line PN-AUCA see Figure
NAP-200-007 Sheet 19/55 Termination of Cables on MDF
Long Line PN-2DLCB/N see Figure
14 Mounting Handset Support to SN610 Attcon
Jack Set Installation for SN610 Attcon NDA-24219
16 SN610 Attcon Switch Setting
NAP-200-007 Sheet 24/55 Termination of Cables on MDF
17 Cable Connection to SN610 Attcon
18 MDF Cross Connection for SN610 Attcon
MDF Cross Connection see Figure
Day/Night Mode Change by External Key see Figure
20 External TAS Indicator Connection Outline
External TAS Indicator Outline of the Connection see Figure
21 MDF Cross Connection for TAS Indicator with Battery
NAP-200-007 Sheet 30/55 Termination of Cables on MDF
Paging Equipment
24 MDF Cross Connection for Paging Equipment
Control Method Start Ground Start Note Stop Ground Off Open
Less than 10 k Ω When using Pin Jacks on PN-TNTA
When using Pin Jack on PN-CP03
When using Pin Jacks on PN-TNTA
26 MDF Cross Connection for External Tone Source Equipment
NAP-200-007 Sheet 36/55 Termination of Cables on MDF
Connecting Tone Source Supplied with D.C
28 MDF Cross Connection for External BGM Sources
External BGM Source
When using Pin Jacks on PN-TNTA see Figure
30shows an outline of a PFT PN-AUCA connection
MDF Cross Connection for PFT PN-AUCA
31 MDF Cross Connection for PFT PN-AUCA
32shows an outline of a PFT PZ-8PFTA connection
When using PZ-8PFTA card
33 Mounting PZ-8PFTA Card to PIM
Connection of 25-Pair Cable and PZ-8PFTA
PFT Connector Pin Assignment NDA-24219
MDF Cross Connection for PFT PZ-8PFTA
36 MDF Cross Connection for PFT PZ-8PFTA
37shows the cross connection for an Alarm Display Panel
Alarm Display Panel
38 Assembly of SN716 Deskcon
39 SN716 Deskcon Cable Connection
MDF Cross Connection with AC Adapter Power Option see Figure
41 MDF Cross Connection via PN-PW00 Power Option
MDF Cross Connection via PN-PW00 Power Option see Figure
42 Single Line Device Interface
43 Message Center Interface Connection for VM00 to AP00
Circuit Cards Switch Setting
PN-CP03 MP
Locations of Lamps, Switches, and Connectors see Figure
Lamp Indications see Table
Lamp Name Color Function
Switch Setting see Table
Switch Name Setting Function Check Number Position
OFF
Down
Modem OFF
PZ-PW86 PWR Card NDA-24219
PZ-PW86 PWR
PZ-PW86 PWR Card
PZ-PW86D
OFF SW102 Battery Start
Switch Settings see Table
SW301
Press MO
PZ-PW112 PWR Card
PZ-PW112 PWR
PZ-PW112 PWR Card Lamp Indications
Locations of Lamps, Switches and Connectors see Figure
Switch Settings This card has no switches
PN-8COTM/8COTP
PZ-PW86/PZ/PW112 Card Lamp Indication
Mounting Procedure
2shows the mounting method of circuit cards
Installing Card Stopper NDA-24219
System Initialization
All Clear, Except LEN0000 CAT
Resident System Program
System Data Entry
CAT
CNF lamp flashes Press CNF lamp is off
MAT
Feature Programming
CM48
CM08
For providing External Hold Tone Source through the MP card
Description Data
Connecting External Hold Tone Source
Set the switches on the MP card as shown in Figure
CM10
Programming Procedure for Pushbutton Calling
CM12 CM45
Circuit No Card No -03 assigned by CM10E200-E203
CM08 32ms 64ms 80ms 96ms 160ms 192ms 240ms 128ms
CM35
2sec
4sec
Operation Test
Visual Check
Cleaning
Mounting Front Cover
This page is for your notes
Customizing Data
Data Programming Procedure
General Information on Customizing Data Numbering Plan
Step Work Remarks
Trunk Data
Station Data
Call Pickup Group Data
Station Hunting Group Data
Speed Calling-System Data
Port Assignment Table
Card to be Port Assignment Table Remarks Assigned
PN-2DLC
PN-AUC
PN-4COT
PN-4DIT
PN-8RST
PN-2DAT
PN-CFT
PN-2DPC
PN-TNT
PN-2ILC
PN-2AMP
Customer Specification Sheets
Access Code Functions Remarks NDA-24219CHAPTER
Programming CM20
Programming
Trunk Data Table Programming CM10, 30, 35
Programming CM18
Kind of Station Hunting
Secretary Station Station Number Chapter
Programming CM16 Station Number NDA-24219CHAPTER
Speed Calling-System Data Table
Port Assignment Table
System Configuration Port Assignment Table
Bay Face Layout for Module
Functional Name Module Quantity Remarks
PIM SN1420 PIMAB-A TOP/BOTTOM Cover Bracket Bracket H
Card Name
Quantity Table for Circuit Cards
Functional Name Quantity
Card Name
BRI Extmem PN-BRTA
CCH ICH
CIR MFR PN-4RSTC DCH PLO
Top
Page
Image
Contents