Main
Dear Panasonic Customer:
Basic OperationSpecial FeaturesInformation
Contents
IMPORTANT SAFETY NOTICE
Page
Precautions with regard to safety
WARNING
a strange smell coming from the projector, turn off the power and
take the full weight of the projector.
is dropped or the cabinet is broken, turn off the power and disconnect
Page
Page
Page
Before Using
Accessories
Caution when moving the projector
Cautions regarding setup
Do not touch the surface of the projection lens with bare hand.
DLP chips
Lamp
Maintenance
Caution:
Disposal
Location and function of each part
Front
Remote control unit
Side
Top
Bottom
Location and function of each part (continued) Front
Projector Main Unit
Rear
Controls
Side
Location and function of each part (continued)
Connection terminals
Using the remote control unit
Loading batteries
Open battery compartment lid.1.
$ #
Insert the batteries.2.
Setting projector ID number to remote control
Using a wired remote control
Installation
Examples of system expansion
Adjusting the feet
Projection scheme
Installation geometry
When attaching an optional ceiling mount bracket (ET-PKD100H)
Projection distances by the type of projection lenses (optional)
Projection distances by the type of projection lenses
For the screen aspect ratio of 4:3 (Units: m (feet/inches))
Screen size (inch)
Effective height (SH)
Effective width (SW)
Calculation formulas for projection distance by lens types
Installation dimensions diagram
Connection
Before starting connection
The pin-out and signal names of the S-VIDEO IN terminal are shown in the diagram below.
The pin-out and signal names of the RGB2 IN terminal are shown in the diagram below.
The pin-out and signal names of the DVI-D IN terminal are shown in the diagram below.
Example of connecting with VIDEO devices
Example of connecting with personal computers
Installation of (optional) input modules
Installing the input module
Types of the input modules (optional)
Procedure of installation
Remove the slot cover.1.
Insert the input module.2.
Install the two screws.3. Register the input signal.4.
Installation of (optional) input modules (continued)
Connecting signals to the input module
Connecting the signal to the SD-SDI input module
Connecting the signal to the HD/SD-SDI input module
Installation of (optional) input modules (continued)
Connecting the signal to the dual link HD/SD-SDI input module
Connecting signals to the DVI-D input module
How to install and remove the projection lens (optional)
How to install the projection lens
How to remove the projection lens
Projection
Power indicator lamp
Connecting the power cord
Powering up the projector
Making adjustment and selection
Powering off the projector
How to adjust the lens
How to adjust the focus, zoom and shift
Adjustment range after lens position (optical shift)
ET-D75LE6
Zoom Lens
ET-D75LE1 ET-D75LE2 ET-D75LE3 ET-D75LE4 ET-D75LE8
The ET-D75LE5 has a fixed focal point, and so shift adjustment cannot be carried out.
Relationship between lens orientation and screen focus
Procedure for adjusting the focus balance (tilt compensation in the lens
mount)
Structure of lens mount (Figure 2, Figure 3)
Adjustment procedure
How to adjust the lens (continued)
Precautions for projector installation work
Registration of input signal data
Registration of new data
Renaming the registered signals
Press to select the 1. signal whose details are to be displayed.
Press ENTER.2.
Clearing Registered Signals data
1. whose data is to be cleared.
Press DEFAULT.2.
Press ENTER.3.
Sub memory
memory
Press on normal screen 1. (when the menu is not displayed).
How to erase sub memory
On-screen indications
Basic operations using the remote control
Using the SHUTTER
Press SHUTTER on the remote 1. control or the main unit.
Press SHUTTER again.2.
On-screen display
Automatic adjustment (AUTO SETUP)
Press AUTO SETUP on the 1. remote control or the main unit.
Turning on button illumination
Press LIGHT on the remote 1.
Using the FUNC1 button
Changing the picture aspect ratio
Press ASPECT on the remote 1.
On-screen menus
MAIN MENU
SUB MENU
PICTURE (pp. 52-57)
On-screen menus (continued) POSITION (pp. 58-61)
ADVANCED MENU (pp. 62-66)
DISPLAY LANGUAGE (p. 67)
DISPLAY OPTION (pp. 68-74)
PROJECTOR SETUP (pp. 75-82)
Using the menu screens
Press MENU.1.
Press to select the desired 2. item.
Press ENTER to establish your 3. selection.
Returning to the previous screen
Adjusting the picture
Switching the picture mode
Press to select PICTURE 1.
Press to switch PICTURE 2.
Adjusting Contrast
Adjusting Brightness
Adjusts the brightness (black level) of the picture.
Press to select 1. BRIGHTNESS.
Press or ENTER.2.
The BRIGHTNESS individual adjustment screen will be displayed.
desired white balance
Select USER1 or USER2 in 4. Step 3. Press ENTER.5.
Press to select WHITE 6. BALANCE HIGH or WHITE BALANCE LOW. Press ENTER.7.
Press to select RED, 8. GREEN or BLUE. Press to adjust the level.9.
Gamma setting
compensation amount
adjustment)
compensation amount
Registering the picture mode settings as presettings
Setting the system selector
signal
To display pictures complying with the sRGB standard
Adjusting the position
Shift adjustment
Press to select SHIFT.1.
Press ENTER.2.
Press to adjust the 3. position. For horizontal (right and left)
Adjusting the aspect ratio
Press to select ASPECT.1.
Press or ENTER.2.
Press to switch ASPECT.3.
Adjusting the position (continued)
Adjusting the zoom ratio
Press to select ZOOM.1.
Press ENTER.2.
Press to select MODE.3. Press to switch MODE.4.
Press to select 5. INTERLOCKED.
Press to adjust the 3. correction amount.
Press to select SUB 4. KEYSTONE or LINEARITY. Press to adjust the 5. correction amount.
How to use ADVANCED MENU
Digital cinema reality
Press to select BLANKING.
Press to select DIGITAL 1. CINEMA REALITY.
Press or ENTER.2.
Adjusting the input resolution
Press to select INPUT 1. RESOLUTION.
Press ENTER.2.
Adjusting the clamp position
Press to select CLAMP 1. POSITION.
marker
Frame delay
Raster position
Setting the DISPLAY LANGUAGE
Changing the display language
Press to select the desired 1. language.
Press ENTER to establish your 2. selection.
Display Option settings
Adjusting color matching
Press to select COLOR 1. MATCHING.
Press to switch COLOR 2. MATCHING.
If 3COLORS or 7COLORS
and chromaticity coordinates
of a desired color (only
Large Screen Correction
RGB IN (Only RGB input)
DVI-D IN
Press to select DVI-D IN.1.
Press ENTER.2.
Press to switch DVI EDID.3.
Press to switch DVI 4. SIGNAL LEVEL.
AUX DVI IN (Only when the ET-MD77DV is installed)
Press to select AUX DVI IN.
1.
Press ENTER.2.
Press to switch AUX DVI 3. EDID.
On-Screen display setting
Press to select 1. ON-SCREEN DISPLAY.
Press ENTER.2.
Press to select the desired 3. item, and press to change the setting.
OSD POSITION
Setting the startup logo
Press to select STARTUP 1. LOGO.
Press to switch STARTUP 2. LOGO.
Projector setup
Setting a projector ID
Press to select 1. PROJECTOR ID.
Press to switch 2. PROJECTOR ID.
Press MENU twice.3.
Installation Setting
Altitude Mode
Direction
Lamp select
Press to select LAMP 1. SELECT.
Press to switch LAMP 2. SELECT.
Press ENTER.3.
Projector setup (continued)
Lamp relay
Press to select LAMP 1. RELAY.
Press to switch LAMP 2. RELAY.
RS-232C setting
Press to select RS-232C.1.
Status
Press to select STATUS.1.
Press ENTER.2.
Press to move to the next 3. page.
Press to move to the next 4. page.
Auto power off
Press to select AUTO 1. POWER OFF.
Press to switch AUTO 2. POWER OFF.
Setting FUNC1
Setting the date and time
Save all user data
Load all user data
Initialize
Service password
P IN P
Using the P IN P function
Press ENTER.1.
Press to select P IN P 2.
Press to select a function.3.
P IN P (continued)
Displaying the internal test pattern
Test pattern
Press to search through the 1. various types of test patterns. Cycle of displayed internal test
patterns
Setting the security
Displaying the security screen
If using for the first time
Press , , , , , , and 1. in this order.
If the existing password has been changed
Changing the text
Changing the security password
Setting the text
Control device setup
How to use network functions
Network standby
Press to select NETWORK 1. STANDBY.
Press to switch NETWORK 2. STANDBY.
Initial setting of network
Network control
Press to select NETWORK 1. CONTROL.
Press ENTER.2.
Press to select items, and 3. press to change the setting.
Network status
Network connections
Name and function of network function parts
Accessing from the Web browser
Basic control page
Detail control page
Projector status page
Error information page
OK: Normal operation FAILED: Occurrence of trouble
When [FAILED] has appeared for an item
Parameter Description
E-mail setup page
Page
E-mail setup page (continued)
Authentication set up page
Ping test page
Contents of mail sent
Mail with the contents shown below is sent when the E-mail settings have been established.
Mail with the contents shown below is sent when an error has occurred.
Adjust clock page
Network config page
Firmware update page
Using the PJLink protocol
Supported commands
PJLink security authorization
Using the serial terminals
Examples of connection
For RS-232C
Single projector
Multiple projectors
For RS-422
Single projector
Multiple projectors
Pin assignments and signal names
Communication conditions (Factory setting)
Basic format
Control commands
Cable specifications
Connecting to a PC
For RS-232C
When multiple projectors are connected
Using the Remote 2 terminal
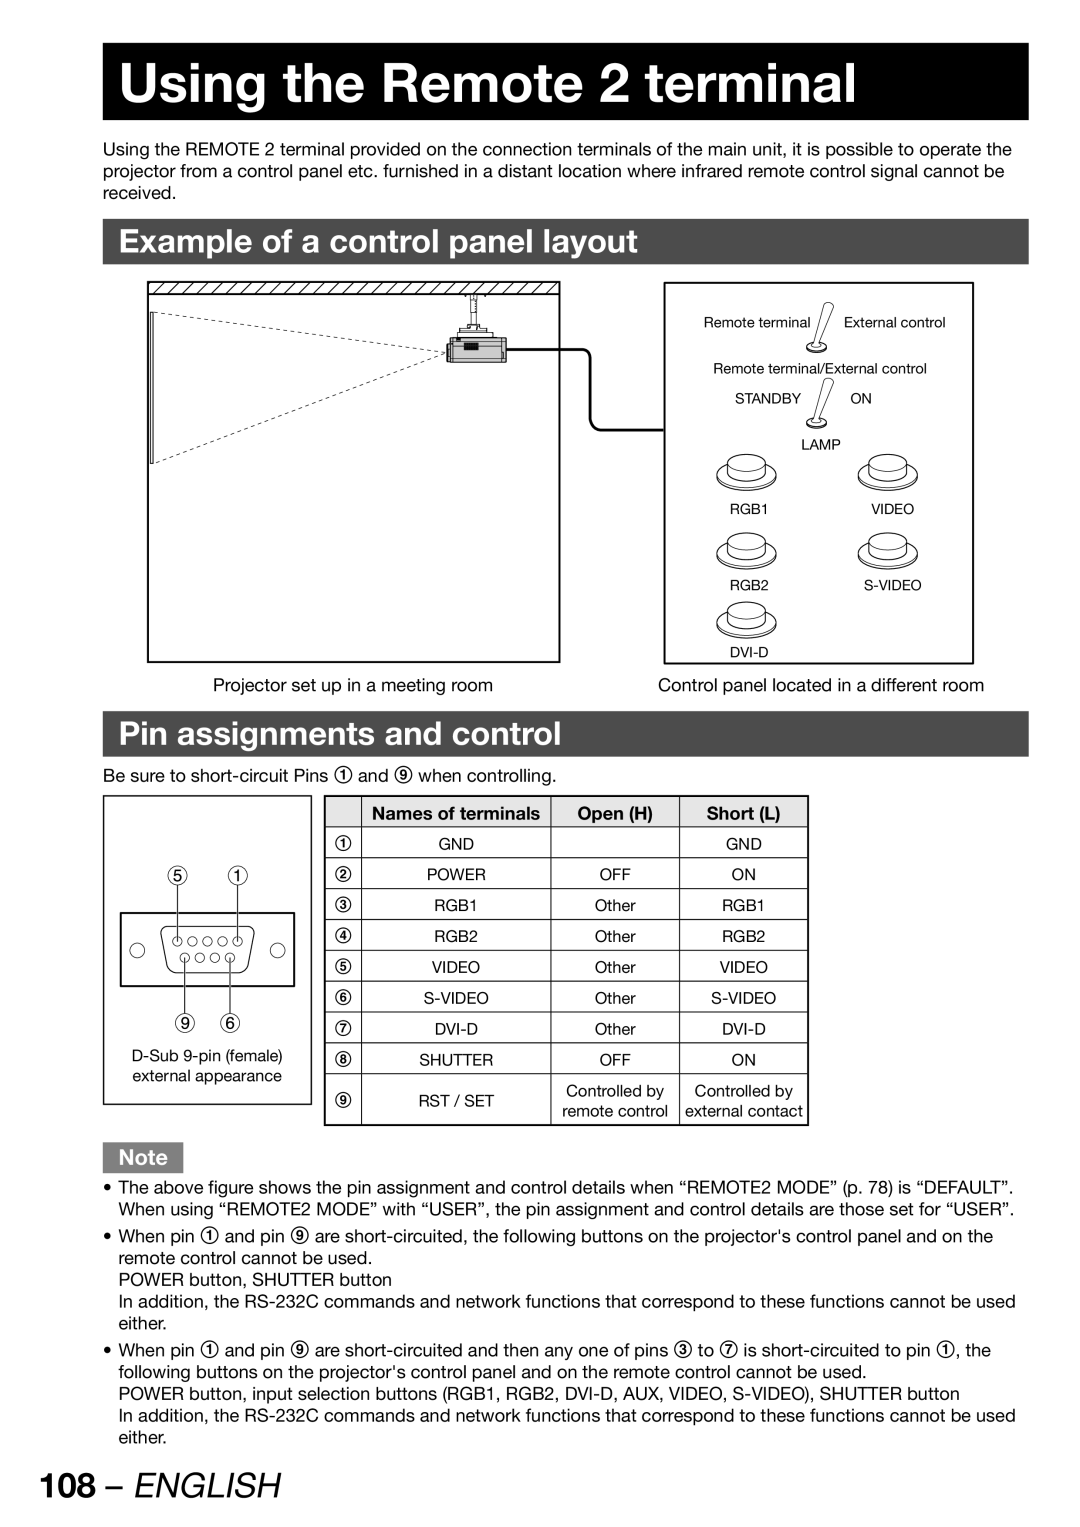
Example of a control panel layout
Pin assignments and control
Monitor Lamp Indicators
LAMP 4 monitor (LAMP 4) LAMP 2 monitor (LAMP 2)
LAMP 1 monitor (LAMP 1) LAMP 3 monitor (LAMP 3)
Temperature monitor (TEMP)
Name of monitor lamp
Cleaning and replacement of air filter
Procedure of cleaning
Page
Replacement of lamp unit
WARNING
Precautions on lamp unit replacement
Timing of lamp unit replacement
Indication after 1 800 hours
Procedure of lamp unit replacement
Notes when installing the ceiling mount bracket
Installation procedure
Before asking for service
Symptoms Check point Page
Self-diagnosis display
Details Remedy
Self-diagnosis display
Details Remedy
The self-diagnosis display and details of the failure may sometimes differ.
Specifications
Model No. PT-DW100U
or more (35
to 40
When the projector is used in high altitude mode (1 400 to 2 700 m), the ambient temperature is 0
. Furthermore, if the ambient temperature becomes 40
Appendix
Compatible Signals
*1: Only when using VESA CVT RB (Reduced Blanking)
Appendix (continued)
List of P IN P
Noise reduction cannot be used.
Subwindow Main window
Dimensions
Outside dimensions
unit : mm (inch)
Index
A
B
C
D
R
S
T
U
W
Information on Disposal in other Countries outside the European Union
Note:
Trademark Acknowledgement
NOTES IMPORTANTES CONCERNANT LA SCURIT
Prcautions de scurit
AVERTISSEMENT
vous remarquez que de la fume ou une odeur suspecte schappe du
rsistant pour supporter le poids du projecteur.
lintrieur du projecteur, de chute du projecteur ou de brisure du
Page
Page
Page
Avant lutilisation
Accessoires
Mise en garde concernant les dplacements du projecteur
Mises en garde concernant la configuration
install lobjectif de projection.
Remarques concernant lutilisation
Pour voir des images trop claires :
Ne jamais toucher la surface de lobjectif de projection avec les mains nues.
Puces DLP
Lampe
Remplacement de la lampe
AVERTISSEMENT
Prcautions prendre lors du remplacement de la lampe
Intervalle de remplacement de la lampe
Indication aprs 1 800 heures
Procdure de remplacement de la lampe