INSTALLING THE SOFTWARE

Installing DV Media Pro Programme

You need to install DV Media Pro to play back recorded

movie fi les or the transferred data from memory camcorder

with the USB cable on your PC. When you install the DV Media Pro software on your Windows computer, you can

enjoy the following operations by connecting your memory

camcorder to your computer via a USB cable.

-View movie recordings on PC:

DV Driver - DirectX9.0 - Video Codec

-PC camera/USB streaming function:

DV Driver - DirectX9.0 - Video Codec

Before you start!

Turn on your PC. Exit all other applications running.

Insert the provided CD into the CD-ROM drive.

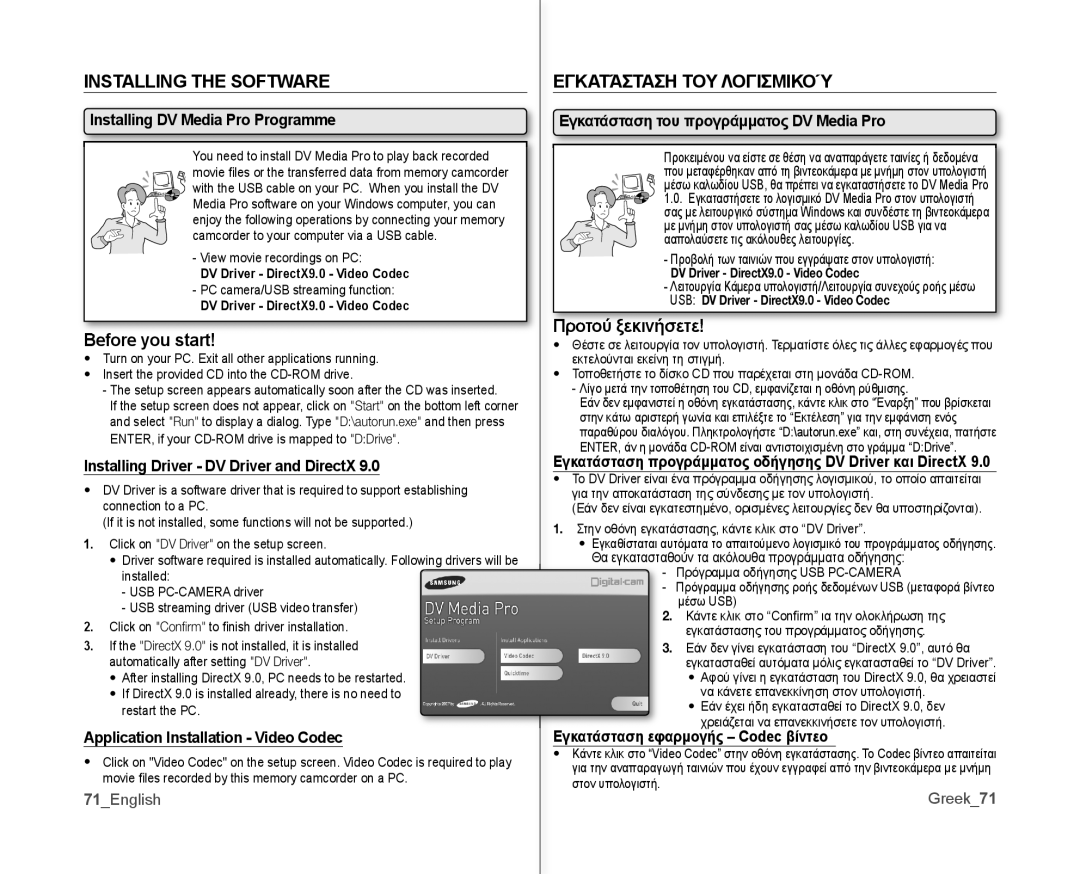
-The setup screen appears automatically soon after the CD was inserted.

If the setup screen does not appear, click on "Start" on the bottom left corner and select "Run" to display a dialog. Type "D:\autorun.exe" and then press

ENTER, if your CD-ROM drive is mapped to "D:Drive".

Installing Driver - DV Driver and DirectX 9.0

DV Driver is a software driver that is required to support establishing connection to a PC.

(If it is not installed, some functions will not be supported.)

1.Click on "DV Driver" on the setup screen.

Driver software required is installed automatically. Following drivers will be installed:

-USB PC-CAMERA driver

-USB streaming driver (USB video transfer)

2.Click on "Confi rm" to fi nish driver installation.

3.If the "DirectX 9.0" is not installed, it is installed automatically after setting "DV Driver".

After installing DirectX 9.0, PC needs to be restarted.

If DirectX 9.0 is installed already, there is no need to restart the PC.

Application Installation - Video Codec

Click on "Video Codec" on the setup screen. Video Codec is required to play movie fi les recorded by this memory camcorder on a PC.

71_English

ΕΓΚΑΤΆΣΤΑΣΗ ΤΟΥ ΛΟΓΙΣΜΙΚΟΎ

Εγκατάσταση του προγράμματος DV Media Pro

Προκειμένου να είστε σε θέση να αναπαράγετε ταινίες ή δεδομένα που μεταφέρθηκαν από τη βιντεοκάμερα με μνήμη στον υπολογιστή μέσω καλωδίου USB, θα πρέπει να εγκαταστήσετε το DV Media Pro 1.0. Εγκαταστήσετε το λογισμικό DV Media Pro στον υπολογιστή σας με λειτουργικό σύστημα Windows και συνδέστε τη βιντεοκάμερα με μνήμη στον υπολογιστή σας μέσω καλωδίου USB για να ααπολαύσετε τις ακόλουθες λειτουργίες.

-Προβολή των ταινιών που εγγράψατε στον υπολογιστή:

DV Driver - DirectX9.0 - Video Codec

-Λειτουργία Κάμερα υπολογιστή/Λειτουργία συνεχούς ροής μέσω USB: DV Driver - DirectX9.0 - Video Codec

Προτού ξεκινήσετε!

Θέστε σε λειτουργία τον υπολογιστή. Τερματίστε όλες τις άλλες εφαρμογές που εκτελούνται εκείνη τη στιγμή.

Τοποθετήστε το δίσκο CD που παρέχεται στη μονάδα CD-ROM.

-Λίγο μετά την τοποθέτηση του CD, εμφανίζεται η οθόνη ρύθμισης.

Εάν δεν εμφανιστεί η οθόνη εγκατάστασης, κάντε κλικ στο “Έναρξη” που βρίσκεται στην κάτω αριστερή γωνία και επιλέξτε το “Εκτέλεση” για την εμφάνιση ενός παραθύρου διαλόγου. Πληκτρολογήστε “D:\autorun.exe” και, στη συνέχεια, πατήστε

ENTER, άν η μονάδα CD-ROM είναι αντιστοιχισμένη στο γράμμα “D:Drive”.

Εγκατάσταση προγράμματος οδήγησης DV Driver και DirectX 9.0

Το DV Driver είναι ένα πρόγραμμα οδήγησης λογισμικού, το οποίο απαιτείται για την αποκατάσταση της σύνδεσης με τον υπολογιστή.

(Εάν δεν είναι εγκατεστημένο, ορισμένες λειτουργίες δεν θα υποστηρίζονται).

1.Στην οθόνη εγκατάστασης, κάντε κλικ στο “DV Driver”.

Εγκαθίσταται αυτόματα το απαιτούμενο λογισμικό του προγράμματος οδήγησης. Θα εγκατασταθούν τα ακόλουθα προγράμματα οδήγησης:

-Πρόγραμμα οδήγησης USB PC-CAMERA

-Πρόγραμμα οδήγησης ροής δεδομένων USB (μεταφορά βίντεο

μέσω USB)

2.Κάντε κλικ στο “Confi rm” ια την ολοκλήρωση της εγκατάστασης του προγράμματος οδήγησης.

3.Εάν δεν γίνει εγκατάσταση του “DirectX 9.0”, αυτό θα εγκατασταθεί αυτόματα μόλις εγκατασταθεί το “DV Driver”.

Αφού γίνει η εγκατάσταση του DirectX 9.0, θα χρειαστεί να κάνετε επανεκκίνηση στον υπολογιστή.

Εάν έχει ήδη εγκατασταθεί το DirectX 9.0, δεν

χρειάζεται να επανεκκινήσετε τον υπολογιστή.

Εγκατάσταση εφαρμογής – Codec βίντεο

Κάντε κλικ στο “Video Codec” στην οθόνη εγκατάστασης. Το Codec βίντεο απαιτείται για την αναπαραγωγή ταινιών που έχουν εγγραφεί από την βιντεοκάμερα με μνήμη στον υπολογιστή.

Greek_71

Page 77
Image 77
Samsung VP-MX10A/XEE, VP-MX10/XEF Installing the Software, Before you start, Εγκατάσταση ΤΟΥ Λογισμικού, Προτού ξεκινήσετε

VP-MX10AH/HAC, VP-MX10/AND, VP-MX10AU/XEO, VP-MX10H/HAC, VP-MX10AU/HAC specifications

The Samsung VP-MX10 series, including models VP-MX10/XEF, VP-MX10H/XEF, VP-MX10AH/XEF, and VP-MX10AU/XEF, is a versatile line of camcorders that caters to both amateur and semi-professional videographers. Known for their user-friendly design and reliable performance, these camcorders provide an excellent combination of features and technologies tailored to capture life's moments with clarity and ease.

One of the standout features of the VP-MX10 series is the high-quality image sensor, which enables users to record in 720p HD resolution. This ensures that videos are vibrant and detailed, allowing for a more immersive viewing experience. The camcorders also incorporate Samsung's advanced optical zoom technology, providing up to 34x optical zoom capabilities. This feature is particularly beneficial for capturing distant subjects without sacrificing image quality, making it ideal for events, wildlife, and sports.

Another significant characteristic of the VP-MX10 series is its intelligent stabilizer system. This technology helps to minimize camera shake, producing smooth and steady footage even when recording in motion or at full zoom. Coupled with the automatic face detection feature, the camcorders ensure that subjects are always in focus, enhancing both the composition and quality of the recorded video.

The VP-MX10 series is designed with convenience in mind. It features a 2.7-inch TFT LCD display that swivels out for easy framing and monitoring while recording. This touch-screen interface allows for intuitive navigation of settings and playback options. Additionally, the camcorders support SD and SDHC memory cards, providing ample storage for extended recording sessions.

Further enhancing the user experience, these camcorders also come equipped with a variety of shooting modes, including night mode for low-light situations, allowing for versatile usage in different environments. The built-in microphone and speaker ensure that sound quality matches the visual clarity, enabling users to capture the full essence of their recordings.

In conclusion, the Samsung VP-MX10 series represents a strong choice for those looking to document their experiences with a reliable and feature-rich camcorder. With its combination of HD recording capabilities, advanced optical zoom, image stabilization, and user-friendly interface, it remains a favored option for both casual users and budding filmmakers alike.