with FOUNDATION Fieldbus Protocol
Reference Manual
Rosemount 2051 Pressure Transmitter
Page
Rosemount 2051 Pressure
Transmitter with FOUNDATION Fieldbus
Rosemount
Reference Manual
Page
Table of Contents
SECTION 1 Introduction SECTION 2 Installation
SECTION 3 Configuration
Rosemount
SECTION Operation and Maintenance
SECTION 5 Troubleshooting
APPENDIX A Reference Data
Rosemount
APPENDIX B Approval Information
APPENDIX C Block Information
Rosemount
Reference Manual
Rosemount
Reference Manual
TOC-4
USING THIS MANUAL SERVICE SUPPORT
Section
Introduction
Rosemount
MODELS COVERED
Rosemount
Reference Manual
Installation
OVERVIEW SAFETY MESSAGES Warnings
Section
Rosemount
GENERAL
CONSIDERATIONS
MECHANICAL
ENVIRONMENTAL
INSTALLATION PROCEDURES
Dimensional Drawings
2051C Coplanar Flange Dimensional Drawing
Rosemount
Coplanar Flange Mounting Configurations with
Rosemount
Reference Manual
00809-0200-4101,Rev AA
2051C Coplanar with Traditional Flange
Rosemount
Reference Manual
Traditional Flange Mounting Configurations with
Optional Brackets for 2-in.Pipe or Panel Mounting
Rosemount
Reference Manual
2051T Dimensional Drawings
2051T with Rosemount 306 Integral Manifold
Rosemount
Reference Manual
Rosemount
Reference Manual
Pipe Mounting
Panel Mounting
2051L Liquid Level
Rosemount
Reference Manual
Mount the Transmitter
Rosemount
Reference Manual
Rosemount
Reference Manual
00809-0200-4101,Rev AA July
Rosemount
Reference Manual
00809-0200-4101,Rev AA July
Rosemount
Reference Manual
00809-0200-4101,Rev AA July
Figure 2-6.Traditional Flange Bolt Configurations
Rosemount
Reference Manual
00809-0200-4101,Rev AA July
Impulse Piping
Rosemount
Reference Manual
Rosemount
Reference Manual
Flow
Process Connections
Rosemount
Reference Manual
Rosemount
Reference Manual
00809-0200-4101,Rev AA July
Housing Rotation
Rosemount
Reference Manual
LCD Display
Tagging
Rosemount
Reference Manual
Conduit Installation
ELECTRICAL
Rosemount
Reference Manual
Wiring
Rosemount
Reference Manual
Transient Protection Terminal Block
Rosemount
Reference Manual
JumpersSecurity
Rosemount
Reference Manual
Grounding
Rosemount
Reference Manual
Figure 2-17.External Ground Assembly
External Ground Assembly
Rosemount
Reference Manual
HAZARDOUS LOCATIONS CERTIFICATIONS
ROSEMOUNT 305, 306 AND 304 MANIFOLDS
Rosemount
Reference Manual
Rosemount 305 Integral Manifold Installation
Procedure Rosemount 306 Integral
Manifold Installation Procedure Rosemount
Conventional Manifold Installation Procedure
Integral Manifold Operation
Rosemount
Reference Manual
Rosemount
Reference Manual
00809-0200-4101,Rev AA July
LIQUID LEVEL MEASUREMENT
Open Vessels Closed Vessels
Rosemount
Reference Manual
Rosemount
Reference Manual
00809-0200-4101,Rev AA July
Rosemount
Reference Manual
00809-0200-4101,Rev AA July
Rosemount
Reference Manual
Configuration
OVERVIEW SAFETY MESSAGES Warnings
Section
Rosemount
DEVICE CAPABILITIES Link Active Scheduler
Capabilities
GENERAL BLOCK INFORMATION Modes
Rosemount
RESOURCE BLOCK FEATURES and FEATURES SEL
Simulation
Rosemount
Reference Manual
MAX_NOTIFY
Rosemount
Reference Manual
Configure the AI block
ANALOG INPUT AI FUNCTION BLOCK
Rosemount
Reference Manual
Configuration Examples
Rosemount
Reference Manual
Rosemount
Reference Manual
00809-0200-4101,Rev AA July
Rosemount
Reference Manual
00809-0200-4101,Rev AA July
Filtering
Low Cutoff
Rosemount
Reference Manual
Process Alarms Alarm Priority
Status Options
Rosemount
Reference Manual
Advanced Features LCD BLOCK
Rosemount
Reference Manual
Rosemount
Reference Manual
00809-0200-4101,Rev AA July
Section 4 Operation and Maintenance
OVERVIEW SAFETY MESSAGES Warnings
Rosemount
Reference Manual
STATUS Master Reset Method Simulation
Rosemount
Reference Manual
CALIBRATION Sensor Calibration
Upper and Lower Trim Methods
Rosemount
Reference Manual
Sensor Calibration, Zero Trim Method
Factory Calibration Method
Rosemount
Reference Manual
Section 5 Troubleshooting
OVERVIEW SAFETY MESSAGES Warnings
Rosemount
Reference Manual
TROUBLESHOOTING GUIDES
Rosemount
Reference Manual
00809-0200-4101,Rev AA July
Figure 5-2.Problems with communications flowchart
Rosemount
Reference Manual
00809-0200-4101,Rev AA July
Table 5-1.Troubleshooting guide
Rosemount
Reference Manual
00809-0200-4101,Rev AA July
RESOURCE BLOCK
Rosemount
Reference Manual
SENSOR TRANSDUCER BLOCK
Rosemount
Reference Manual
LCD TRANSDUCER BLOCK
Rosemount
Reference Manual
ANALOG INPUT AI FUNCTION BLOCK
1.Put Resource block into OOS Out of Service
Rosemount
Reference Manual
00809-0200-4101,Rev AA July
DISASSEMBLY PROCEDURES Remove from Service
Remove Terminal Block
Rosemount
Reference Manual
Remove the Electronics Board
Rosemount
Reference Manual
REASSEMBLY PROCEDURES Attach the
Electronics Board Install the Terminal Block
Reassemble the 2051C Process Flange
Rosemount
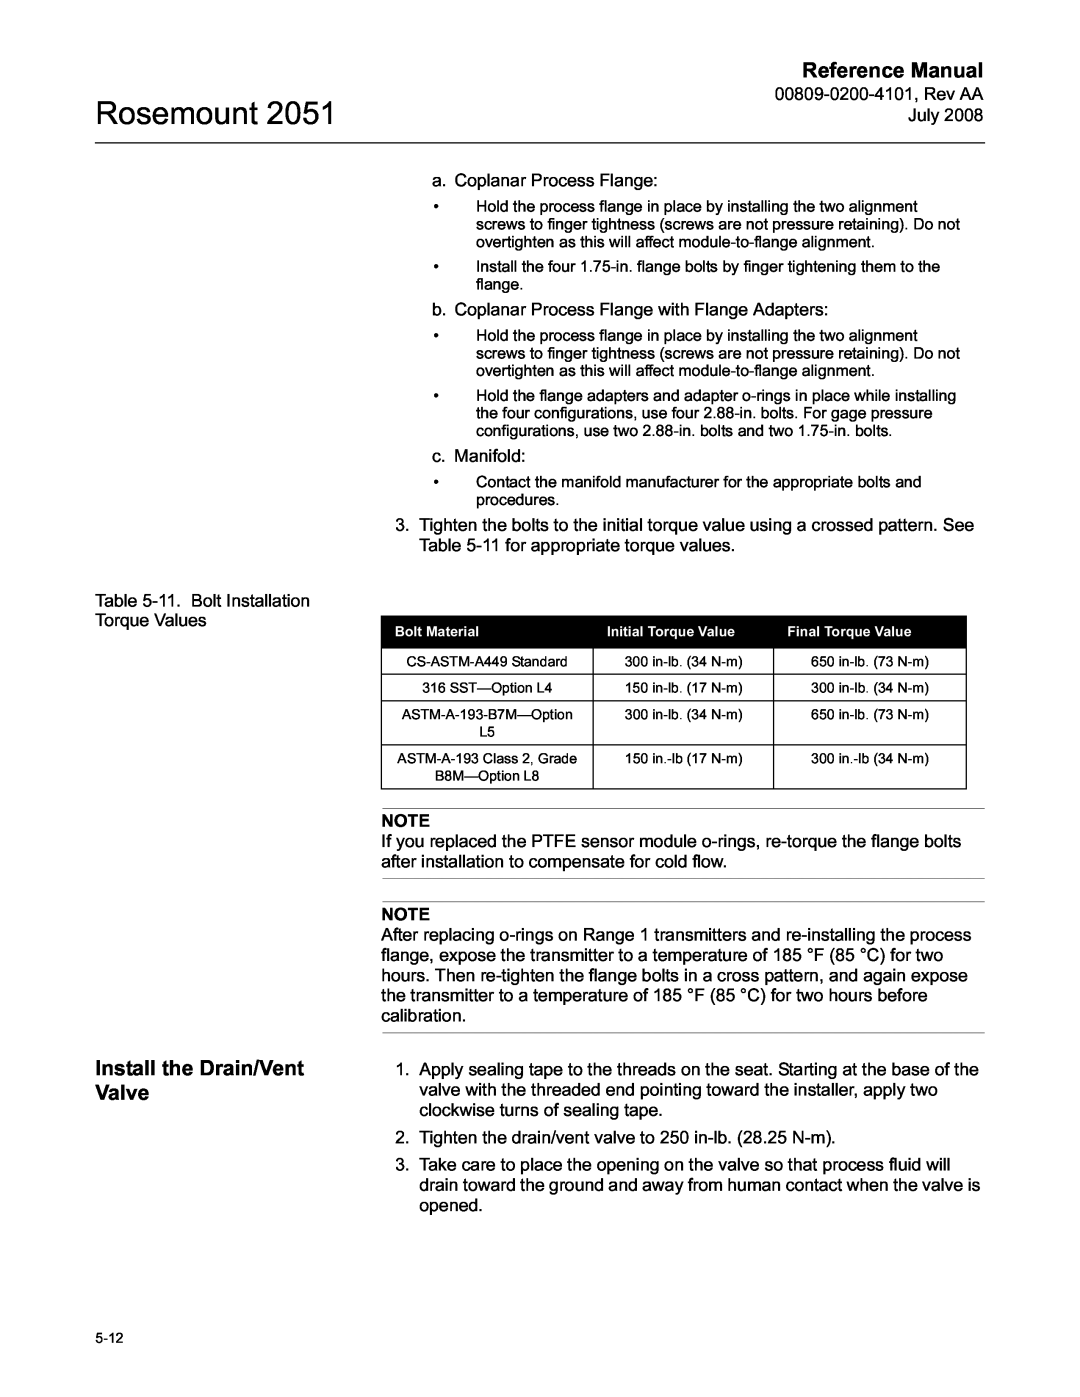
Install the Drain/Vent Valve
Rosemount
Reference Manual
PERFORMANCE SPECIFICATIONS
Conformance To Specification ±3σ Sigma
Appendix A
Reference Data
Long Term Stability
Dynamic Performance
Line Pressure Effect per 1000 psi 6,9 MPa
Rosemount
Vibration Effect Power Supply Effect
Ambient Temperature Effect per 50F 28C
Mounting Position Effects
Electromagnetic Compatibility EMC
FUNCTIONAL SPECIFICATIONS Range and Sensor Limits
Service
Protocols
Rosemount
Rosemount
Reference Manual
00809-0200-4101,Rev AA July
Overpressure Limits
Rosemount
Reference Manual
Static Pressure Limit Burst Pressure Limits
Temperature Limits
Rosemount
Reference Manual
Humidity Limits Volumetric Displacement Damping
Failure Mode Alarm
Rosemount
Reference Manual
PHYSICAL SPECIFICATIONS Electrical Connections
Process Connections 2051C Process Wetted Parts
2051T Process Wetted Parts
2051L Process Wetted Parts
Non-WettedParts for 2051C/T/L
Rosemount
Reference Manual
Shipping Weights
Table A-4.Transmitter Weights without Options
Table A-5.2051L Weights without Options
Table A-6.Transmitter Options Weights
ORDERING INFORMATION
Rosemount
Reference Manual
Rosemount
Reference Manual
Alternate Process Connection: Flange2
Rosemount
Reference Manual
CSA FISCO Intrinsically Safe
Rosemount
Reference Manual
A-15
Rosemount
Reference Manual
GGage AAbsolute
Rosemount
Reference Manual
FM Intrinsically Safe, Division
Rosemount
Reference Manual
Special Certifications Q4 Calibration Certificate
Prior-usecertificate of FMEDA data
Rosemount
Reference Manual
4 -300to 300 psi/3 psi -20,7to 20,7 bar/0,2 bar
Rosemount
Reference Manual
Syltherm XLT
ATEX Flameproof, Intrinsic Safety, Type n, Dust
Rosemount
Reference Manual
OPTIONS
Rosemount
Reference Manual
Rosemount
Reference Manual
00809-0200-4101,Rev AA July
Rosemount
Reference Manual
00809-0200-4101,Rev AA July
SPARE PARTS
Rosemount
Reference Manual
LCD Display, FOUNDATION fieldbus
Rosemount
Reference Manual
Nickel-platedcarbon steel
Rosemount
Reference Manual
Gage Flange and Adapter Bolt Kit Set of
Rosemount
Reference Manual
A-28
OVERVIEW SAFETY MESSAGES
Appendix B Approval Information
Warnings
Approved Manufacturing Locations
European Directive Information
FIELDBUS PROTOCOL
Hazardous Locations Certifications
Rosemount
Rosemount
Reference Manual
00809-0200-4101,Rev AA July
Rosemount
Reference Manual
00809-0200-4101,Rev AA July
Rosemount
Reference Manual
00809-0200-4101,Rev AA July
Rosemount
Reference Manual
00809-0200-4101,Rev AA July
Rosemount
Reference Manual
00809-0200-4101,Rev AA July
APPROVAL DRAWINGS Factory Mutual FM
Rosemount
Reference Manual
Rosemount
Reference Manual
Rosemount
Reference Manual
B-10
Rosemount
Reference Manual
B-11
Rosemount
Reference Manual
B-12
Rosemount
Reference Manual
B-13
Rosemount
Reference Manual
B-14
Rosemount
Reference Manual
B-15
Rosemount
Reference Manual
B-16
Rosemount
Reference Manual
B-17
Rosemount
Reference Manual
B-18
Rosemount
Reference Manual
B-19
Rosemount
Reference Manual
B-20
Canadian Standards Association CSA
Rosemount
Reference Manual
B-21
Rosemount
Reference Manual
B-22
Rosemount
Reference Manual
B-23
Rosemount
Reference Manual
B-24
Rosemount
Reference Manual
B-25
Rosemount
Reference Manual
B-26
Rosemount
Reference Manual
B-27
Rosemount
Reference Manual
B-28
Rosemount
Reference Manual
B-29
Rosemount
Reference Manual
B-30
Appendix C
Block Information
TRANSDUCER BLOCK Overview
Rosemount
Parameters and Descriptions
Rosemount
Reference Manual
Rosemount
Reference Manual
PRIMARY_VALUE_RANGE
Rosemount
Reference Manual
00809-0200-4101,Rev AA July
Rosemount
Reference Manual
00809-0200-4101,Rev AA July
Troubleshooting
Overview
Rosemount
Reference Manual
Rosemount
Reference Manual
Parameters and Descriptions
00809-0200-4101,Rev AA July
Rosemount
Reference Manual
FLANGE_MTL
Rosemount
Reference Manual
REM_SEAL_FILL
Rosemount
Reference Manual
Simulate_STATE
Block Errors
Rosemount
Reference Manual
00809-0200-4101,Rev AA July
Rosemount
Reference Manual
00809-0200-4101,Rev AA July
Rosemount
Reference Manual
Mode will not leave
Rosemount
Reference Manual
C-14
Index
Rosemount
Reference Manual
Rosemount
Reference Manual
00809-0200-4101,Rev AA July
Rosemount
Reference Manual
00809-0200-4101,Rev AA July
Rosemount
Reference Manual
Index-4
Rosemount
Reference Manual
00809-0200-4101,Rev AA July NOTES
Rosemount
Reference Manual
Page
Rosemount
¢00809-0100-4801V¤
Reference Manual