Manuals
/
Extron electronic
/
Home Audio
/
Stereo System
Extron electronic
DVS 605
manual
DVS using the LockIt bracket as follows
Models:
DVS 605
1
14
98
98
Download
98 pages
46.7 Kb
11
12
13
14
15
16
17
18
Specifications
Scalers And Signal Processors
Password
Symbol Definitions
Hardwired IR Port
Warranty
Input Configuration
User Presets
IP setup commands
•Commands and Responses
Page 14
Image 14
Page 13
Page 15
Page 14
Image 14
Page 13
Page 15
Contents
User Guide
SCALERS AND SIGNAL PROCESSORS
with Seamless Switching
HDCP-CompliantScaler
Chinese Simplified(简体中文)
Safety Instructions
Safety Instructions • English
Instructions de sécurité • Français
Trademarks
FCC Class A Notice
Copyright
Conventions Used in this Guide
Specifications Availability
Software Commands
Notifications
SIS Communication and Control
Contents
Using the Default Web Pages
Mounting the DVS
Introduction
DVS 605 Series Description
Package
Licensed Third-partySoftware Used in the DVS
Licensed Third-partySoftware Used in the DVS
License
Video Outputs
Key Features
Video Inputs
DVS 605 • Introduction
Audio
General
DVS 605 • Introduction
Controlling the DVS
Rear Panel Cabling
DVS 605 Rear Panel Features — All Models
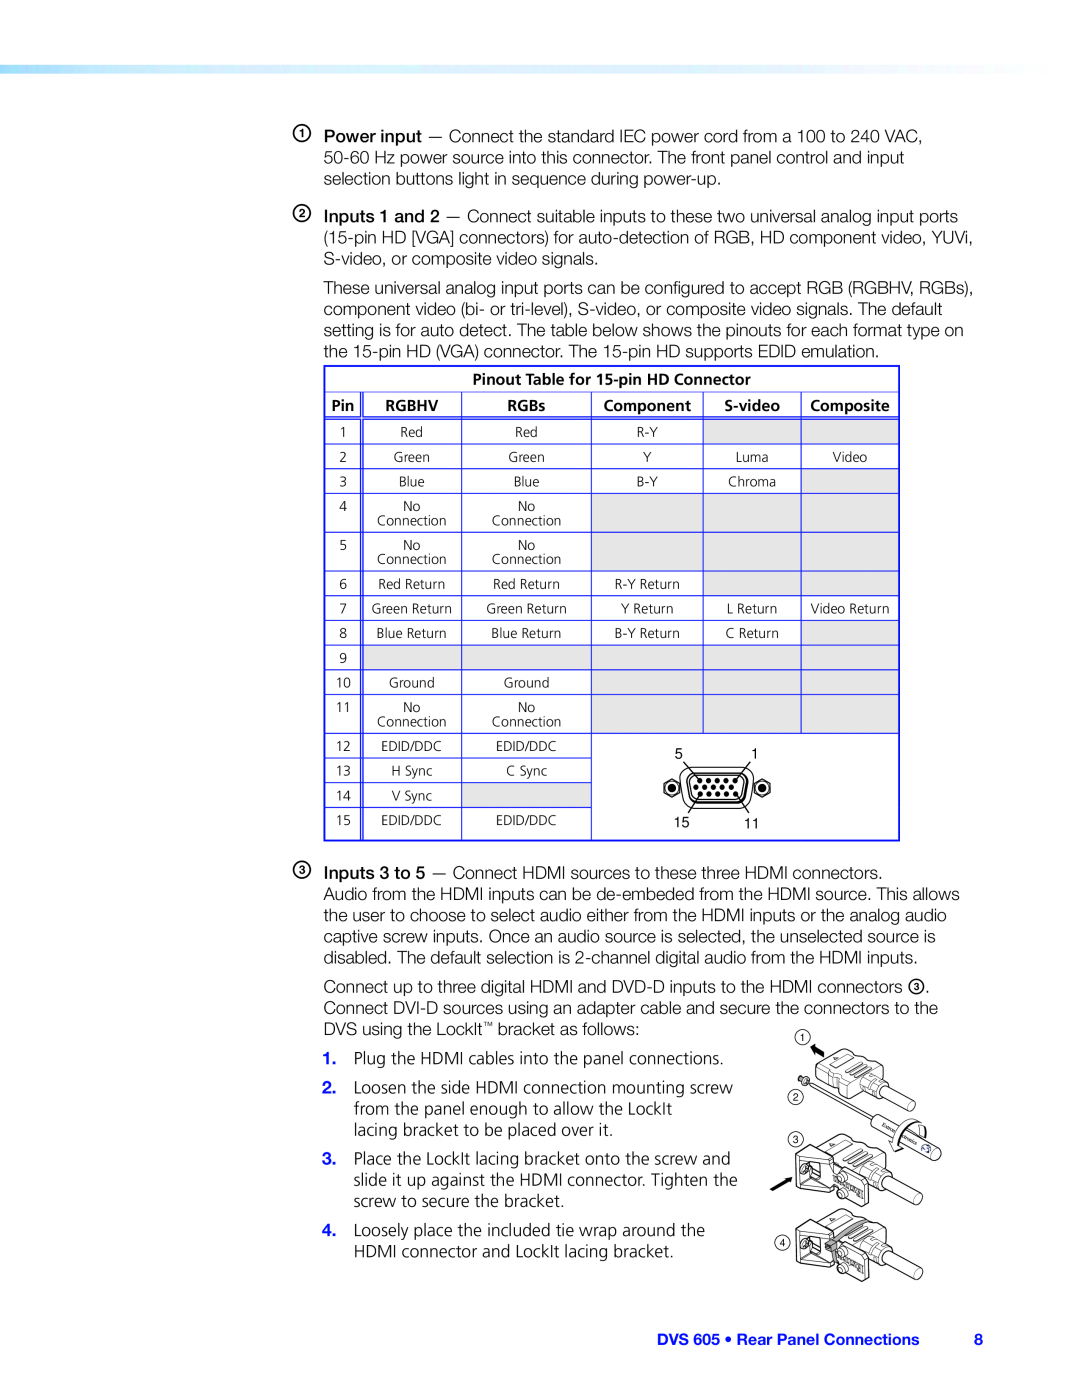
Rear Panel Connections
Figure
DVS using the LockIt bracket as follows
Figure
Audio Input Connector Wiring
Figure 2. LockIt Bracket Mounting Options
Figure 6. RJ-45LAN Connector Wiring
Figure 4. Audio Output Connector Wiring
Figure 5. Audio Output Connector Wiring
DVS 605 • Rear Panel Connections
Figure 7. DVS 605 Front Panel Features
•Front Panel Overview •Powering Up
•Other DVS 605 Operating Features
Operation
Menu Navigation Using Front Panel Controls
Powering Up
Default Display Cycle
Figure 8. Typical Default Display Cycle
Menu Overview
Figure 9. Top Level Menus
Figure 10. Main Menu
DVS 605 • Operation
Picture Control
User Presets
Figure 11. User Preset Menu
Figure 12. Picture Control Menu
Input video types
Input Configuration
Figure 13. Input Configuration Menu
Input
Figure 14. Output Configuration Menu
Output Configuration
Resolutions and Refresh Rates
HDMI Format
Analog Output Format
Sync Polarity
HDCP Notification
Genlock/AFL Modes
HDCP Status: Inputs & Outputs
HDCP Authorized
Genlock/AFL Offset Description
Figure 17. Audio Configuration Menu
Audio Configuration All Models
Audio Delay Setting
Aspect Ratio
Advanced Configuration
Figure 18. Advanced Configuration Menu
Auto Memory
Auto-Imagethreshold settings
Auto-Image
Test pattern
Switch type
Overscan
OSD duration
Figure 21. Edit Comm Settings Menu
View Comm Settings
Factory Reset
Exit Menu
Enable Executive Mode
Front Panel Lockout Executive Modes
Figure 22. Front Panel Lockout
Disable Executive Mode
Window vs. Image Size Position — An Overview
DVS 605 Operation
NOTES
Picture-in-picturePIP Mode
Front Panel Activation
PIP Presets
Figure 24. Default Main and PIP Window Layouts
Custom EDID/Custom Output Resolution
Other DVS 605 Operating Features
Power Save
Screen Save
Audio Format
Hardwired IR Port
The OSD Bug
Audio Source
Figure 25. Reset Mode Comparison
Resetting the Unit
DVS 605 Reset Mode Summary
Reset All IP Reset to Factory Defaults Settings
•Commands and Responses
SIS Communication and Control
Copyright Information
Host to Scaler Communications
Error Responses
Commands and Responses
Password Information
Error Response References
Symbol Definitions
DVS 605 • SIS Communication and Control
Figure 29. SIS Command EDID Table
DVS 605 SIS Communication and Control
DVS 605 SIS Communication and Control
DVS 605 • SIS Communication and Control
SIS IP command definitions
DVS 605 • SIS Communication and Control
DVS 605 • SIS Communication and Control
ASCII Command
SIS Command and Response Table
Command
Response
Auto-Image
Additional Description
Input name
Horizontal start
Response
Command
ASCII Command
Additional Description
Color
Picture Adjustments
Video mute
Tint
Horizontal position image
Horizontal position window
Vertical position window
Vertical position image
Horizontal size image
Output Configuration
Power save mode
Output scaler rate
Audio delay available on all models
Audio Configuration Audio mute global settings
Volume control audio models only
Command
Audio follow
Audio input format
Audio output format
Command
Input presets
Presets User presets
User preset name
Input preset name
Freeze
Advanced Configuration
Test pattern
Auto memories per input
Front panel security lockout Executive Mode
Video effect
Effect duration
HDCP notification green screen/message
Genlock/AFL Offset
Video signal presence
Genlock
Command
Picture In Picture
Hardwired IR port
Reset commands
PIP on/off
Product naming
Backup/restore configuration
Information request
Command
Command
Ethernet data port
Firmware version requests
ASCII Telnet
Command
IP setup commands
Information requests
ASCII Telnet
NOTE:
E X12!CA
Re-mapport designations
Directory commands
File erase commands
Command
•Accessing the Default Web Pages
Using the Default Web Pages
Accessing the Default Web Pages
Navigating the Default Web Pages
Turning Off Compatibility Mode
Navigating the Default Web Pages
To check compatibility view settings
Auto-Imagebutton
Configuration Pages
AV Controls Panel
AV input buttons inputs
Freeze button
Breakaway audio check box audio models only
Video and audio mute buttons
Input renaming
Signal type
Figure 34. Input Configuration Panel
RGB Scaled
Auto-Image
Aspect ratio
Film Detect
Auto Memory
Figure 35. Input Configuration Panel
Resolution
Analog signal format
Refresh rate
Genlock
Digital output signal format
Switch transition
Test pattern
EDID Minder Page
Figure 36. EDID Minder Page
Assigning EDIDs
Figure 37. Assigning EDIDs
Figure 38. Image Settings Page
Image Settings Page
Signal Sampling
Setting
User Presets
Settings Included Within Presets
User Preset
Input Presets
Overscan
PIP input selection
PIP Settings Page
Figure 40. PIP Settings Page
Snap PIP to
Horizontal Size and Vertical Size fields
PIP picture controls
Size and Position
Horizontal Pos and Vertical Pos fields
PIP presets
Figure 41. PIP Preset Default Window Locations
None
Audio Settings Page
Figure 42. Audio Config Page
•2-CHDigital •Full Digital
Dual Mono
Stereo
a.Recall: Inputs, Size & Position, or
Preset Management Page
Figure 43. Preset Management Page
b.Recall: Size & Position Only
Device Settings Page
Figure 44. Device Settings Page
On Screen Display Message
Screen Saver Settings
1.Select the Enable On Screen Display check box
HDCP Notification
Auto Switch
Figure 46. Unit Information Page
Hardware Pages
Unit Information Page
See Licensed Third-partySoftware Used in the
Device Name Page
Connection Settings Page
Figure 48. Connection Settings Page
Figure 47. Device Name Page
Firmware Loader Page
RS-232Settings
Ethernet Settings
Figure 49. Firmware Loader Page
Executive Mode
Executive/Power Mode Page
Figure 50. Executive/Power Mode Page
Mute Video and Sync
Power Mode
Date and Time Page
Figure 51. Date and Time Page
Password Page
Figure 52. Password Page
device name, DHCP setting, and port mapping
Reset Device Page
Figure 53. Reset Device Page
Mounting the DVS
Tabletop Placement
Mounting
UL Guidelines for Rack Mounted Devices
Figure 54. Rack Mounting the DVS
Rack Mounting
Furniture Mounting
Figure 55. Furniture Mounting the DVS
and Central America
Extron Warranty
USA, Canada, South America
Japan
Top
Page
Image
Contents