|
|
|
|
| PREV |
|
|
|
| ESC | SEL | ||
|
|
|
|
| NEXT |
|
|
|
|
|
|
|
|
|
| ] |
|
|
| ] |
Mode | – | AUTO |
| + | ||
[ |
| [ | ||||
|
|
|
|
|
|
|
|
|
|
|
|
|
|
|
|
|
|
|
|
|
|
| ] |
|
|
| ] |
Mode | – | 100M | FULL | + | ||
[ | [ | |||||
|
|
|
|
|
|
|
|
|
|
|
|
|
|
|
|
|
|
|
|
|
|
| ] |
|
|
| ] |
Mode | – | 100M | HALF | + | ||
[ | [ | |||||
|
|
|
|
|
|
|
|
|
|
|
|
|
|
|
|
|
|
|
|
|
|
| ] |
|
|
| ] |
Mode | – | 10M | FULL | + | ||
[ | [ | |||||
|
|
|
|
|
|
|
|
|
|
|
|
|
|
|
|
|
|
|
|
|
|
| ] |
|
|
| ] |
Mode | – | 10M | HALF | + | ||
[ | [ | |||||
|
|
|
|
|
|
|
4.15 Network setting
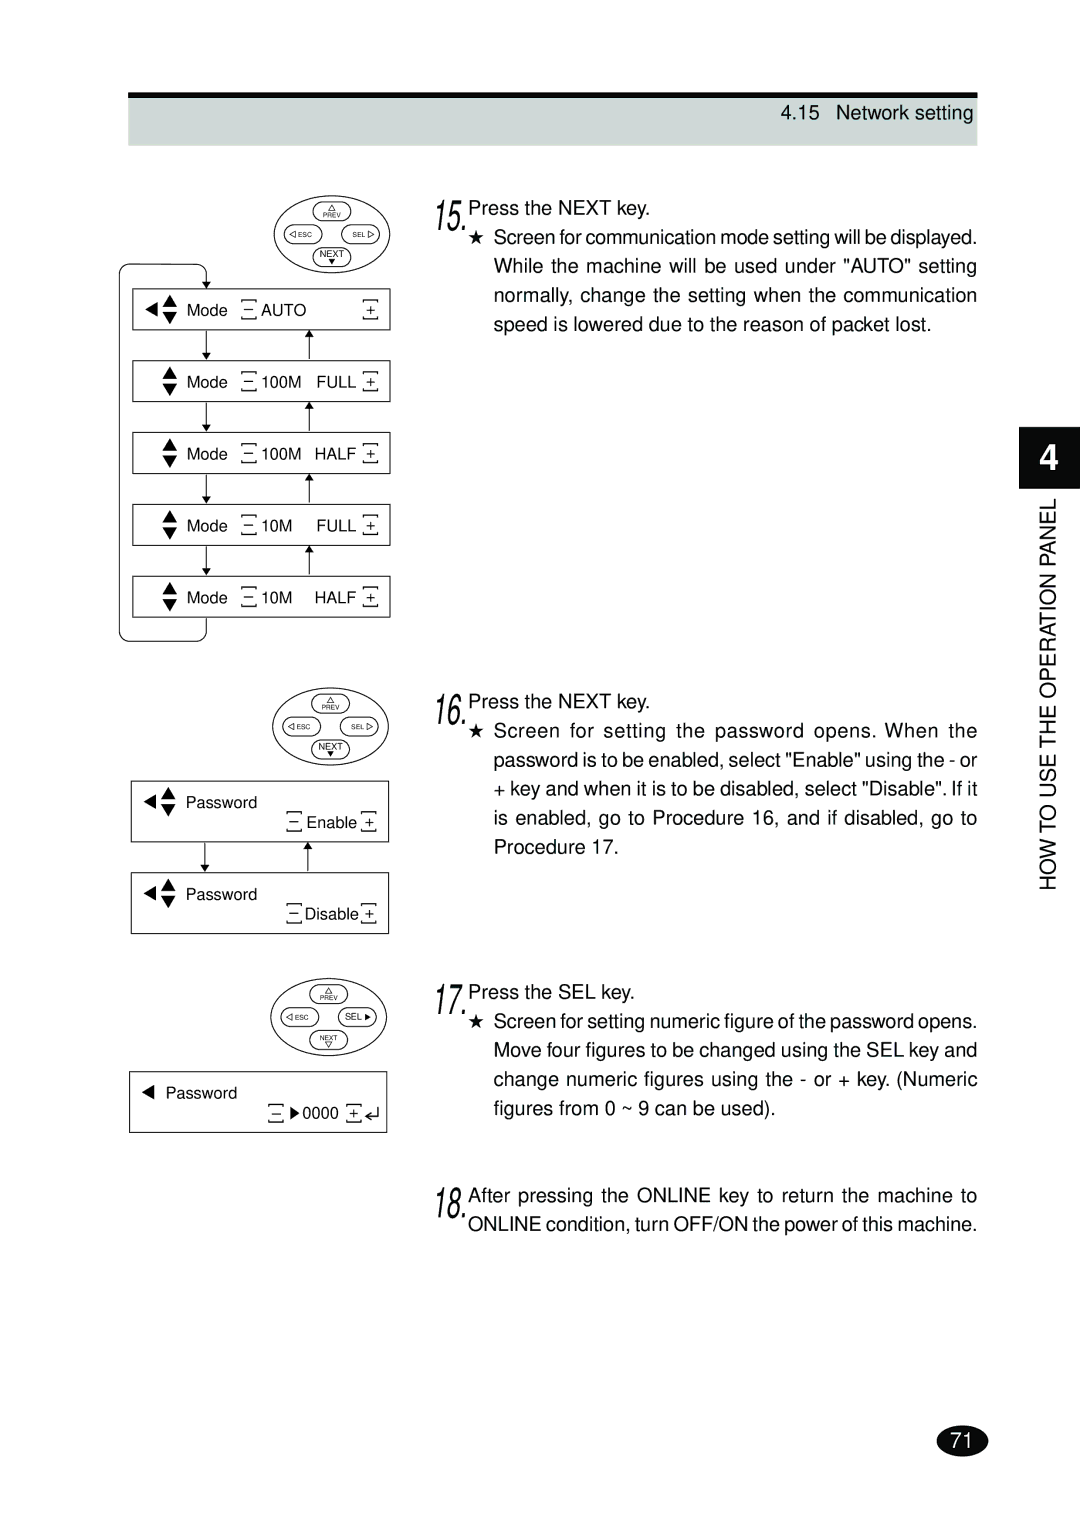
15.Press the NEXT key.
★Screen for communication mode setting will be displayed. While the machine will be used under "AUTO" setting normally, change the setting when the communication speed is lowered due to the reason of packet lost.
4
OPERATION PANEL
| PREV |
ESC | SEL |
| NEXT |
Password |
|
| ] |
] |
|
| |
– | Enable | + | |
[ | [ | ||
Password |
|
| ] |
] |
|
| |
– | Disable | + | |
[ | [ | ||
| PREV |
|
|
ESC | SEL | ||
| NEXT |
|
|
Password |
| ] |
|
] | 0000 |
| |
– | + |
| |
[ |
| [ |
|
16.Press the NEXT key.
★Screen for setting the password opens. When the password is to be enabled, select "Enable" using the - or + key and when it is to be disabled, select "Disable". If it is enabled, go to Procedure 16, and if disabled, go to Procedure 17.
17.Press the SEL key.
★Screen for setting numeric figure of the password opens. Move four figures to be changed using the SEL key and change numeric figures using the - or + key. (Numeric figures from 0 ~ 9 can be used).
18.After pressing the ONLINE key to return the machine to ONLINE condition, turn OFF/ON the power of this machine.
HOW TO USE THE
71
