General Information
Initial Set Up
Maintenance
Troubleshooting
HP Print Server Appliance Documentation For Firmware Version
Product Introduction
Product Overview
Product Description
Operation and Management
Product Updates
Compatibility with HP Print Servers
Compatibility with Other Non-HP Print Servers
Page
Model Number
Product Specifications
System Requirements
Language Options and Power Cord Requirements
What Ships in the Box
Supported Clients
Supported Printers
Supported Web Browsers
Physical Specifications
Security Features
Electrical Specifications
Environmental Specifications
Safety Certifications
Accessing the Web Interface
Web Interface for the PSA
Supported Web Browsers
Overview
Print Services
Diagnostics
Menu
Disk Usage
Print Server Name
Appliance Status
System Load
Changing the Date and Time
System Messages for Date and Time
Steps for Installation and Configuration
Getting Started
What Ships in the Box
Install printers on clients Back up the settings
Installing Printers on Clients
For Windows 2000 and XP Clients
Bypassing Point and Print
Configuring Printing for Unix Clients
Configuring Print Queues for BSD-like Systems
For Windows NT Clients
Printing a Test File
Configuring Print Queues Using SAM HP-UX Systems
Complete the Add Remote Printer/Plotter screen
Be sure to check the box Remote Printer is on a BSD System
Lpr -Pprintername filename
LED Name Description
LEDs
Front Panel Display
Power Button Starting Up and Shutting Down the PSA
Enter and Cancel Buttons
Power LED
Messages on the Front Panel
Direction Buttons
Numeric Keypad
Making Entries
Display Action
Configuring the IP Address Using the Front Panel
Configuring the IP Address
Starting Front Panel Operation
Display Action
Setting or Changing the Front Panel Password
Page
Hardware Installation
Desktop/Rack Shelf/Under-Printer Installation
Rackmount Installation
Cable Connections
Page
TCP/IP and DNS Settings
TCP/IP and DNS Settings
Subnet Mask
Manually specify IP information
At a workstation, access the web browser
Configuring the PSA Using the Web Interface
Microsoft Network Settings
Microsoft Network Settings
Microsoft Network Settings Field Name Description
Appliance Name
Workgroup Enable
Authentication Automatically
Print Server
Membership
Administrator Name Domain
Administrator Password
Specified
Microsoft Windows Domain Authentication Features
Enabling and Disabling Microsoft Domain Security
Adding the PSA to a Domain
Administrator Accounts for the PSA
Granting Printer Access or Authority to Users and Groups
LPD Printing
LPD
Enable LPD printing from specified hosts
LPD Settings
Field Name Description Disable LPD printing
Enable LPD printing from ALL hosts
Configuring LPD Printing
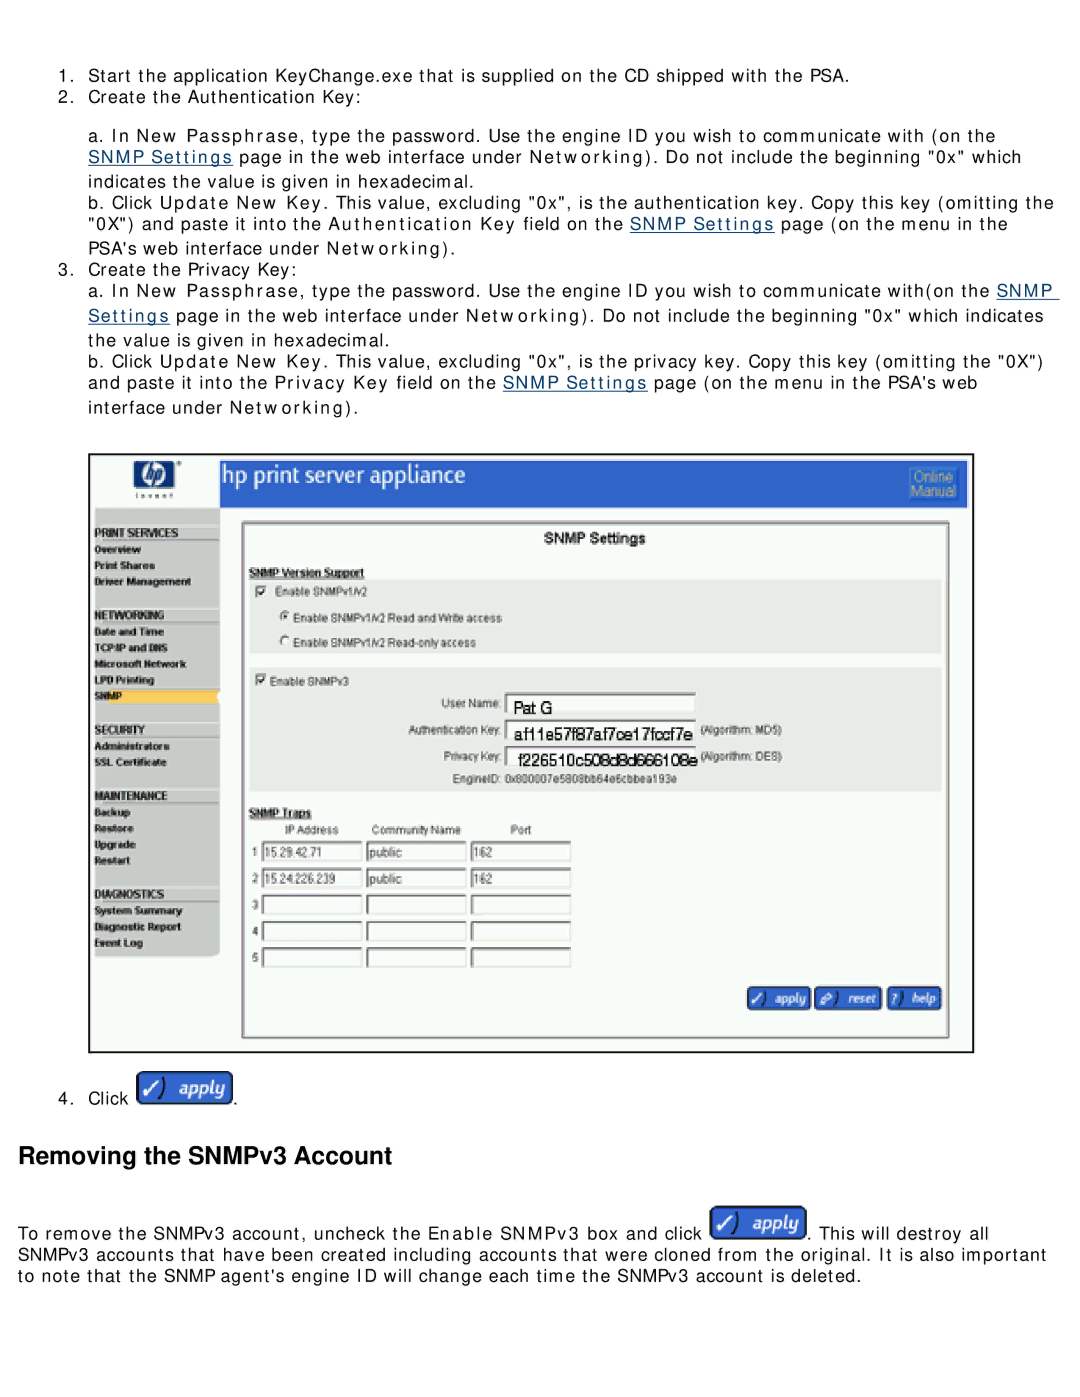
Snmp Settings
Snmp and the PSA
Snmp Traps
User Name
Snmp Settings
Field Name Description Enable SNMPv3
Authentication Key
ColdStart Status current
TrapTest
LogEventCriticalAlert
SNMPv3
Initial Account Creation Through the PSAs Web Interface
Removing the SNMPv3 Account
Print Shares
Print Shares Option
Print Share List
Field Description Names Share
Status
Active
Delete
Adding a Print Share to the PSA
HP Business Inkjet Printers
HP Color LaserJet Printers
HP LaserJet Printers
TCP/IP and DNS Settings
Add Print Share of 3
Field Names Description
Description optional
Add Print Share of 3 Field Names Description
Network Places
My Network Places
Page
Print Jobs
Viewing and Managing Print Jobs
Properties
Print Share Properties
Pause printing from this print share
Printer Network Connector
Prevent the print share from being used, just from being
Displayed in Network Neighborhood or in My Network Places
Drivers Field Name Description
Printer Driver
Print Share Security
Select Access Type
Domain Members
Print Share Security
System Messages for Driver Management
Printer Driver Management
Com/go/psawhitepapers
Client side rendering
Psawhitepapers
Adding a New Printer Driver
New Printer Driver Field Name Description
Adding a New Printer Driver
Drivers Highlight the driver to install and click
New Printer Driver Field Name Description
Installing Printer Drivers
Scenario
Security Warning When Adding New Drivers
Resolution
Driver Name Mismatch
Page
Administrator Accounts
Configuring the Administrator Account
Adding a Local Administrator Account
Local Administrator Accounts
Confirm Password
Deleting a Local Administrator Account
Local Administrator Password
Field Names Description Administrator Name
Adding a Domain Administrator Account
Domain Administrator Accounts
Domain Members
Select Accounts from
Single Sign-On SSO
Basic Authentication
Configuring Internet Explorer
SSL Certificates
SSL Certificate
SSL Certificate
Page
Viewing the SSL Certificate
Requesting a New Certificate
Creating a Self-Signed Certificate
Self-Signed Certificate Field Names Description
Days
Requesting a Signed Certificate from a Certificate Authority
Page
Installing a Certificate from a Certificate Authority
Page
Backing Up Network Settings and Printer Information
Restore Configuration Successful window appears. Click
Resetting the PSA to Factory Defaults Front Panel
Upgrading the Firmware on the PSA
Restarting or Rebooting the PSA
Page
System Summary
TCP/IP Network Configuration Information
Microsoft Network Configuration Information
Snmp Traps Information
LPD Configuration Information
Installed Printer Drivers Information
Diagnostic Report
System
Domain Controllers
Printer Status
Full
Event Log Messages
Event Log
Button Description Name
Buttons on the Event Log
Fields on the Event Log
Event Log Filters
Page
Initiated standard shutdown
Completed standard startup
Completed non-standard startup -- followed abrupt shutdown
Running on UPS battery due to power failure
Shutdown initiated due to low UPS battery
Shutdown initiated. UPS battery run time expired
Shutdown cancelled. Normal power restored
Category Networking
Cannot communicate with any domain controllers
Cannot communicate with domain controller Level Error
Action
Category Security
Action
Failed Wins name resolution Level Error Category Networking
Controller, the PSA will not be able to authenticate users
Cannot communicate with any Wins servers
Cannot communicate with any DNS servers
Authentication failed Level Error Category Security
Action
Action
Page
Detected printer problem
Changed IP address
Added printer
Deleted printer
Cleared log file
Upgraded firmware
Changed printer IP address
Deleted printer driver
Backed up settings
Failed to restore settings from backup file
Added administrator account
Changed Windows domain or workgroup name
Deleted administrator account
Enabled NT domain authentication
Changed Wins server address
Disabled NT domain authentication
Enabled LPD printing for all hosts
Added account in NT domain
Failed to create NT domain machine account
Enabled LPD printing for specified hosts
Disabled LPD printing for all hosts
Set NT user capabilities
Changed PSA name
Failed to join NT domain
Changed SSL encryption level
Removed administrator access from domain accounts
Security--Administrators Changed DNS server address
Changed time
Installed certificate from a certificate signing authority
Installed self-signed certificate
Disabled Snmp v1/v2
Enabled Snmp v1/v2
Removed destination from Snmp trap notification list
Enabled Snmp v3
Disabled Snmp v3
Added destination to Snmp trap notification list
Deleted Wins server
Enabled redirection to Https
Disabled redirection to Https
Added Wins server
Deleted DNS server
Failed to upgrade firmware
Failed to backup settings
Added DNS server
Installed printer driver
Created NT domain account
Joined NT domain
Initialized printer driver
Printer driver installation failed Level Error
Action
Page
Add Printer Wizard and Add Driver Wizard
System Messages
Page
Page
Page
Installing driver Informational Installing Printer Drivers
Page
Page
Print Shares
Page
Driver Management
Date / Time
Microsoft Network Settings
TCP/IP and DNS Settings
Page
LPD Printing
Snmp Settings
Joined to domain controllers
Administrators
SSL Certificate
Backup, Restore, Upgrade, and Restart Pages
Backup, Restore, Upgrade in progress
Cposupport
Event Log
Troubleshooting the HP Print Server Appliance
Hardware Problems
# Condition
Num. Condition Possible Cause/Solution
Configuration Problems
To find the PSA more quickly
Security tab
General tab
Scheduling tab
Sharing tab
Page
Num. Condition
Printing Problems
Page
Initialize the driver for that printer
Verify the DNS lookup tables using the following steps
Page
Download the latest firmware for the PSA
Printer Driver Problems
Administrators-Add Domain Accounts page in the PSAs web
LED Normal Conditions
Security Problems
About the Indicator Lights LEDs
LED Problem Conditions
Frequently Asked Questions
Configuration
Printing
Printer Driver
Power Outages
Answers Configuration
Can I use Web Jetadmin to manage my PSA?
Is the PSA compatible with non-HP print servers?
Can the PSA be configured via TELNET?
Can I use a hyphen in the PSA name?
Can the PSA integrate into a Windows 2000 environment?
Can the PSA accept print jobs from Unix clients?
Can I print in a Novell environment?
How are print jobs sent to the PSA?
Verify the DNS lookup tables using the following steps
Jobs are getting stuck on the PSA for one of my printers
Printer Drivers
Page
How do I connect an uninterruptible power supply UPS?
Page
Contact HP
Warranty, Regulatory, and Licensing Information
Hewlett-Packard Limited Warranty Statement
HP Product Duration of Limited Warranty
Regulatory Statements FCC Statement USA
Local Warranty Statements
Australia
Safety Certifications
European Community
Electromagnetic Emissions
Signature of HP Representative
Trademarks and Copyrights
HP Limited Warranty/Limitation of Liability
HP Software License
Page
Other Software Licenses
412 268-4387, fax 412 268-7395 tech-transfer@andrew.cmu.edu
Copyright c 1995-1997 The Apache Group All rights reserved
Version 2, June 1991 Copyright c 1989
GNU General Public License
GNU General Public License
Page
Page
USA
Version 2, June 1991 Copyright C
GNU Library General Public License
Page
Page
Page
Page
Page
Copyright c 2000 Gregory Trubetskoy. All rights reserved
Page
Page
Page
Page
Page
Page
Page
Page
Page
Page
Page
Page