HP Integrity iLO 2 MP Operations Guide
Copyright 2008, Hewlett-Packard Development Company, L.P
Table of Contents
Setting Up and Connecting the Console
System Status Status Summary General
102
100
101
103
Target SYSTEM1 130
Target map1 131 Map1 Example 132 Resetting the iLO 2 MP
130
Target map1/sshsvc1 137 SSH Examples 138
147
187
195
Page
Local Image File Dialog Box
Power & Reset
Login Options
Licensing
Restricting the Reset Role
Admin User Gaining Admin Role Right, Example
User and Role Access Restrictions
Logon Hours Screen
LAN Page Description
Swinstallsvc1 Properties
Licensing Page Description
Swid# Properties
Gateway1 Properties
Enetport1 Properties
Ipendpt1 Properties
Cddr1 Properties
Publishing History
Intended Audience
New and Changed Information in This Edition
Rx7640 Rx8640 Superdome sx2000
5991-6005 HP-UX 11i BL870c
Document Organization
Publishing History Details
5991-5992 HP-UX 11i BL860c
Typographic Conventions
Related Information
Warranty Information HP Encourages Your Comments
Windows Operating System Information
Features
Features
Standard Features
Always-on Capability
Multiple Access Methods
User Access Control
Virtual Front Panel
Internal Subsystem Information
Firmware Upgrades
Ipmi over LAN
Dhcp and DNS Support
Advanced Features
Advanced Pack License
Power Meter Readings
HP Insight Power Manager
Ldap Lite
Obtaining and Activating iLO 2 MP Advanced Pack Licensing
Supported Systems and Required Components and Cables
ILO 2 MP Supported Browsers and Client Operating Systems
Supported Systems and Required Components Matrix
Login
Password- and key-based for secure shell SSH
Authorization
Security
Lights-Out Advanced/KVM Card
Protecting Snmp Traffic
HP Integrity Server Blade Components
Onboard Administrator
HP Integrity Server Blade Components
Ports and LEDs
Onboard Administrator Bay 2 redundant if used
Onboard Administrator Active LED
USB Ports
HP Integrity rx2660 Server Components
HP Integrity rx3600 and rx6600 Server Components
Console Serial Port UID Button/LED RS-232
ILO 2 MP Status LEDs
Standby Power Solid green ILO 2 MP Self Test
ILO 2 MP Status LEDs
Console Serial Port Pinouts
ILO 2 MP Reset Button
Console Serial Port and Auxiliary Serial Port
4lists the iLO 2 MP LAN link status LEDs and states
ILO 2 MP LAN Port
ILO 2 MP LAN LEDs
5lists the iLO 2 MP LAN link speed LEDs and states
Setting Up and Connecting the Console
Setup Checklist
Setup Checklist
Use the checklist in -1to help set up iLO 2 MP
Setup Flowchart
Setup Flowchart
Determining the iLO 2 MP LAN Configuration Method
Preparing to Set Up iLO 2 MP
Determining the Physical iLO 2 MP Access Method
LAN Configuration Methods
Configuring the iLO 2 MP LAN Using Dhcp and DNS
Configuring the iLO 2 MP LAN Using Dhcp and DNS
Configuring the iLO 2 MP LAN Using ARP Ping
ARP Ping Commands
Appropriate IP address
Configuring the iLO 2 MP LAN Using the Console Serial Port
Configuring the iLO 2 MP LAN Using the Console Serial Port
Following is the MP Main Menu
Physically Connecting the Server Blade to the iLO 2 MP
Logging In to the iLO 2 MP
SSH/telnet connection with iLO 2 MP
Auto-Login
Physically Connecting the Server Blade to the iLO 2 MP
ILO Web GUI Connection
Required to periodically change configuration settings
User management, and resetting default settings
It allows access to all but configuration changes and user
Operators
Disabled
There is already a user registered with the same login name
User Login
Local database with user administration right
Connecting the SUV Cable to the Server Blade
SUV Cable
Additional Setup
Modifying User Accounts and Default Passwords
Additional Setup
Setting Up Security
Setting Security Access
Page
Interacting with the iLO 2 MP Using the Web GUI
Interacting with the iLO 2 MP Using the Web GUI
Accessing the Host Console
Accessing the Host Console Using the TUI
Accessing Online Help
Help System
Accessing the Graphic Console Using VGA
Accessing the Host Console Using Smash SM CLP
Accessing iLO 2 MP Using Onboard Administrator
Accessing the Host Console
Modify the MP Dhcp status
Configuring Dhcp
Display current LAN settings
Modify the MP IP address
Configuring DNS
Configuring Ldap Extended Schema
Configuring Ldap Extended Schema
Configuring Ldap Lite Default Schema
Login Process Using Directory Services with Extended Ldap
Enter G. The current group configuration appears
Setting up Directory Security Groups
Set up directory security groups
Configuring Ldap Lite Default Schema
Configuring DHCP, DNS, LDAP, and Ldap Lite
MP Command Interfaces
MP Command Interfaces
1lists and describes the available MP command interfaces
Text User Interface
MP Main Menu command descriptions are listed as follows
MP Main Menu Commands
MP Main Menu Commands
MP Main Menu
VFP Virtual Front Panel Simulate the display panel
CO Console Leave the Main Menu and enter console mode
CM Command Mode Enter command mode
CL Console Log View the history of the console output
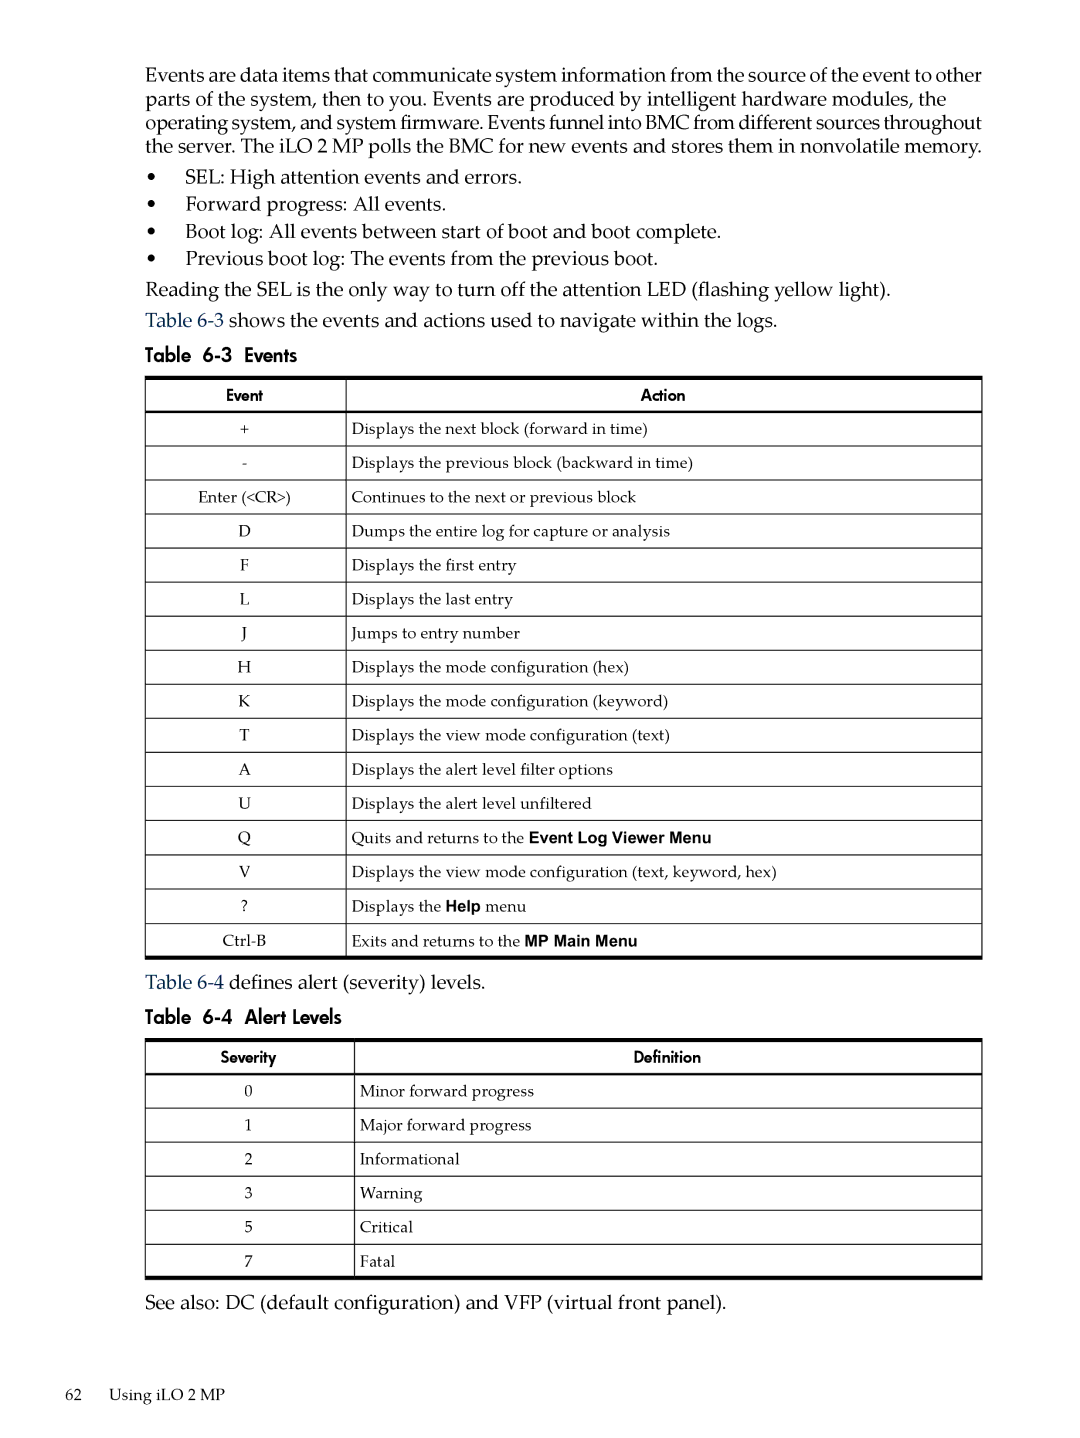
Alert Levels
Events
4defines alert severity levels
Exit Exit the iLO 2 MP
Command Menu
Command Menu Commands
Command Line Interface Scripting
Expect Script Example
# User
#Run SL command to dump logs
BP Reset BMC passwords
Blade Display Blade parameters
Degraded
CA Configure asynchronous local serial port
Normal operation, any issues have been acknowledged
4800, 9600, 19200, 38400, 115200 bit/sec
DF Display FRU information
Command access level Login access
Date Display date
Server blade usage
Command access level MP configuration access
DNS DNS settings
FW Upgrade the MP firmware
DI Disconnect LAN, WEB, SSH or Console
Blocking other ports when inactive
ID System information settings
IT Inactivity timeout settings
LC LAN configuration usage
Ldap Ldap directory settings
For example cn=MP Server,ou=Management Devices,o=hp
LM License management
LOC Locator UID LED configuration
See also LOGIN, US
LS LAN status
PC Power control access
PM Power regulator mode
RB Reset BMC
PR Power restore policy configuration
PS Power status
Snmp Configure Snmp parameters
RS Reset system through the RST signal
SA Set access LAN/WEB/SSH/IPMI over LAN ports
See also TC
See also ID
SO Security option help
SS System Status
TE Send a message to other mirroring terminals
TC System reset through Init or TOC signal
Sysrev Firmware revisions
See also PS
Command CO
UC User Configuration users, passwords, and so on
Not bypass host authentication requirements, if any
Access right
See also DI, TE
XD iLO 2 MP Diagnostics or reset
WHO Display a list of iLO 2 MP connected users
System Status
System Status tab enables you to access the following pages
Web GUI
Status Summary General
Status Summary General Page Description
Status Summary Active Users
6lists the fields and descriptions
Active Users Page Description
Server Status General
7lists the fields and descriptions
8lists the fields and descriptions
System Power
Server Status Identification
Server Status General Page Description
Server Status Identification Page Description
System Event Log
9lists the fields and descriptions
10lists the fields, buttons, and descriptions
10 System Event Log Page Description
Integrated Remote Console vKVM
IRC Requirements and Usage
Limitations of the vKVM Mouse and Keyboard
VKVM-Supported Resolutions and Browser Configurations
Before running the IRC, note the following
Browsers and Client Operating Systems that Support vKVM
IRC page refreshes every 10 seconds
Accessing the IRC
Select None for mouse pointer scheme
IRC displays the host server’s graphics console Figure
11lists the fields, buttons, and actions
11 IRC Page Description
Fullscreen Resizes the IRC
Thumb Tack
12 IRC Window Description
Integrated Remote Console Fullscreen
Away
Remote Serial Console
Remote Serial Console
Using this feature you can do the following
10 Remote Serial Console Window
Virtual Media
Virtual Serial Port
Using iLO 2 MP Virtual Media Devices
11 Virtual Media
Virtual CD/DVD
Select Local Media Drive
13 Virtual Media Dialog Box after connection
Open VMS
Creating the iLO 2 MP Disk Image Files
14 Local Image File Dialog Box
15 Create Media Image Dialog Box
Virtual Floppy/USB Key
Virtual Media Applet Timeout
Supported Operating Systems and USB Support for vMedia
Java Plug-in Version
Power Management
Power & Reset
Client Operating System and Browser Support for vMedia
15lists the fields, buttons, and descriptions
15 Power & Reset Page Description
Current power state of the system
When ac was removed or lost
System Power Restore
Settings
Control is required to power on the system
16 Power Meter Readings Page Description
Minimum Power
Power Regulator
Maximum Power
17lists the fields, buttons, and descriptions
Administration
17 Power Regulator Page Description
Firmware Upgrade
Licensing
Licensing Key Status
Pack features. Fields are case sensitive
18 Licensing Page Description
Is an Evaluation license
User Administration Local Accounts
21 Local Accounts
20lists the fields, buttons, and descriptions
Group Accounts
19 Local Accounts Page Description
20 Group Accounts Page Description
Access Settings
Serial Login Options
21lists the fields, buttons, and descriptions
Serial
21 LAN Page Description
22lists the fields, buttons, and descriptions
Login Options
23 Login Options Page Description
22 Serial Page Description
Current Ldap Parameters
24lists the fields and descriptions
24 Current Ldap Parameters Page Description
Network Settings
Network Settings Standard
25 Standard Page Description
Domain Name Server
25lists the fields, buttons, and descriptions
Is automatically supplied
26 DNS Page Description
Snmp Settings
26lists the fields, buttons, and descriptions
Ilo.hp.com. You can enter a new DNS name
27 Snmp Settings Page Description
27lists the fields and descriptions
BL c-Class
Click OK and reset the iLO 2 MP
28 Onboard Administrator Page Description
28lists the fields and descriptions
Help
Enclosure Name
Smash Server Management Command Line Protocol
Smash Server Management Command Line Protocol
SM CLP Features and Functionality Overview
SM CLP Session
Accessing the SM CLP Interface
Changing the iLO 2 Default Interface to SM CLP
Exiting the SM CLP Interface
Using the SM CLP Interface
Mpcmsa
Supported Command Verbs
Command Line Terms
Command Verbs
SM CLP Syntax
Using the target’s relative path form map1 target
Command Targets
Command Target Properties
Using implicit current target’s with the verb show
Command Options
Character Set, Delimiters, Special, and Reserved Characters
30shows the available command options
30 Command Options
31 SM CLP Reserved Characters and Character Sequences
System1 Target
System Reset Power Status and Power Control
Resetting the System
Target SYSTEM1
Powering On the System
Displaying Power Status
Powering Off the System
Map1 iLO 2 Target
Map1 Example
Text Console Services
Resetting the iLO 2 MP
Opening the MP Main Menu from SM CLP
34 /map1/textredirectsap1 Properties
Switching Between the System Console and the SM CLP
Opening the System Console Interface from SM CLP
Target system1/consoles1/textredirectsap1
Firmware Revision Display and Upgrade
SM CLP Firmware Targets
Displaying Firmware Revisions
This example displays only the iLO 2 MP firmware revision
This example displays all the firmware revisions
Remote Access Configuration
Telnet SM CLP Targets
Disable Telnet Service
Target map1/sshsvc1
SSH Examples
Network Configuration
Disable SSH Service
SM CLP Network Targets, Properties, and Verbs
Target map1/dhcpendpt1
Target map1/enetport1/lanendpt1/ipendpt1
43 ipendpt1 Properties
44 dhcpendpt1 Properties
Target map1/enetport1/lanendpt1/ipendpt1/gateway1
Target map1/dnsendpt1
Dnsendpt1 Properties
46 gateway1 Properties
Determine current IP Address
SM CLP Network Command Examples
Set
Determine Subnet Mask
VMedia
Target map1/group1/account#
User Accounts Configuration
Target map1/group1
User Account Examples
Ldap Configuration
Target map1/settings1/oemhpldapsettings1
Configure Ldap parameters This command
Ldap Configuration Examples
52 oemhpldapsettings1 Properties
146
Directory Services
Installing Directory Services
Features Supported by Directory Integration
Directory Services Installation Prerequisites
Installing and Configuring Directory Services
EDirectory Installation Prerequisites
Schema Documentation
Directory Services Support
Schema Preview Screen
Required Schema Software
Schema Installer
Setup Screen
Schema Setup Screen
Results Screen
Active Directory Installation Prerequisites
Directory Services for Active Directory
Management Snap-In Installer
Click OK
Preparing Directory Services for Active Directory
Directory Services for Active Directory
Installing and Initializing Snap-Ins for Active Directory
NewHPObject
Create New HP Management Object Dialog Box
Select Users Dialog Box
Managing HP Devices In a Role
Directory Services Objects
Active Directory Snap-Ins
HP Devices Tab Managing Users In a Role
Setting Login Restrictions
10 Role Restrictions Tab Setting Time Restrictions
12 New IP/Mask Dialog Box
Lights Out Management Rights
Setting User or Group Role Rights
1lists the available Lights Out Management rights
Directory Services for eDirectory
Directory Services for eDirectory
Installing and Initializing Snap-In for eDirectory
Creating Objects
Creating Roles
15 Select Object Subtype Dialog Box
16 Setting Role Rights
Add users to the remoteMonitors role using the Members tab
Adding Members
Directory Services Objects for eDirectory
Adding Role Managed Devices
Setting Role Restrictions
18 Members Tab eDirectory
Defining Client IP Address or DNS Name Access
Setting Time Restrictions
Setting Lights-Out Management Device Rights
Management Device Rights
Installing the Java Runtime Environment
2lists the available management device rights
Run this file by executing the following command
Installing Snap-Ins
Extending Schema
Verifying Snap-In Installation and Schema Extension
User Login Using Directory Services
Installing Certificate Services
Certificate Services
Directory-Enabled Remote Management
Verifying Directory Services
Using Existing Groups
Using Multiple Roles
Restricting Roles
Directory-Enabled Remote Management
Creating Roles that Follow Organizational Structure
Role Time Restrictions
IP Address and Subnet Mask Restrictions
How Directory Login Restrictions Are Enforced
IP Address Range Restrictions
DNS-Based Restrictions
24shows the user and role access restrictions
How User Time Restrictions Are Enforced
User Address Restrictions
Creating Multiple Restrictions and Roles
Directory Services Schema Ldap
Directory Services Schema Ldap
Core Class Definitions
Core Classes
Core Attributes
Core Attribute Definitions
8through -13define the HP management core class attributes
HpqTargetMembership 10 hpqTargetMembership
HpqRoleIPRestrictionDefault 11 hpqRoleIPRestrictionDefault
HpqRoleTimeRestriction 13 hpqRoleTimeRestriction
HpqRoleIPRestrictions 12 hpqRoleIPRestrictions
ILO 2 MP Attributes
ILO 2 MP-Specific Ldap OID Classes and Attributes
ILO 2 MP Classes
ILO 2 MP Class Definitions
ILO 2 MP Attribute Definitions
17through -22define the iLO 2 MP core class attributes
HpqLOMRightLocalUserAdmin 21 hpqLOMRightLocalUserAdmin
HpqLOMRightConfigureSettings 22 hpqLOMRightConfigureSettings
186
Glossary
187
To the client
Glossary
Domain
189
Ipmi
MAP address
191
Snmp
User
193
194
Directory objects, configuring for Active Directory
195
Index
LAN
197
SMASH, 123 Snmp
199