English
Editing an MD (Continued)
Introducing Track Editing Functions
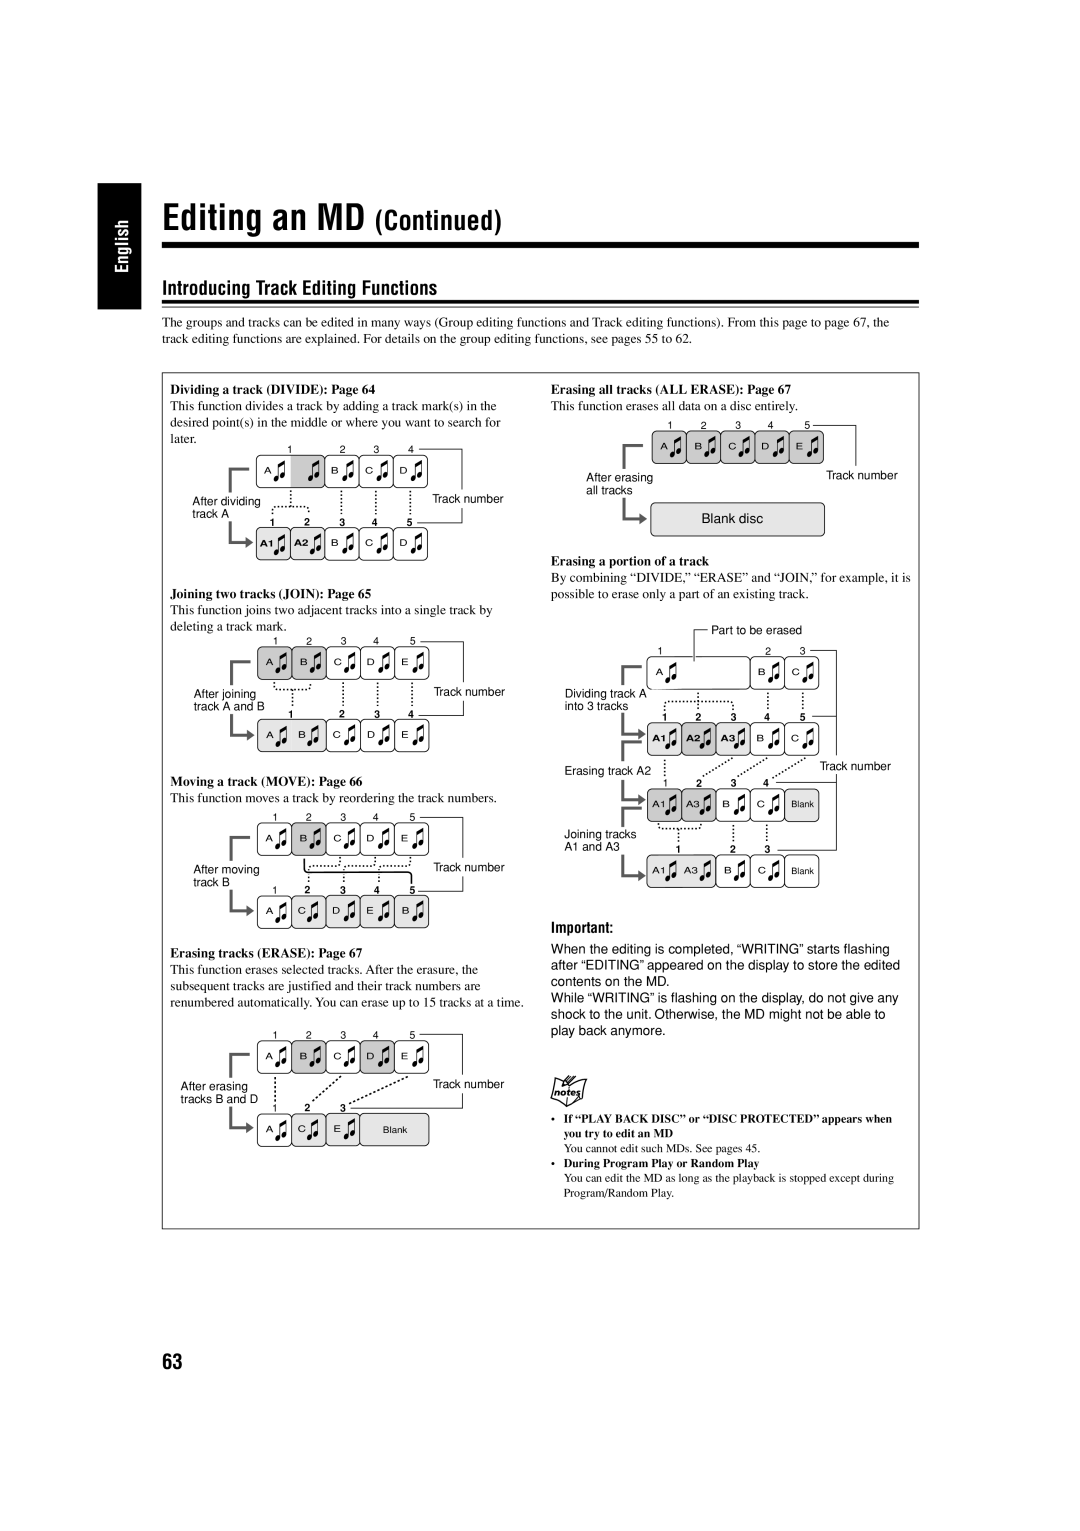
The groups and tracks can be edited in many ways (Group editing functions and Track editing functions). From this page to page 67, the track editing functions are explained. For details on the group editing functions, see pages 55 to 62.
Dividing a track (DIVIDE): Page 64
This function divides a track by adding a track mark(s) in the desired point(s) in the middle or where you want to search for later.
1 | 2 | 3 | 4 |
A | B | C | D |
After dividing |
|
|
| Track number |
track A | 2 | 3 | 4 | 5 |
1 | ||||
A1 | A2 | B | C | D |
Joining two tracks (JOIN): Page 65
This function joins two adjacent tracks into a single track by deleting a track mark.
1 | 2 | 3 | 4 | 5 |
A | B | C | D | E |
After joining |
|
|
| Track number |
track A and B | 1 | 2 | 3 | 4 |
| ||||
A | B | C | D | E |
Moving a track (MOVE): Page 66
This function moves a track by reordering the track numbers.
1 2 3 4 5
A ![]() B
B ![]() C
C ![]() D
D ![]() E
E
After moving |
|
|
| Track number |
track B | 2 | 3 | 4 | 5 |
1 |
A ![]() C
C ![]() D
D ![]() E
E ![]() B
B
Erasing tracks (ERASE): Page 67
This function erases selected tracks. After the erasure, the subsequent tracks are justified and their track numbers are renumbered automatically. You can erase up to 15 tracks at a time.
1 2 3 4 5
A ![]() B
B ![]() C
C ![]() D
D ![]() E
E
After erasing |
|
| Track number | ||||
tracks B and D | 2 | 3 |
|
| |||
|
| 1 |
|
| |||
|
|
| |||||
|
|
| A | C | E | Blank | |
|
|
| |||||
Erasing all tracks (ALL ERASE): Page 67
This function erases all data on a disc entirely.
1 | 2 | 3 | 4 | 5 |
A | B | C | D | E |
After erasing |
|
|
| Track number |
all tracks |
|
|
|
|
Blank disc
Erasing a portion of a track
By combining “DIVIDE,” “ERASE” and “JOIN,” for example, it is possible to erase only a part of an existing track.
|
| Part to be erased | ||
1 |
|
| 2 | 3 |
A |
|
| B | C |
Dividing track A |
|
|
|
|
into 3 tracks |
|
|
|
|
1 | 2 | 3 | 4 | 5 |
A1 | A2 | A3 | B | C |
Erasing track A2 |
|
|
| Track number |
2 | 3 | 4 |
| |
1 |
| |||
A1 | A3 | B | C | Blank |
Joining tracks |
|
|
|
|
A1 and A3 | 1 | 2 | 3 |
|
A1 | A3 | B | C | Blank |
Important:
When the editing is completed, “WRITING” starts flashing after “EDITING” appeared on the display to store the edited contents on the MD.
While “WRITING” is flashing on the display, do not give any shock to the unit. Otherwise, the MD might not be able to play back anymore.
•If “PLAY BACK DISC” or “DISC PROTECTED” appears when you try to edit an MD
You cannot edit such MDs. See pages 45.
•During Program Play or Random Play
You can edit the MD as long as the playback is stopped except during Program/Random Play.
63