Disk mode
0–6: Edit WAVE
The
You can access the Edit WAVE page once you have selected a WAVE file in “Load,” “Save,” “Utility,” or “Make Audio CD.”
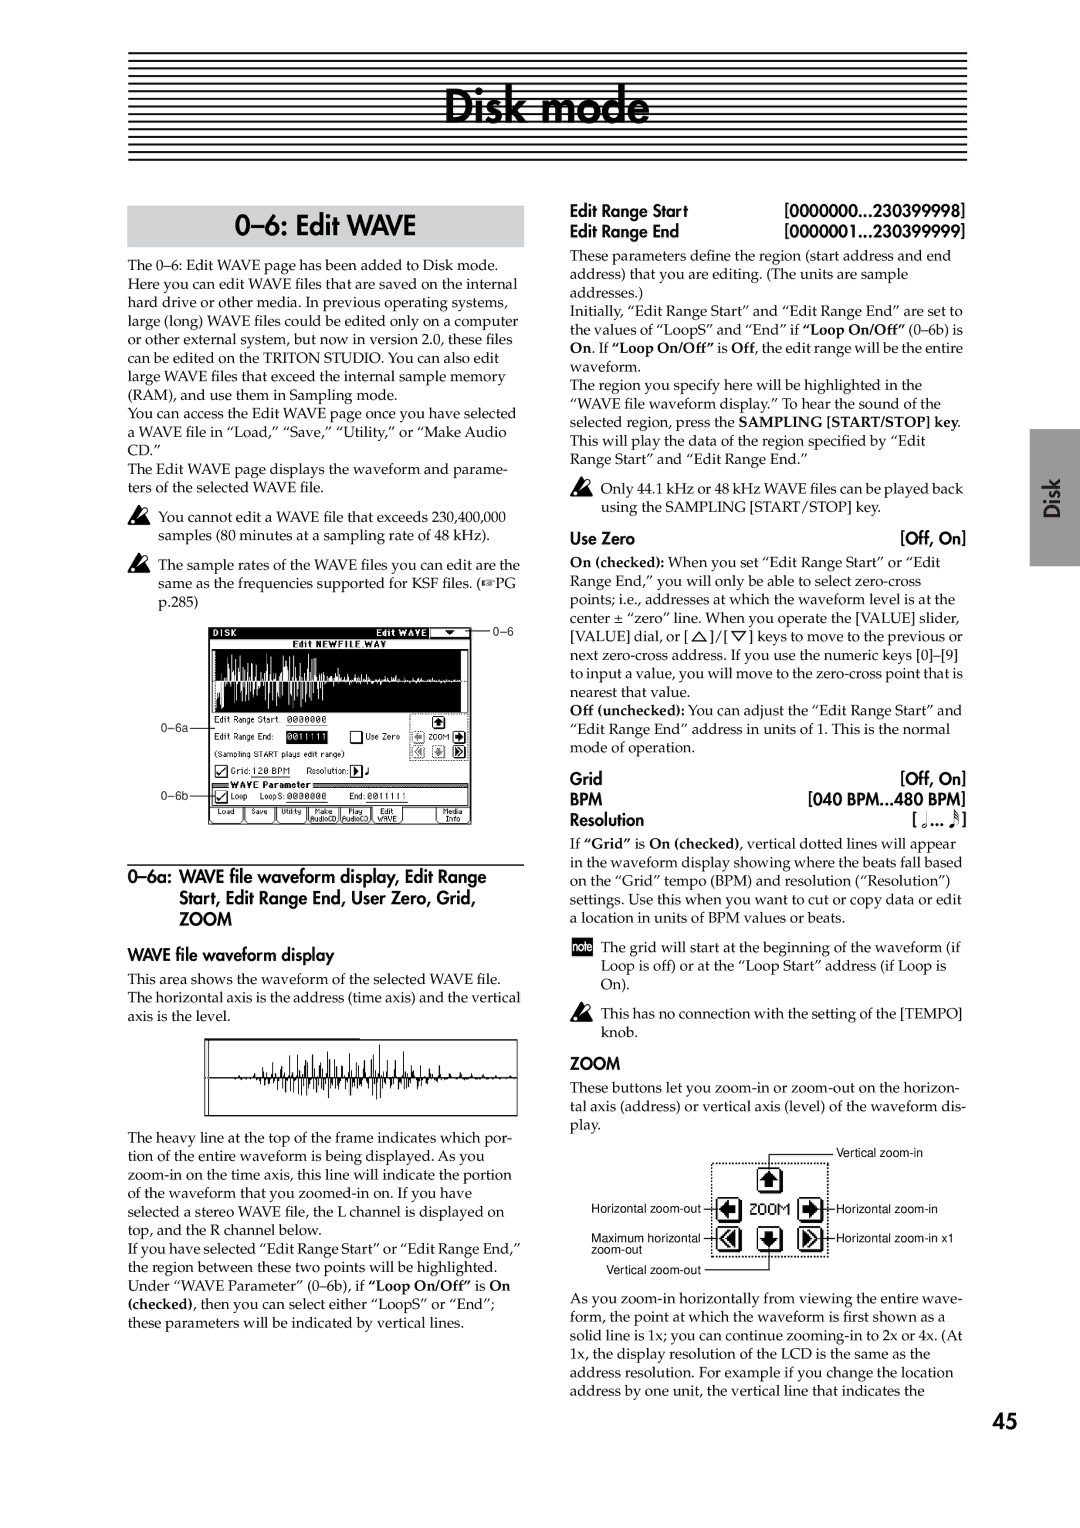
The Edit WAVE page displays the waveform and parame- ters of the selected WAVE file.
![]() You cannot edit a WAVE file that exceeds 230,400,000 samples (80 minutes at a sampling rate of 48 kHz).
You cannot edit a WAVE file that exceeds 230,400,000 samples (80 minutes at a sampling rate of 48 kHz).
![]() The sample rates of the WAVE files you can edit are the same as the frequencies supported for KSF files. (☞PG p.285)
The sample rates of the WAVE files you can edit are the same as the frequencies supported for KSF files. (☞PG p.285)
ZOOM
WAVE file waveform display
This area shows the waveform of the selected WAVE file. The horizontal axis is the address (time axis) and the vertical axis is the level.
The heavy line at the top of the frame indicates which por- tion of the entire waveform is being displayed. As you
If you have selected “Edit Range Start” or “Edit Range End,” the region between these two points will be highlighted. Under “WAVE Parameter”
Edit Range Start | [0000000... | 230399998] |
Edit Range End | [0000001... | 230399999] |
These parameters define the region (start address and end address) that you are editing. (The units are sample addresses.)
Initially, “Edit Range Start” and “Edit Range End” are set to the values of “LoopS” and “End” if “Loop On/Off”
The region you specify here will be highlighted in the “WAVE file waveform display.” To hear the sound of the selected region, press the SAMPLING [START/STOP] key. This will play the data of the region specified by “Edit Range Start” and “Edit Range End.”
![]() Only 44.1 kHz or 48 kHz WAVE files can be played back using the SAMPLING [START/STOP] key.
Only 44.1 kHz or 48 kHz WAVE files can be played back using the SAMPLING [START/STOP] key.
Use Zero | [Off, On] |
On (checked): When you set “Edit Range Start” or “Edit Range End,” you will only be able to select ![]() ]/[
]/[ ![]() ] keys to move to the previous or next
] keys to move to the previous or next
Off (unchecked): You can adjust the “Edit Range Start” and “Edit Range End” address in units of 1. This is the normal mode of operation.
Grid | [Off, On] |
BPM | [040 BPM...480 BPM] |
Resolution | [ ... ] |
If “Grid” is On (checked), vertical dotted lines will appear in the waveform display showing where the beats fall based on the “Grid” tempo (BPM) and resolution (“Resolution”) settings. Use this when you want to cut or copy data or edit a location in units of BPM values or beats.
The grid will start at the beginning of the waveform (if Loop is off) or at the “Loop Start” address (if Loop is On).
This has no connection with the setting of the [TEMPO] knob.
ZOOM
These buttons let you
Horizontal |
|
|
|
|
|
| Vertical |
|
|
|
|
| |||
|
|
|
|
|
| Horizontal | |
|
|
|
|
| |||
|
|
|
| ||||
Maximum horizontal |
|
|
|
|
| Horizontal | |
|
|
|
| ||||
|
|
|
| ||||
|
|
|
| ||||
Vertical |
|
|
|
|
|
| |
|
|
|
|
|
| ||
As you
Disk
Global
Other functionality Program Combination Sampling
45
