FS-C5400DN
OPERATION GUIDE
Page
Contents
Glossary Index
A-12
Legal and Safety Information
Notice on Software
Copyright Notice
Regarding Tradenames
Typeface Trademark Acknowledgement
License Agreements
Monotype Imaging License Agreement
Open SSLeay License
Original SSLeay License
Page
Compliance and Conformity
Interface connectors
Safety Information
Laser Safety
Laser Notice
Radio Frequency Transmitter
Cautionary Labels
The printer bears any of the following labels
Label inside the printer Laser radiation warning
For Europe, Asia, and other countries
CDRH Regulations
Ozone concentration
DECLARATION OF CONFORMITY TO
2004/108/EC, 2006/95/EEC, 93/68/EEC and 1999/5/EC
EN ISO
Disclaimer
Energy Saving Control Function
Sleep
Automatic 2-SidedPrint Function
Paper Recycling
Other Precautions
Installation Precautions
Environment
Power Supply/Grounding the Printer
Other Precautions
Handling of Plastic Bags
Precautions for Use
Cautions when Using the Printer
Other Precautions
Cautions for Toner Handling
About the Operation Guide
Conventions
Chapter 4 - Using the Operation Panel
Chapter 5 - Maintenance
1 Machine Parts
Components at the Front of the Printer
Components at the Left of the Printer
Internal Components
Components at the Rear of the Printer
Operation Panel
2 Printing Operation
Changing Network Interface Parameters
Setting
Menu
Submenu
Printing a Status Page
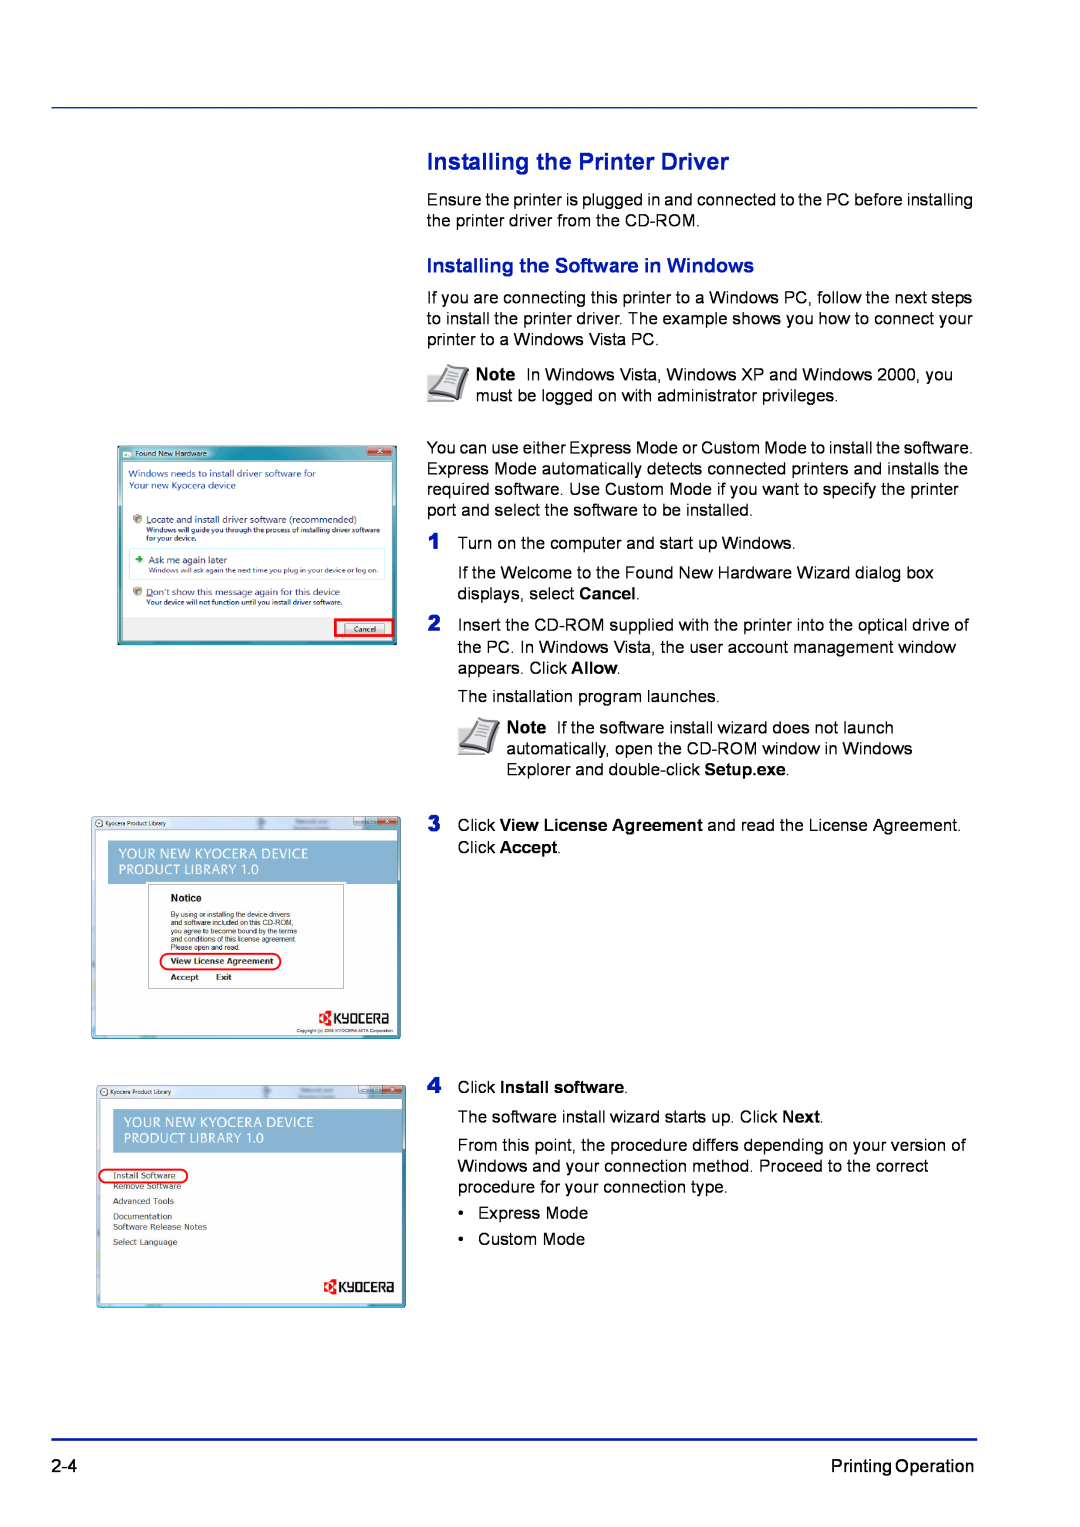
Installing the Printer Driver
Installing the Software in Windows
Express Mode
Installation on a Macintosh
Custom Mode
1Select Custom Mode
5Double-click Kyocera OS X
8Open System Preferences and click Print & Fax
Printing Operation
Printing Operation
Printing from Application Software
Status Monitor
Accessing the Status Monitor
Exiting the Status Monitor
Screen Overview
Configure
3D View
Show the status monitor
Preferences
Status Monitor Settings
Enable Event Notification
Sound Notification Tab
Sound file
Appearance Tab
Enlarge window
Doubles the size of the Status Monitor window
Always on top
Uninstalling Software Windows PC
5Click Uninstall
2-16
Printing Operation
3 Handling Paper
General Guidelines
Paper Specifications
Specification
Paper Availability
Weight
Minimum and Maximum Paper Sizes
Recommended Paper
Size
Selecting the Right Paper
MP Tray Only
Size
Cassette or
Basis Weight
Paper Weight Equivalence Table
U. S. Bond Weight lb
Europe Metric Weight g/m²
Paper Grain
Moisture Content
Other Paper Properties
Paper Type to be Used
Special Paper
Paper Type to be Selected
Transparency
Specification
Item
Labels
Specification
Item
Postcards
Envelopes
Thick Paper
Colored Paper
Preprinted Paper
Recycled Paper
Envelopes
Paper Type
Paper Weight
Paper Source
Paper Type
Loading Paper
Loading Paper into the Cassette
6 Slide the paper into the paper cassette
Loading Paper into the MP Multi-PurposeTray
Correct Incorrect
Paper stopper
4 Using the Operation Panel
General Information
Understanding the Operation Panel
Message Display
Error Codes
Refer to the Troubleshooting on page
Status Information
Message
Ready to print
Toner
Ready, Data, and Attention Indicators
Indicator
Keys
Cancel Key
Canceling a Printing Job
MENU Key
Print Are you sure? z Q Data01 Yes No
OK Key
Back Key
Left Select Key / Right Select Key
Using the Menu Selection System
Menu Selection System
1Report Print 2USB Memory 3Job Box Exit
Detail
File Name
ABCDEFGHIJKLMNOPQRSTN Detail
Menu
Setting a Mode Selection Menu
1Report Print 2USB Memory 3Job Box Exit
Report Print: a b 1Menu Map 2Status Page
3Font List Exit Print Are you sure? z Menu Map
Yes No
Using the Operation Panel
Menu Map
FS-C5400DN
Printer
Menu Map Sample
Print Are you sure? z Status Page Yes No
Status Page
Status Page Printing a printers status page
Understanding the Status Page
2 Printer Settings Information
3 Installed Options
Font List Printing a list of the printers fonts
1 Firmware Version
Are you sure? z RAM File List Yes No Print
Print Are you sure? z Font List Yes No Print
Are you sure? z Hard Disk File List Yes No
Print Are you sure? z Mem. Card File List
Yes No
USB Memory USB memory selection
Print File Prints the selected file
Detail Shows the details of the selected file
Folder Name: 1/ ABCDEFGHIJKLMNOPQRSTN Detail
ABCDEFGHIJKLMNOPQRSTN
Cannot remove the memory while in use
Detail
Job Box
Job Retention
Quick Copy
Proof-and-Hold
1Quick Copy 2Private/Stored 3Job Box Settings
Job Box
Quick Copy Using Quick Copy
Exit
Quick Copy
User01
User02
lUser03
QData02 QData03 Delete Delete
Are you sure? z Q Data01 Yes No Completed
Quick Copy
User01
Quick Copy
User01
User02
lUser03
Accepted
Quick Copy
User01
User02
Private/Stored: a b lUser01 lUser02 lUser03
l User01
0000-9999
0123456789 Bckspace Enter
0123456789
Bckspace Enter Delete Are you sure? z Q Data01
Copies
Print Are you sure? z Q Data01 Yes No Accepted
Completed Job Box Settings: a b 1Quick Copy Jobs
Quick Copy Jobs: a b
Job Box Settings Job Box Configuration
Exit
Job Log
Job Log: a b 0006 n ABCDEFGHIJN
Content
Detail
0006 Detail
Total Displaying the total printed pages
Counter Viewing the counter value
Color Displaying the color printed pages
Black & White: O b Total17000 A42000 B51000
Paper Settings
Paper Settings: a b 1MP Tray Set 2Cassette 1 Set
3Cassette 2 Set Exit MP Tray Set.: a b
1Paper Size 2Media Type Exit
1 *Envelope Monarch 2Envelope #10 3Envelope DL
Paper Size
Media Type Paper type setting for MP tray
MP Tray Set.: a b 1Paper Size 2Media Type
1 *Plain
2Transparency 3Preprinted Exit
Exit
Cassette 1 Set. a b 1Media Type
2Other Paper Size 3Custom PaperSize Exit
Selecting the Size Dial Setting
Setting the Paper Size from the Operation Panel
Other Paper Size: a b 1*Envelope C5 2Executive
3 Letter Exit
Using the Operation Panel
5Press U or V to select the desired paper size
Custom PaperSize: a b 1Measurement 2Size EntryY
3Size EntryX Exit Measurement: a b 1*inch 2mm
Size EntryY: a b
Setting a Custom Paper Size
Size EntryX: a b
Cassette 1 Set
Other Paper Size
Custom PaperSize
Media Type
Paper Weight
Setting the Paper Thickness
Media Type
1Paper Weight Exit Paper Weight: a b 1Extra Heavy
Media Type Set.: a b 1Plain 2Transparency
3Preprinted Exit
2*Heavy 3Heavy Media Type Set.: a b 1Plain
1Paper Weight 2Duplex Exit Paper Weight: a b
1Paper Weight 2Duplex Exit
CUSTOM
1Extra Heavy 2*Heavy 3Heavy Media Type Set.: a b
Reset Type Adjust. Are you sure? Yes No
Reset Type Adj. Resets customized settings
Print Settings
Print Settings: a b 1Paper Selection
2Paper Feed Mode 3Duplex Exit
Paper Selection: a b 1*MP Tray 2Cassette
Paper Feed Mode: a b 1*Auto 2Fixed
Alternative
When the Paper Runs Out During Printing
Plain
Duplex Setting the duplex printing
Binding Modes
1 *Off
2Bind Long Edge 3Bind Short Edge
Override A4/LTR: a b 1*Off 2On
Emulation Set. Setting the emulation
Emulation Set.: a b 1Emulation 2KPDL Error Rpt
2KPDL Error Rpt Exit KPDL Error Rpt. a b 1*Off
Emulation
1 *PCL6
Color Mode
1 *Color
2Black & White Print Quality: a b 1EcoPrint
2Gloss Mode Exit
2High Page Setting: a b 1Copies 2Orientation
Gloss Mode
1 *Low
3Wide A4 Exit
Orientation: a b 1*Portrait 2Landscape
Copies
Copies Number of copies
Orientation Print orientation
Wide A4
2On XPS FitTo Page: a b 1*Off 2On
1 *Off
Wide A4 Wide A4 pitch
2Image Resolution 3Print Resolution
TIFF/JPEG Size: a b 1*Paper Size
2Press OK. The TIFF/JPEG Size screen appears
4-54
Network Network settings
1TCP/IP Settings Exit TCP/IP Settings: a b
1TCP/IP 2IPv4 Setting 3IPv6 Setting Exit
Network
IPv4 Setting: a b 1DHCP 2IP Address 3Subnet Mask
TCP/IP
TCP/IP Enable/Disable TCP/IP
IPv4 Setting TCP/IP IPv4 settings
DHCP
1Off 2*On
IP Address: a b
DHCP DHCP setting
Subnet Mask Subnet mask setting
Subnet Mask
Default Gateway Gateway setting
Bonjour
Default Gateway: a b
Bonjour Bonjour setting
IPv6 Setting: a b 1TCP/IPIPv6 2RAStateless
3DHCPv6 Exit
TCP/IPIPv6: a b 1Off 2*On
IPv6 Setting TCP/IP IPv6 settings
RAStateless: a b 1Off 2*On
DHCPv6
RAStateless RA Stateless setting
DHCPv6 DHCPv6 setting
Device Common Selecting/Setting the common device
3RAM Disk Setting Exit
Device Common: a b 1Language 2Buzzer
Language
Buzzer
1Key Confirmation 2Job Finish 3Ready Exit
Using the Operation Panel
Press OK. The Buzzer screen appears
Key Confirmation: a b 1Off 2*On
Job Finish
Ready
Key Confirmation Key confirmation tone setting
Error 1Off 2*On
Error Error tone setting
2RAM Disk Size Exit
RAM Disk Setting: a b 1RAM Disk Mode
RAM Disk Setting Using the RAM disk
RAM Disk Mode: a b 1*Off 2On
RAM Disk Size: a b
RAM Disk Mode Setting the RAM disk
RAM Disk Size RAM disk size setting
Format Are you sure? zHard Disk Yes No
Format Hard Disk
Format Are you sure? zMemory Card Yes No
Display Bright.: a b 1Darker 2Darker 3*Normal
Display Bright. Display brightness setting
Format Mem. Card Formatting the memory card
Error Handling: a b 1DuplexPaperError
DuplexPaperError: a b 1 *1-sided 2Display Error
2Paper Mismatch Exit
Error Handling Error detection setting
Paper Mismatch: a b 1*Continue 2Display Error
Timer Setting: a b 1Err. Clear Timer 2Sleep Timer
3PanelReset Timer Exit
Timer Setting
Err. Clear Timer: a b
Sleep Timer
Err. Clear Timer Setting the error clear time
Sleep Timer Sleep timer timeout time
PanelReset Timer: a b
PanelReset Timer Setting the panel reset timer
FormFeed TimeOut:a b
5 - 495 /30-sec
Auto Panel Reset: a b 1Off 2*On
Auto Err. Clear: a b 1*Off 2On
Auto Sleep
Auto Sleep Setting the sleep timer
Security Security function setting
Network Security: a b 1Netware 2AppleTalk 3IPP
Netware
1Off/On 2Frame Type Exit
Netware NetWare setting
Off/On
Frame Type
1 *Auto
2802.3 3Ether-II
AppleTalk
AppleTalk AppleTalk setting
IPP IPP setting
1 *Off
SSL Setting
1SSL 2IPP over SSL 3HTTPS Exit
1Off/On 2*Encryption Exit
SSL Setting SSL Server setting
Encryption
3DES
Complete
Encryption Encryption setting
IPP over SSL: a b 1*Off 2On
HTTPS
IPP over SSL SSL Server IPP over SSL setting
HTTPS SSL Server HTTPS setting
IPSec
I/F Block Set.: a b 1USB Host 2USB Device
3Option I/F Exit
USB Host
USB Device
Option I/F
1 *Unblock
2Block
Job Account.Set. Job Account setting
0123456789 Bckspace Login Job Account.Set.:a b
0123456789 Bckspace Next
1Job Accounting 2Account. Report
Job Accounting: a b 1*Off 2On Print Are you sure?
z Account. Report Yes No
Job Accounting Job Accounting settings
Account. Report Account report printing
1Printed Pages 2Counter Reset
Each Job Account: a b k341736 k00923022 k12345678
Printed Pages: a b Total300000
Color200000 Black & White
Reset counter. Are you sure? z k Yes No
Account. List: a b k1228 k00122 k3485739
Account ID
1 - 8 digit
1Detail/Edit 2Delete 3Exit
Restrict.Total: a b 1*Off 2Counter Limit
3Reject Usage Detail/Edit: a b 1Account ID
2Restrict.Total 3LimitTotal LimitTotal: a b
This account ID is already registered
Restrict.Color: a b 1*Off 2Counter Limit
2Restrict.Total 3LimitTotal LimitColor: a b
3LimitTotal Account. List: a b k1228 k00122
k3485739 Add
Delete Are you sure? z k Yes No
Account. List: a b k00122 k3485739 Add
Apply Limit
1Immediately 2*Subsequently
Job Account.Set.:a b 1Job Accounting
Unknown ID Job: a b 1*Reject 2Permit
2Account. Report 3Each Job Account Exit
Administrator Administrator settings
Admin. Password: P b 1 - 16 digit
0123456789 Bckspace Login Administrator: P b
1Admin. ID 2Admin. Password Exit
New ID
Confirm Password: P b 0 - 16 digit
0123456789 Bckspace Enter Administrator: a b
1Admin. ID 2Admin. Password Exit
New Password: P b 0 - 16 digit
Adjust/Maint. a b 1ColorCalibration
2Color Regist 3Restart Exit
Start the color calibration. Are you sure?
Yes No
1Print Chart 2Adjust Magenta 3Adjust Cyan Exit
Color Regist.: a b 1Normal 2Detail Exit
Normal
Print Are you sure? z Registration chart
Sample Color Registration Correction Chart Normal
Using the Operation Panel
Color Registration Correction Chart
4-99
Adjust Magenta: a b I - A, 0 - H-L:/0- V: 0 H-R:0
Adjust Magenta: a b I - A, 0 - H-L:/*- V: 0 H-R:0
1Print Chart 2Adjust Magenta 3Adjust Cyan Exit
Adjust Magenta Magenta correction
Adjust Cyan
Adjust Yellow: a b I - A, 0 - H-L:/0- V: 0 H-R:0
I - A
H-L:/0-
1Print Chart 2Adjust Magenta 3Adjust Cyan Exit
Print Are you sure? z Registration chart Yes No
Detail
Using the Operation Panel
Sample Color Registration Correction Chart Detail
4-103
Adjust Magenta: a b I - A, 0 - H-1:/0-H-2:0 H-3:0
Adjust Magenta: a b I - A, 0 - H-1:/*-H-2:0 H-3:0
H-4:0 H-5:0 V-3:0
1Print Chart 2Adjust Magenta 3Adjust Cyan Exit
Adjust Yellow: a b I - A, 0 - H-1:/0-H-2:0 H-3:0
I - A, 0 - H-1:/0-H-2:0 H-3:0 H-4:0 H-5:0 V-3:0
H-4:0 H-5:0 V-3:0 Restart Are you sure? Yes No
Adjust Cyan
Service Setting: a b 1Service Status
Are you sure? z Service Status Yes No
2Network Status 3Test Page Exit Print
Service Setting for Maintenance
Print Are you sure? z Network Status Yes No
Print Are you sure? z Test Page Yes No
Network Status Printing the network status page
Test Page Printing the test page
Are you sure? Yes No
Maintenance Are you sure? Yes No DEV-CLN
DEV-CLNDeveloper/Refresh mode setting
Drum Are you sure? Yes No LSU Are you sure?
Drum Drum/Refresh mode setting
LSU LSU cleaning mode setting
Yes No
Using the Operation Panel
4-110
5 Maintenance
Toner Container Replacement
Cleaning the Printer
General Information
Toner Container Replacement
General Information
Toner Color
Toner container model number
Toner Kits
Replacing the Toner Container
4Take the new toner container out of the toner kit
Replacing the Waste Toner Box
5Open the cap of the new waste toner box
Cleaning the Printer
Cleaning the Paper Transfer Unit
4Push the front cover back in completely
Maintenance
5-10
6 Troubleshooting
Print Quality Problems
Error Messages
General Guidelines
Symptom
Refer to Print Quality Problems on page
General Guidelines
Check Items
Print Quality Problems
Printed Results
Corrective Action
page
Replacement on page
For details, refer to Paper Settings on page
Container Replacement on page
Printed Results
Cleaning the Paper Transfer Unit on page
Printed Results
Corrective Action
Grey background
Error Messages
Canceling
Clean the printer
Check cassette #
Check waste toner
Close left cover
Job Accounting
KPDL error
No multi copies
Press OK
RAM disk error
Unknown toner
Incorrect password
Incorrect ID
Incorrect account ID
Message
Storage Error Codes
Hard Disk Errors Code Meaning
Memory Card and USB Memory Errors Code Meaning
RAM Disk Errors Code Meaning
Clearing Paper Jams
Paper
jammed in
the printer
Paper
jammed in
cassette #
Help
Paper Jam in Printer
Troubleshooting
4Close the front cover
6-19
Fuser
Paper Jam at Cassette 2 to
Troubleshooting
6-20
Appendix
Interface
USB Interface
Basic Specification
Connectors
Network Interface
Automatic IP Address Resolution
Management using Web Browsers
Connector
EMI Countermeasures
Operation Environment
VCCI Class B, FCC Class B U.S., CE Europe
About the Options
Expansion Memory Modules
Expansion Memory Modules
Installing the Memory Modules
Removing a Memory Module
Print Are you sure? z Status Page Yes No
Checking Expansion Memory
General Description of Options
Memory Card
PF-500, PF-510Paper Feeder
Reading the Memory Card
Base CA-500
Hard Disk HD-5A
Additional network interface
PF-510
USB Memory
Item
Specifications
Description
Description
Item
Paper Types†
A-14
Glossary
Default Gateway
DHCP Dynamic Host Configuration Protocol
Form Feed Timeout
NetBEUI NetBIOS Extended User Interface
IP Address Internet Protocol Address
KPDL
MP Tray
Subnet Mask
Status page
USB Universal Serial Bus
Glossary-4
Index
Index-2
Index-3
Index-4
We recommend the use of our own brand supplies
Page
First Edition
452+%9