|
| Chapter 7: Troubleshooting and Support | |
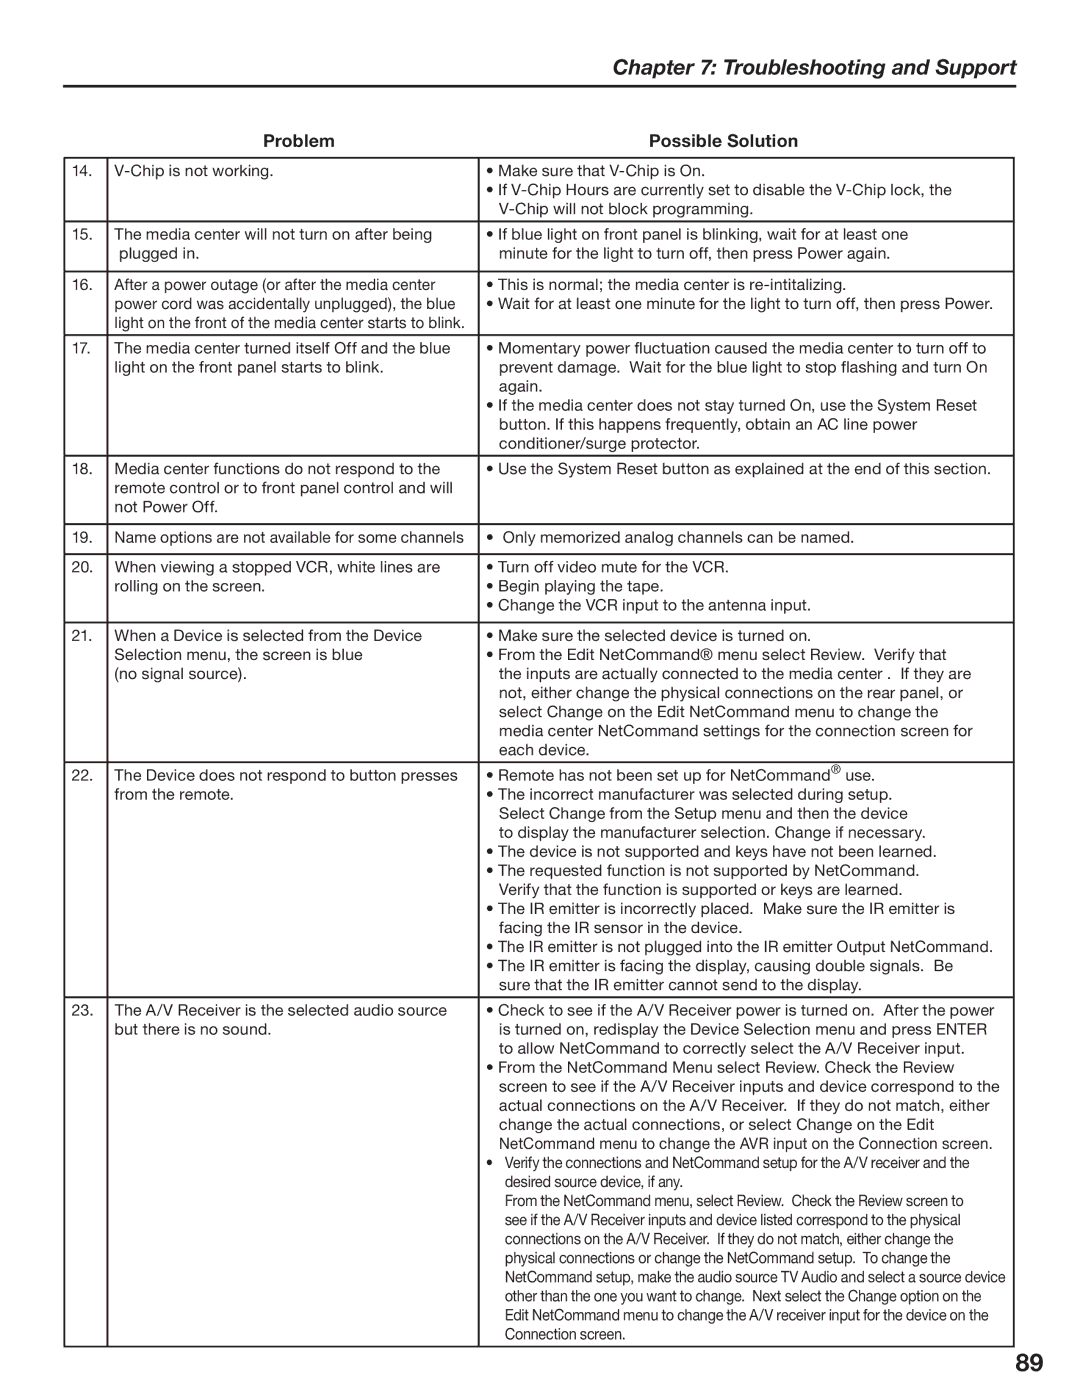
| Problem | Possible Solution | |
|
|
|
|
14. | • Make sure that |
| |
|
| • If |
|
|
|
| |
|
|
|
|
15. | The media center will not turn on after being | • If blue light on front panel is blinking, wait for at least one |
|
| plugged in. | minute for the light to turn off, then press Power again. |
|
|
|
|
|
16. | After a power outage (or after the media center | • This is normal; the media center is |
|
| power cord was accidentally unplugged), the blue | • Wait for at least one minute for the light to turn off, then press Power. |
|
| light on the front of the media center starts to blink. |
|
|
|
|
|
|
17. | The media center turned itself Off and the blue | • Momentary power fluctuation caused the media center to turn off to |
|
| light on the front panel starts to blink. | prevent damage. Wait for the blue light to stop flashing and turn On |
|
|
| again. |
|
|
| • If the media center does not stay turned On, use the System Reset |
|
|
| button. If this happens frequently, obtain an AC line power |
|
|
| conditioner/surge protector. |
|
|
|
|
|
18. | Media center functions do not respond to the | • Use the System Reset button as explained at the end of this section. |
|
| remote control or to front panel control and will |
|
|
| not Power Off. |
|
|
|
|
|
|
19. | Name options are not available for some channels | • Only memorized analog channels can be named. |
|
|
|
|
|
20. | When viewing a stopped VCR, white lines are | • Turn off video mute for the VCR. |
|
| rolling on the screen. | • Begin playing the tape. |
|
|
| • Change the VCR input to the antenna input. |
|
|
|
|
|
21. | When a Device is selected from the Device | • Make sure the selected device is turned on. |
|
| Selection menu, the screen is blue | • From the Edit NetCommand® menu select Review. Verify that |
|
| (no signal source). | the inputs are actually connected to the media center . If they are |
|
|
| not, either change the physical connections on the rear panel, or |
|
|
| select Change on the Edit NetCommand menu to change the |
|
|
| media center NetCommand settings for the connection screen for |
|
|
| each device. |
|
|
|
|
|
22. | The Device does not respond to button presses | • Remote has not been set up for NetCommand® use. |
|
| from the remote. | • The incorrect manufacturer was selected during setup. |
|
|
| Select Change from the Setup menu and then the device |
|
|
| to display the manufacturer selection. Change if necessary. |
|
|
| • The device is not supported and keys have not been learned. |
|
|
| • The requested function is not supported by NetCommand. |
|
|
| Verify that the function is supported or keys are learned. |
|
|
| • The IR emitter is incorrectly placed. Make sure the IR emitter is |
|
|
| facing the IR sensor in the device. |
|
|
| • The IR emitter is not plugged into the IR emitter Output NetCommand. |
|
|
| • The IR emitter is facing the display, causing double signals. Be |
|
|
| sure that the IR emitter cannot send to the display. |
|
|
|
|
|
23. | The A/V Receiver is the selected audio source | • Check to see if the A/V Receiver power is turned on. After the power |
|
| but there is no sound. | is turned on, redisplay the Device Selection menu and press ENTER |
|
|
| to allow NetCommand to correctly select the A/V Receiver input. |
|
|
| • From the NetCommand Menu select Review. Check the Review |
|
|
| screen to see if the A/V Receiver inputs and device correspond to the |
|
|
| actual connections on the A/V Receiver. If they do not match, either |
|
|
| change the actual connections, or select Change on the Edit |
|
|
| NetCommand menu to change the AVR input on the Connection screen. |
|
|
| • Verify the connections and NetCommand setup for the A/V receiver and the |
|
|
| desired source device, if any. |
|
|
| From the NetCommand menu, select Review. Check the Review screen to |
|
|
| see if the A/V Receiver inputs and device listed correspond to the physical |
|
|
| connections on the A/V Receiver. If they do not match, either change the |
|
|
| physical connections or change the NetCommand setup. To change the |
|
|
| NetCommand setup, make the audio source TV Audio and select a source device |
|
|
| other than the one you want to change. Next select the Change option on the |
|
|
| Edit NetCommand menu to change the A/V receiver input for the device on the |
|
|
| Connection screen. |
|
|
|
|
|
89