6.9 Setting Messages (MSG)
6.9 Setting Messages (MSG)
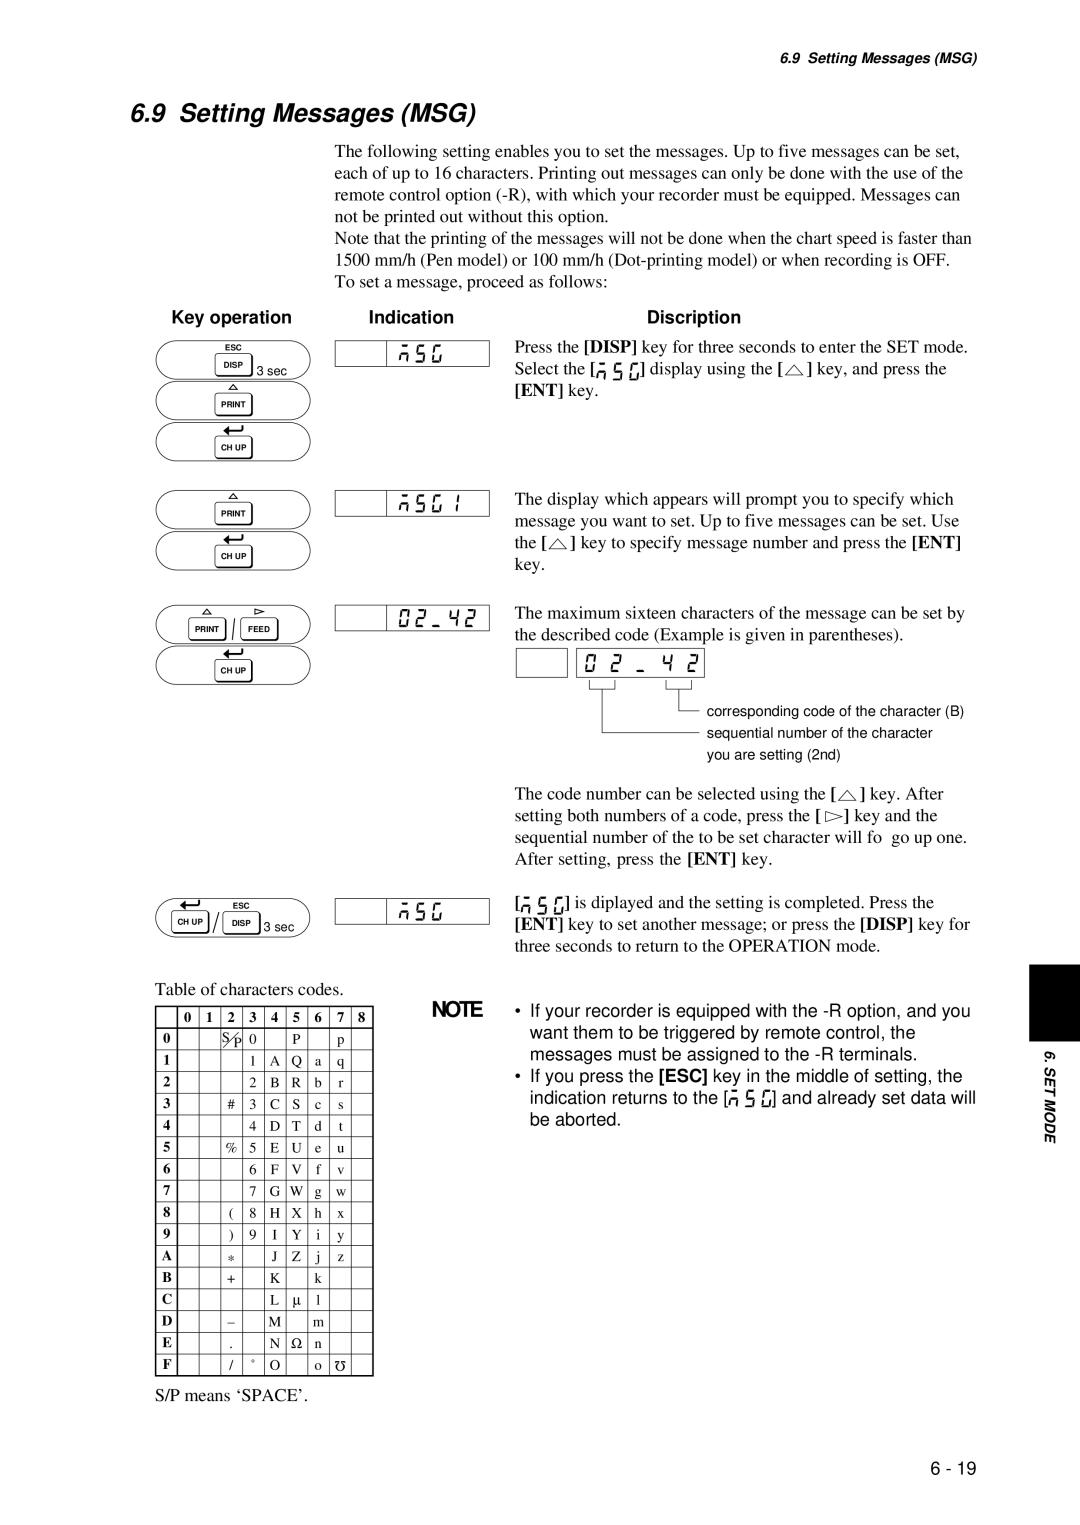
The following setting enables you to set the messages. Up to five messages can be set, each of up to 16 characters. Printing out messages can only be done with the use of the remote control option
Note that the printing of the messages will not be done when the chart speed is faster than 1500 mm/h (Pen model) or 100 mm/h
Key operation
ESC
DISP
3 sec
CH UP
CH UP
PRINT FEED
Indication
Discription
Press the [DISP] key for three seconds to enter the SET mode.
Select the [ ![]()
![]()
![]() ] display using the [
] display using the [![]() ] key, and press the [ENT] key.
] key, and press the [ENT] key.
The display which appears will prompt you to specify which message you want to set. Up to five messages can be set. Use the [![]() ] key to specify message number and press the [ENT] key.
] key to specify message number and press the [ENT] key.
The maximum sixteen characters of the message can be set by the described code (Example is given in parentheses).
CH UP
| ESC |
|
CH UP | DISP | 3 sec |
|
|
Table of characters codes.
0 | 1 | 2 | 3 | 4 | 5 | 6 | 7 | 8 |
0 |
| S P 0 |
| P |
| p |
| |
1 |
|
| 1 | A | Q | a | q |
|
|
|
|
|
|
|
|
|
|
2 |
|
| 2 | B | R | b | r |
|
|
|
|
|
|
|
|
|
|
3 |
| # | 3 | C | S | c | s |
|
|
|
|
|
|
|
|
|
|
4 |
|
| 4 | D | T | d | t |
|
|
|
|
|
|
|
|
|
|
5 |
| % | 5 | E | U | e | u |
|
|
|
|
|
|
|
|
|
|
6 |
|
| 6 | F | V | f | v |
|
77 G W g w
8 | ( | 8 | H | X | h | x |
9 | ) | 9 | I | Y | i | y |
|
|
|
|
|
|
|
A | * |
| J | Z | j | z |
B | + |
| K |
| k |
|
|
|
|
|
|
|
|
C |
|
| L | ∝ | l |
|
|
|
|
|
|
|
|
D | – |
| M |
| m |
|
|
|
|
|
|
|
|
E | . |
| N | Ω | n |
|
|
|
|
|
|
|
|
F | / | ˚ | O |
| o | Ω |
|
|
|
|
|
|
S/P means ‘SPACE’.
corresponding code of the character (B)
sequential number of the character
you are setting (2nd)
The code number can be selected using the [![]() ] key. After setting both numbers of a code, press the [
] key. After setting both numbers of a code, press the [ ![]() ] key and the sequential number of the to be set character will fo go up one. After setting, press the [ENT] key.
] key and the sequential number of the to be set character will fo go up one. After setting, press the [ENT] key.
[ ![]()
![]()
![]() ] is diplayed and the setting is completed. Press the [ENT] key to set another message; or press the [DISP] key for three seconds to return to the OPERATION mode.
] is diplayed and the setting is completed. Press the [ENT] key to set another message; or press the [DISP] key for three seconds to return to the OPERATION mode.
NOTE • If your recorder is equipped with the
•If you press the [ESC] key in the middle of setting, the
indication returns to the [![]()
![]()
![]()
![]()
![]()
![]() ] and already set data will be aborted.
] and already set data will be aborted.
6. SET MODE
6 - 19
