Manuals
/
Panasonic
/
Computer Equipment
/
All in One Printer
Panasonic
DP-3000, DP-2000
manual
177, Printing/Scanning Area
Models:
DP-3000
DP-2000
1
177
180
180
Download
180 pages
26.84 Kb
173
174
175
176
177
178
179
180
Troubleshooting
Install
Password
Warranty
Configuration Editor
Parameter Reset
English\Lpr\Setup.exe
Parallel Interface Connector
Activation Procedure
Halftone Color Adjustment
Page 177
Image 177
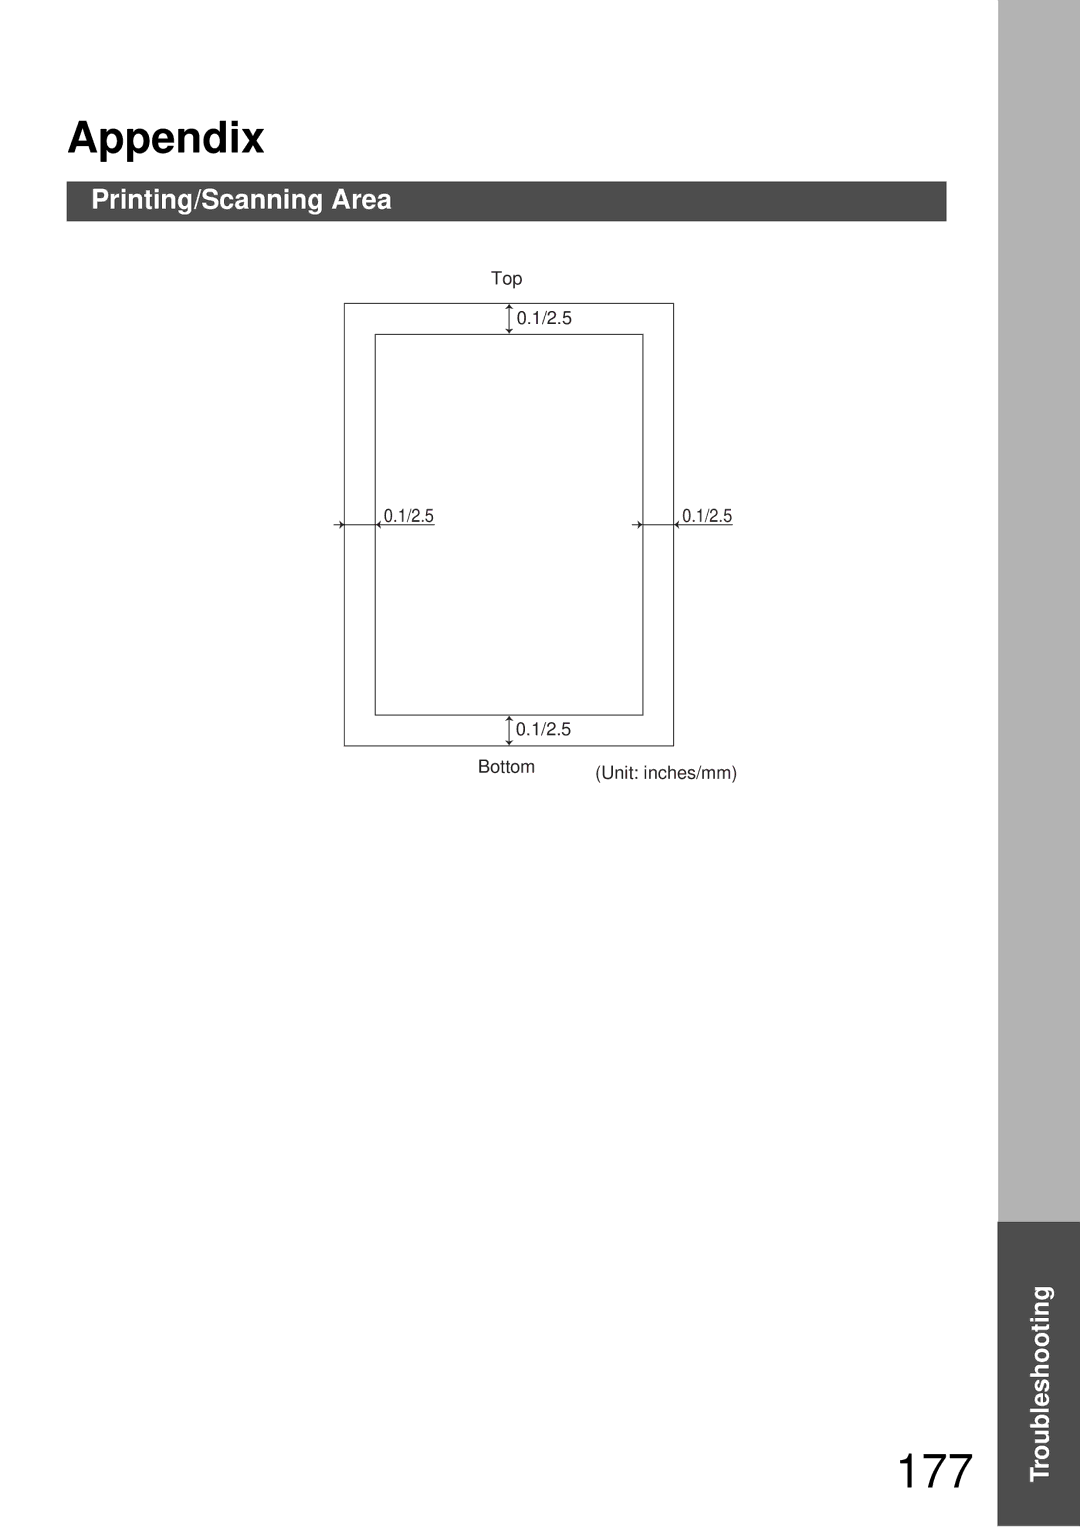
Appendix
Printing/Scanning Area
Top
0.1/2.5
0.1/2.5
0.1/2.5
0.1/2.5
Bottom
(Unit: inches/mm)
177
Troubleshooting
Page 176
Page 178
Page 177
Image 177
Page 176
Page 178
Contents
English
DP-2000/2500/3000
Energy Star
Table of Contents
Document Management System Section
Troubleshooting
Precautions
External View
External View and Control Panel
FAX
Control Panel For DP-2500/3000
FAX
Control Panel For DP-2000
DP-2000/2500/3000
\English\Lpr\Setup.exe
Installing the LPR Line Printer Remote Monitor
Installing the Printer Driver
\English\Driver\Win9x
Default printer?, select Yes or No
Response to Do you want your Windows
Based programs to use this printer as
Installation and Configuration Windows 95/98/Me
Add Port dialog box appears. Click the Other
Configuring the Printer Driver Settings
Comment
General Tab
Separator
Button
Timeout settings Not selected
Print using the following driver
Timeout settings Transmission retry
Details Tab Print to the following port
Spool Data Type
Enable bidirectional support
Password
Sharing Tab Not Shared/Shared As
Share Name
Paper Size
Paper/Layout Tab
Paper Source
Orientation
Printing on both sides Duplex
Handling Tab Sorter
Flipping Direction
Binding Margin
Staple
Document orientation
Stapling position
Resolution
Quality Tab Halftone
Density
Device Options Tab
Secure Print Password
Duplex Unit
Inner Tray
Setting Print Conditions Setting on the Device
Touch-panel
Display
Click Control Panel
Installation and Configuration Windows NT
Select Network Service dialog box, then select
Network Settings Change dialog box is displayed
Microsoft TCP/IP Printing
Installing the Printer Driver
Available Ports list appears For local printer, click
\English\Driver\WinNT4
Select Not Shared and click
Required files are copied
Configuring the Printer Driver Settings Administrator
Driver
Location
Print Processor
Enable printer pooling
Enable bidirectional support
Ports Tab
Print to the following ports
Priority
Scheduling Tab Available
Spool print documents... / Print directly to the printer
Hold mismatched documents
Sharing Tab
Not Shared/Shared
Alternate Drivers
Security Tab
Halftone Setup
Device Settings Tab
Button
Halftone Pattern
Device Gamma
Pixel Diameter
Luminance CIE Y
Configuring the Printer Driver Settings User
Copy Count
Setup Tab Paper Size
Sort
Print on Both Sides Duplex Printing
Scaling
Advanced Tab
Advanced Tab Metafile Spooling
Document orientation Paper orientation Stapling position
Secure Print
Halftone Color Adjustment
Press the Printer key Press the Function key
About Windows
Installation and Configuration Windows
Installation and Configuration Windows
Installation and Configuration Windows
Finish
\English\Driver\WinNT4
Select Do not share this printer and click
Finish
Installation and Configuration Windows
General Tab Printer Name
Features
Location and Comment
Model
Additional Drivers
Ports Tab Print to the following ports
Spool print documents so program finishes printing faster
Always available/Available from
Keep printed documents
Enable advanced printing features
Add or delete a user or group in the list
Adjust the gamma strength of colors of printing image
Security Print Password
Configuring the Printer Driver Settings User
Range
Select Printer
Number of copies
Collate
Print on Both Sides Duplex
Layout Tab Orientation
Paper/Quality Tab
Advanced Paper Size
Ledger
Adjust the contrast of the printing image
FAX
Printing from Windows Applications
Print Operation
Printer server PC connected to a printer
Printing on Network
Select Network Printer
Remote PC that uses other computers printer
Class 2 Fax Modem Section
Installation Windows 95/98/Me
Class 2 Fax Modem
Control Panel
Select No, I want to select the hardware from List
Select No, the device isnt in the list
Enter D\Setup
Select Ports COM&LPT
Select Communications Port
12Repeat steps from 1 to
Select Dont detect my modem I will select it
Enter D\English\Setup
From a list
Select Panasonic DP-2000, DP-2500 or
Select Panasonic MFP Redirected Com Port COM3
Installation Windows NT
Where D is your CD-ROM drive Click the OK Button
Close the Modems Properties screen
Select Add/Troubleshoot a device
Installation Windows
Select No, I want to select the hardware from a list
Select Add a new device
It from a list
Select the COM port shown at the bottom COM ports list Click
Fax Modem
Page
Document Management System Section
Click Install Pdms software
Installing the Document Management System
Click the Typical button
Installing the Document Management System
Configuration Editor
Main Window
Document Manager
Menu Bar
Title Bar
Tool Bar
Folder Window
Basic Operations
Selecting documents
Editing documents
Copying/Moving Documents
100
101
Setting Plug-in
Import document from scanner
Import document from file
102
File Menu
103
New Folder
Open
Rename
104
Properties
Acquire Image
105
Print Setup
Print
Horizontal Position and Vertical Position
Launch to another application
106
Trash Can
107
Open Trash Can
Empty Trash Can
Edit Menu
108
View Menu
109
List Format/Thumbnail Format
Arrange Documents
Document Menu
110
Duplicate
Rotate Object
111
Ungroup
Enhancement
Document Scanner
112
113
Slice Level valid only when monochrome is selected
Preview Window
Image Type
114
Adjustment Gamma Curve
115
Tool Menu
Adjustment Highlight and Shadow
Parameter Reset
116
Image Scanning
117
118
Document Viewer
119
List
120
Size Bar
Image Window
Selecting
121
Image Editing
Selecting Area
Annotation Function
122
Save
123
124
Vertical position and horizontal position
In-1 printing
Mapi Compliant
125
126
127
Copy Page to Clipboard
Rotate
Menu
128
Annotation Menu
129
130
Text
Line
131
Rectangle
Ellipse
132
White Block
Black Block
133
Marker
Label
134
Stamp
Date
Graphics Format Setup
Text Format Setup
135
Number
Image Menu
136
Correct Skew
Eliminate Noise
Brightness/Contrast
137
Hue/Chroma
Reverse Gradation
Monochrome
138
Grayscale
RGB Color
139
Task Bar Display
140
Task Bar Menu
141
Display Status Details
142
Configuration Tab Model
Configuration
143
Paper Tab
144
145
Retry
Exit Exit the program
Buttons
146
User Parameters Folder
147
Fax Parameters Folder
148
149
Copier Settings Folder
General Functions Folder
150
Journal Folder
151
152
Phone Book Settings Shortcut Activation Folder
153
Features
154
Activation Procedure
Main Window For DP-2500/3000
155
Main Window For DP-2000
156
157
Retrieve/Write
Retrieve
Write
158
Open/Save File
159
Open File
File Open dialog box appears
160
Save File
For Save File
161
Insert Entry
Click Insert Entry
162
Delete Entry
Click Delete Entry
Starting with
163
164
Document is not printed correctly
Select Spool print jobs so program finishes printing faster
165
Error messages displayed on the computer
166
Adding Paper
Sheet paper drawer/tray
Replacing the Toner Cartridge and Waste Toner Bottle
167
168
Removing a Misfeed Paper
169
Finisher
170
171
Removing a Paper Misfeed
Paper Transport Area
Paper Entry area
172
ADU
173
System Console
174
ADF/i-ADF
175
176
Printing/Scanning Area
177
178
Parallel Interface Connector
179
Warranty
Top
Page
Image
Contents