Manuals
/
Pioneer
/
Home Audio
/
Stereo Receiver
Pioneer
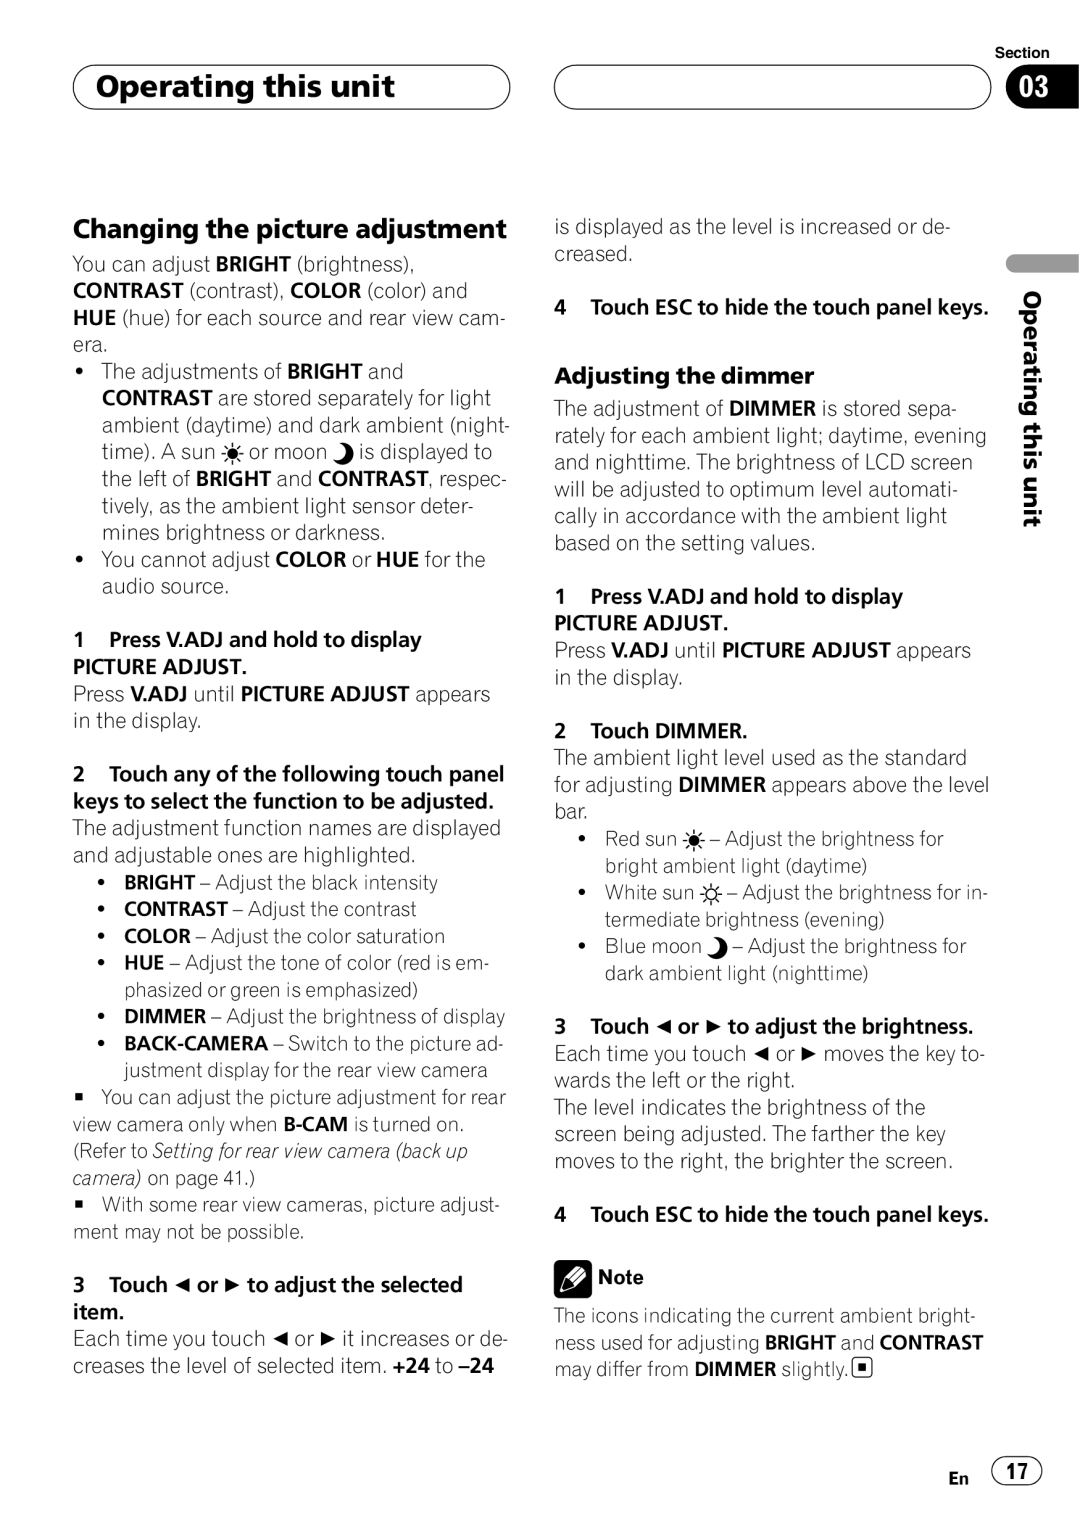
AVH-P4900D Changing the picture adjustment, Adjusting the dimmer, Operating this unit
Models:
AVH-P4900D
1
17
85
85
Download
85 pages
22.78 Kb
14
15
16
17
18
19
20
21
Tuning in strong signals
Symptom
Available accessories XM tuner
To avoid battery exhaustion
Adjusting the LCD panel angle
Resetting the microprocessor
Optional remote control
How to
Adjusting the volume
Features
Page 17
Image 17
Page 16
Page 18
Page 17
Image 17
Page 16
Page 18
Contents
AVH-P4900DVD
DVD AV Receiver
English
Operation Manual
Thank you for buying this Pioneer product
Contents
To ensure safe driving
Precautions IMPORTANT SAFEGUARDS
Parking brake interlock
01 Precautions
To avoid battery exhaustion
For Canadian model
Before You Start Information to User
About this unit
Playable discs
02 Before You Start
After-sales service for Pioneer products
About this manual
DVD video disc region numbers
Visit our website
Features
Before You Start
“DTS” and “DTS Digital Out” are registered trademarks of DTS, Inc
About WMA
For viewing LCD comfortably
About the SAT RADIO READY mark
To protect the LCD screen
names and other text information may not be correctly displayed
When an operation is prohibited
Resetting the microprocessor
Protecting your unit from theft
Attaching the front panel
Before You Start
What’s What
03 Operating this unit
Head unit
k j i h g f e d c b a
Power ON/OFF
Optional remote control
Operating this unit
Basic Operations
Touch panel key basic operation
Adjusting the volume
1 2 3 4
Activating the touch panel keys
Opening and closing the LCD panel
Adjusting the LCD panel angle
Turning the LCD panel horizontal
Changing the wide screen mode
Adjusting the dimmer
Changing the picture adjustment
Basic Operations
03 Operating this unit Tuner
Storing and recalling broadcast frequencies
1 2 3
Storing the strongest broadcast frequencies
Tuning in strong signals
Introduction of advanced tuner operation
03 Operating this unit Built-in DVD player
Operating the DVD menu
Specifying title
Skipping back or forward to another title
Operating the DVD menu with 10 key
Changing the subtitle language during playback Multi-subtitle
Changing audio language during playback Multi-audio
Changing the viewing angle during playback Multi-angle
Pausing disc playback
Stopping playback
Frame-by-frame playback
Return to the specified scene
Slow motion playback
Automatic playback of DVDs
PBC playback
Displaying text information
Text information
Scrolling text information in the display
Displaying information on compressed audio
Playing tracks in random order
Introduction of advanced operations
Repeating play
Selecting audio output
Scanning tracks of a CD
Resume playback Bookmark
28 En
Selecting tracks from the track title list
Entering disc titles
Using balance adjustment
03 Operating this unit Audio Adjustments
Introduction of audio adjustments
Recalling equalizer curves
Using the equalizer
Adjusting equalizer curves
Adjusting loudness
Adjusting bass and treble
Using subwoofer output
Adjusting bass
Using the high pass filter
Using nonfading output
Boosting the subwoofer level
Operating
34 En
Adjusting source levels
Compensating for equalizer curves EQ-EX
Introduction of DVD setup adjustments
Operating this unit Setting up the DVD player
Setting the subtitle language
Setting the audio language
Switching the assist subtitle on or off
Setting the menu language
Setting the angle icon display
Setting the aspect ratio
Changing the level
Setting the parental lock
Setting the code number and level
If you forget your code number
Initial Settings
Adjusting initial settings
Switching the auxiliary setting
Switching the warning tone
Setting the rear output and subwoofer controller
Correcting distorted sound
Resetting the audio functions
Switching the sound muting/ attenuation
Setting the illumination switch
40 En
Setting the AV input
Introduction of setup adjustments
Setting for rear view camera back up camera
Operating this unit Other Functions
Setting the clock
Setting the automatic open function
Setting the AUX title
Using the AUX source
Selecting the background display
Selecting AUX as the source
44 En
Using the PGM button
Switching the XM display
Available accessories XM tuner
Storing and recalling broadcast stations
Available
Switching the XM channel select mode
04 Available accessories
Channel number select setting
Channel category select setting
Switching the SIRIUS display
Available accessories SIRIUS Satellite Radio tuner
Selecting a SIRIUS channel directly
Selecting the SIRIUS channel select mode
Pausing a song
Available accessories Playing songs on iPod
Listening to songs on your iPod
Browsing for a song
50 En
Displaying text information on iPod
Playing songs in a random order shuffle
accessories
Available accessories Multi-CD Player
Introduction of advanced operations
1 Press A.MENU button to display MENU. MENU appears on the display
Creating a playlist with ITS programming
Using ITS playlists
Function and operation
Playback from your ITS playlist
Available accessories
Erasing a track from your ITS playlist
Erasing a CD from your ITS playlist
Using compression and bass emphasis
Using CD TEXT functions
DVD Player
Displaying disc titles
Selecting a folder
Selecting a disc
5 Preset list display Shows the preset list
TV tuner
Storing the strongest broadcast stations sequentially
Introduction of advanced
operations
58 En
Digital Signal Processor
Introduction of DSP adjustments
Using the position selector
Using the sound field control
FRONT-L
Using the down-mix function
Using the dynamic range control
Using the direct control
Using the Dolby Pro Logic
Setting the speaker setting
04Available accessories
Selecting a cross-over frequency
Correcting the subwoofer’s phase
64 En
Adjusting the speaker output levels
Adjusting the speaker output levels using a test tone
Adjusting the time alignment
Using the time alignment
Adjusting 3-band parametric equalizer
Auto TA and EQ auto-time alignment and auto-equalizing
Using the auto-equalizer
Carrying out auto TA and EQ
Before operating the auto TA and EQ function
Available accessories
Symptom
Additional Information Troubleshooting
Common
Cause
Additional Information
Additional Information
Understanding auto TA and EQ error messages
Additional Information Error messages
Information
Additional Information Understanding messages
Messages
Translation
CD-R/CD-RW discs
Additional Information Handling guideline of discs and player
DVD discs
Read the precautions with CD-R/CD-RW discs before using them
Dual Discs
Compressed audio files on the disc
Example of a hierarchy
Using the display correctly
Compressed audio compatibility
Handling the display
Small fluorescent tube
Liquid crystal display LCD screen
Keeping the display in good condition
Language code, input code
Additional Information Language code chart for DVD
Additional
Terms
80 En
Additional Information
General
Additional Information Specifications
Display
Audio
AM tuner
FM tuner
6,.81
Index
Audio language
4-1, MEGURO 1-CHOME, MEGURO-KU TOKYO 153-8654, JAPAN
PIONEER CORPORATION
KSNZF 07A00000
CRB2343-A UC
Top
Page
Image
Contents