SVM-1000
POWER-CORD Caution
Important the Moulded Plug
Ventilation Caution
Operating Environment
Contents
Confirm Features Accessories
Digital sound/video system for high quality sound and image
Channnel Music and Video Synchromix
Features
Improved design and operability for new club culture
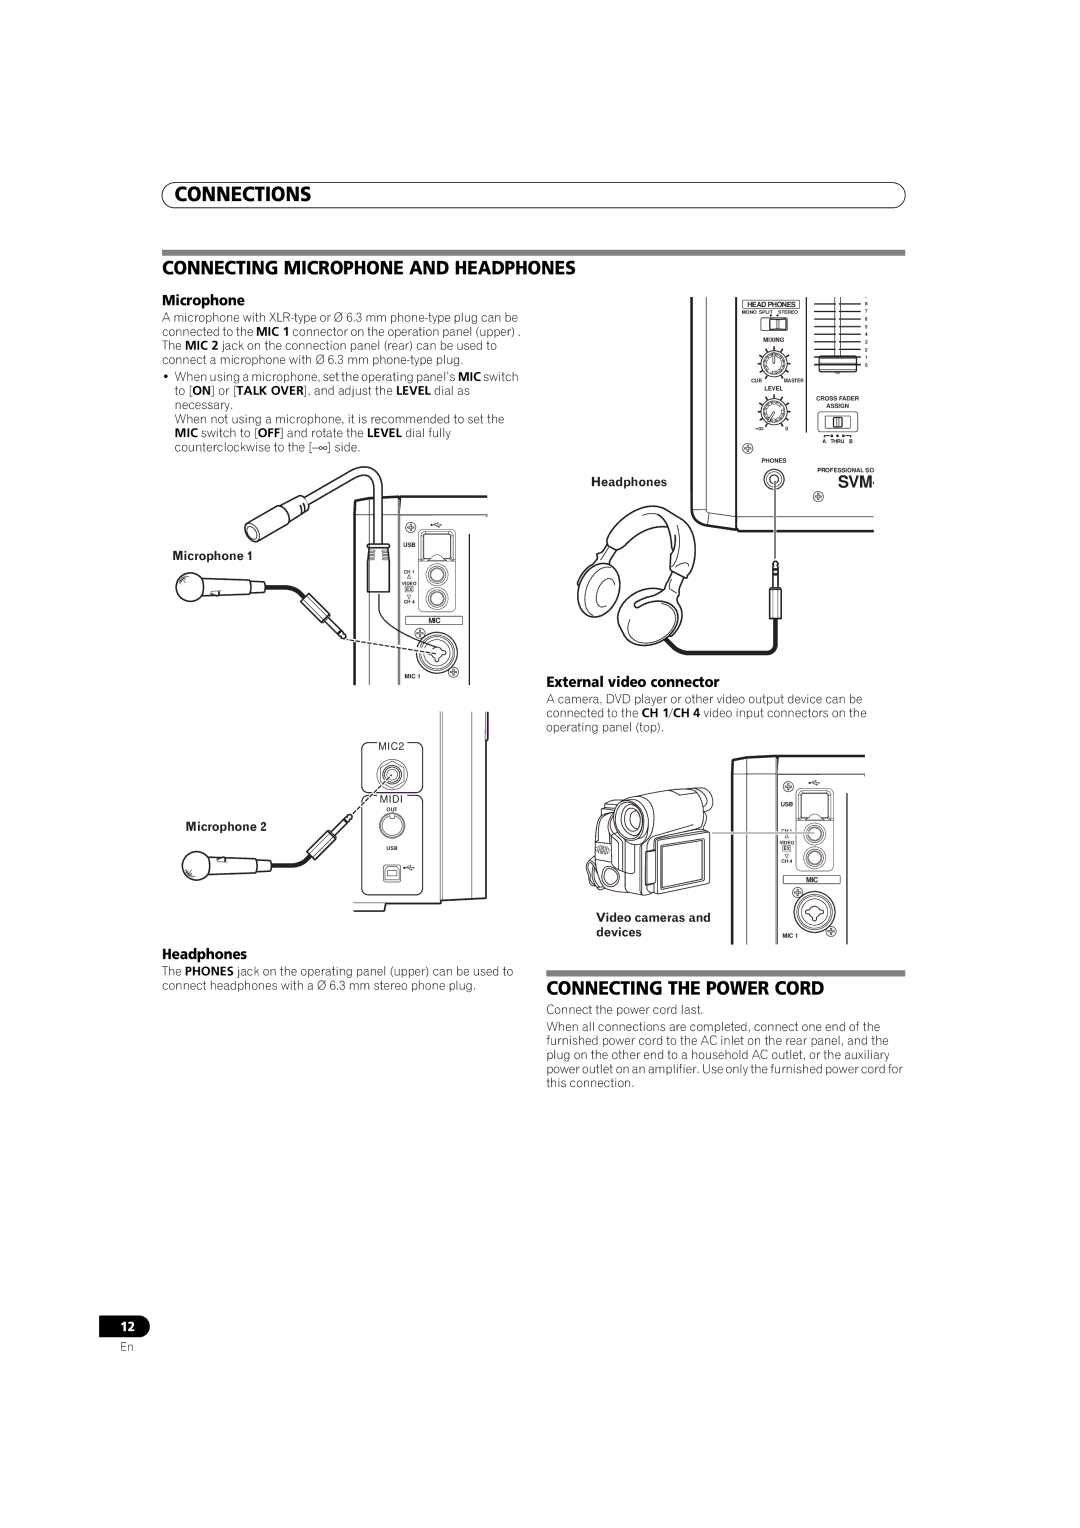
Names and Functions of Parts
Connection Panel
Master COMPONENT, COMPOSITE, S-VIDEO
Operation Panel
Talk Over
Stereo
Phono
Line
Digital
Master level indicator Master L, R
Booth Monitor level control dial
Channel fader curve switch CH Fader Curve
Video EQ button ON/OFF, SET UP
Connecting Inputs
Connecting an analog turntable
Connecting other line level output devices
Connections
Connecting Outputs
Connecting Microphone and Headphones
Connecting the Power Cord
External video connector
Headphones
Basic Operations
Booth Monitor Output
Headphones Output
Fader Curve Selection
Selecting Stereo or Monaural
Using the Video Control Functions
Operating the Video Channel Switch
Operating the Video Cross Fader
Operating in the Video Solo Mode
Video MIX Effects Chart
When Fader AV Sync is on
When Fader AV Sync is OFF
Using the Effect Function
Using Beat Effects
When master monitor is on
When master monitor is off
Manually entering the BPM using the TAP button
Using the visualizer
Video effect pattern
Parameter
Using Touch Effects
When master monitor is off When master monitor is on
Pattern
Select an effect from the effect select buttons
Using Text Effects
Text Bank
Text Edit
Text bank
DISPLAYING/HIDING the Master Monitor
USB keyboard
Text BOX
Caps /
Effect List
Beat effects *1
TIME/PARAMETER
LEVEL/DEPTH
Parameter Description of the effect Beat button parameter
TIME/PARAMETER LEVEL/DEPTH
Touch effects *1
Touched Description
Block
Cube PATTERN1
Spot
Outputs an image of a circle with color in motion
Text effects
Character
Description of the effect Beat button parameters
Using the Jpeg Viewer
Before Using the Jpeg Viewer
Jpeg Viewer Setup
Using a USB memory device
Using a Jpeg file by assigning it to a channel
Operating in Manual Mode
Operating in Auto Mode
Loading Jpeg files to the SVM-1000
Operating in Fader Mode
Press the Clear button once again to leave this mode
Deleting Jpeg files downloaded to the Jpeg BOX
SET UP the Video EQ
Video EQ SET UP
Video Equalizer Function
Turning the Equalizer ON/OFF
Using the Cross Fader to Start Playback
Using the Channel Fader to Start Playback
Fader Start Function
Cross Fader Start Play and Back CUE Play
Perform Utility Setup
Midi Settings
Set up Midi
Midi Code List
Center Panel Area
GUI Buttons
Cross Fader Switch BTN
Random BTN
Zoom BTN
Rotation BTN
Perform Video Monitor Setup
Keyboard Language Setup
Video monitor setup
Keyboard language setup
Hardware Setup
System Settings
MIC Setting
Initiate hardware setup
Master OUT Settings
LCD Settings
Monitor OUT Settings
Touch Panel Settings
Returning to Default Settings
Ending Hardware SET UP
TOP Panel
Troubleshooting
Symptom Possible Cause Remedy
Depth
About the LCD Screen
About Miniature Fluorescent Tube Technology
Specifications
Other
Avertissement
Précaution DE Ventilation
Milieu de fonctionnement
Installation du SVM-1000 dans un bâti aux normes
EIA
Utilisation DES Fonctions
Remarque
Vérification DES Accessoires
Caractéristiques
Synchomix Musique 4 canaux et Vidéo
Noms ET Fonctions DES Organes
Panneau DE Connexion
Français
Video
Bague Headphones Mixing
Bague de réglage Headphones Level
Bouton/voyant Fader Start CH-1 à CH-4
15 Sélecteur Video Input de canal
Bague de contrôle de niveau Booth Monitor
Bouton Video EQ ON/OFF, SET UP
Bouton Video Solo Mode
31 Sélecteur Cross Fader Curve
Connexions
Branchement DES Entrées
Lecteurs de DVD DJ/VJ ou lecteurs de CD DJ de Pioneer
Branchement d’une platine-disque analogique
Branchement DES Sorties
Branchement D’UN Microphone ET D’UN Casque
Branchement DU Cordon ’ALIMENTATION
Connecteur vidéo externe
Casque d’écoute
Réglez l’interrupteur Power du panneau arrière sur on
Démarches DE Base
Sélection DE Courbe DE Fondu
Sélection de son stéréo ou monaural
Entrée de microphone
Sortie du moniteur de cabine
Utilisation DES Fonctions DE Contrôle Vidéo
Utilisation DU Fondu Croisé Vidéo
Utilisation DU Commutateur DE Canal Vidéo
Trans
Utilisation EN Mode Solo Video
Tableau DES Effets DE Mixage Vidéo
Quand Fader AV Sync est activé on
Quand Fader AV Sync est désactivé OFF
Utilisation DE LA Fonction D’EFFET
Beat
Quand le moniteur principal est activé
Quand le moniteur principal est désactivé
Utilisation DES Effets Tactiles Touch
Saisie manuelle du BPM au moyen du bouton TAP
Utilisation du visualiseur
Motif d’effet vidéo
Motif
Bank
Edit
Banque de texte
Affichage / Masquage DU Moniteur Principal
SAVE/LOAD Sauvegarde/Chargement
Clavier USB
Liste DES Effets
Effets de battement Beat *1
Paramètre Description de l’effet Paramètre du bouton de
Battement Description
100 % et 100 % Hauteur du son
Effets tactiles Touch *1
Toucher Description
Ripple PATTERN1
La gauche pour réduire la longueur De ce cycle
Français
Lens PATTERN2
Rotatif de torsion
Drop PATTERN1
Effet de Texte Text
Caractère
Paramètre Description de l’effet
Configuration DU Visusaliseur Jpeg
Utilisation DU Visualiseur Jpeg
Avant D’UTILISER LE Visualiseur Jpeg
Utilisation d’une clé de mémoire USB
Fonctionnement en mode manuel Manual Mode
Fonctionnement en mode automatique Auto Mode
Chargement des fichiers Jpeg sur le SVM-1000
Utilisation d’un fichier Jpeg en l’attribuant à un canal
Fonctionnement en mode de fondu Fader Mode
Touchez le bouton Fader Mode pour sélectionner le mode
Fader
Actionnez le levier de fondu
Configuration DE L’ÉGALISEUR Vidéo
Mise EN/HORS Service DE L’ÉGALISEUR
Fonction D’ÉGALISEUR Vidéo
Fonction DE Départ EN Fondu
Lancement de la lecture par fondu croisé
Lancement de la lecture par fondu de canal
Exécution DE LA Configuration Utilitaire
Configuration Midi
Réglages Midi
Remarque
Liste DES Codes Midi
MSB LSB Video Trim Audio Trim CH1 MID LOW CUE BTN
Zone Centrale DU Panneau
Boutons GUI Interface utilisateur graphique
BANK1 BTN BANK2 BANK3 BANK4 Text Effect BANK5
Effet de texte
BANK6 BTN Text Edit
Exécution DE LA Configuration DU Moniteur Vidéo
Configuration DE LA Langue DU Clavier
Configuration du moniteur vidéo
Configuration de la langue du clavier
Configuration DU Matériel
Effectuez la configuration du matériel
Réglages DE Système System
Réglages DE Microphone MIC
Réglages DE Sortie Principale Master OUT
Réglages D’ÉCRAN À Cristaux Liquides LCD
Réglages DE Sortie DE Moniteur Monitor OUT
FIN DE LA Configuration DU Matériel
Réglages DE L’ÉCRAN Tactile Touch Panel
Retour AUX Paramètres PAR Défaut
Guide DE Dépannage
Symptômes Causes possibles Corrections
Le réglage Cross Fader Assign a , Thru
DVD/CD
Propos DE LA Technologie DES Tubes Fluorescents Miniaturisés
Fiche Technique
Divers
Warnung
Betriebsumgebung
Vorsichtshinweis ZUR Belüftung
Vorsicht MIT DEM Netzkabel
Einbau des SVM-1000 in ein EIA-Rack
Bezeichnung UND Funktion DER
Verwendung DER Video
Hinweis
Überprüfen DES Mitgelieferten Zubehörs
Merkmale
Synchromix von 4 Audio- und Videokanälen
Digitaltechnologie für weitere DJ/VJ Darbietungsfunktionen
Bezeichnung UND Funktion DER Bedienelemente
Anschlussfeld
Bedienfeld
Mono Split
Pegelregler für Kabinen-Monitor Booth Monitor
UTILITY-Taste Master MONITOR, SET UP
Video-Solo-Modus-Taste Video Solo Mode
Pegelregler für Master-Videoausgang Video Master Level
Anschlüsse
Anschlüsse AN DEN Eingangsbuchsen
Plattenspieler
Sonstige Geräte mit Line-Pegel-Ausgang
Anschlüsse AN DEN Ausgangsbuchsen
Anschliessen VON Mikrofonen UND Kopfhörer
Anschliessen DES Netzkabels
Mikrofon
Externes Videogerät
Grundlegende Bedienungsverfahren
Wahl DER Faderhebel Dämpfungskurve
Wahl zwischen Stereo und Mono
Mikrofoneingang
Kabinen-Monitorausgang
Verwendung DER Video Steuerfunktionen
Bedienung DES VIDEO-KREUZFADERS
Bedienung DES Videokanalschalters
Bedienung IM VIDEO-SOLO-MODUS
Tabelle DER VIDEO-MISCHEFFEKTE
Bei eingeschalteter Fader AV SYNC-Taste
Bei ausgeschalteter Fader AV SYNC-Taste
Verwendung DER Effektfunktion
Verwendung DER BEAT-EFFEKTE
Deutsch
Bei eingeschaltetem MASTER-Monitor
Gebrauch der TAP-Taste für manuelle Eingabe des BPM-Wertes
Verwendung der Visualizer-Funktion
Videoeffektmuster
Beat-Wahl
Verwendung DER TOUCH-EFFEKTE
Muster
Hold
Verwendung VON TEXT-EFFEKTEN
Effect Text Edit
Textspeicherbank
ANZEIGEN/VERDECKEN DES MASTER- Monitors
Effekttabelle
BEAT-Effekte *1
USB-Tastatur
PAN
Chorus-Ton
TOUCH-Effekte *1
Parameter Beschreibung des Effekts
Berührung Beschreibung
Ton *4 Ausgabe eines Phaser-Effekts
Lens
Ton Der Flanger-Effekt wird
TEXT-Effekte
Drop
Charaktertabelle
Rechts nach links ausgedehnt
Jpeg VIEWER-SETUP
Verwendung DES Jpeg Viewer
Gebrauch eines USB-Speichergerätes
Gebrauch einer SD-Speicherkarte
Laden von JPEG-Dateien in das SVM-1000
Zuordnen einer JPEG-Datei zu einem Kanal
Betrieb im MANUAL-Modus
Betrieb im AUTO-Modus
Betrieb im FADER-Modus
Betätigen Sie den Kanal-Faderhebel
Berühren Sie die CLEAR-Schaltfläche
Video EQUALIZER-SETUP
DIE Video EQUALIZER-FUNKTION
EIN- UND Ausschalten DES Equalizers
Berühren Sie die EXIT-Schaltfläche
FADER-STARTFUNKTION
Starten der Wiedergabe über den Kreuz-Faderhebel
Starten der Wiedergabe über Kanal-Faderhebel
Ausführung DES UTILITY-SETUP
MIDI-Setup
Stellen Sie Midi OUT in der MIDI-Setup-Anzeige auf on ein
MIDI-EINSTELLUNGEN
MIDI-CODETABELLE
Zentraler Bereich DES Bedienfelds
GUI-SCHALTFLÄCHEN
Random BTN
Ausführung DES Video MONITOR- Setup
TASTATURSPRACHEN-SETUP
Videomonitor-Setup
Tastatursprachen-Setup
HARDWARE-SETUP
Starten des Hardware-Setup
MIKROFON-EINSTELLUNG
Systemeinstellungen
Master OUT-EINSTELLUNGEN
Monitor OUT-EINSTELLUNGEN
LCD-EINSTELLUNGEN
Berühren Sie die Master OUT-Schaltfläche
Beenden DES HARDWARE-SETUP
SENSORBILDSCHIRM-EINSTELLUNGEN
Wiederherstellen DER Standardeinstellungen
Störungsbeseitigung
Störung Mögliche Ursache Abhilfemaßnahme
Hinweise ZUM LCD-BILDSCHIRM
Hinweise ZUR MINIATUR- FLUORESZENZRÖHREN-TECHNOLOGIE
Technische Daten
Attenzione
Avvertenza PER LA Ventilazione
Condizioni ambientali di funzionamento
Avvertimento Riguardante IL Filo DI Alimentazione
Installazione dellSVM-1000 in un rack EIA
Accessori
Controllo Degli
Caratteristiche
Canali Synchromix per musica e video
Nome Delle Varie Parti E Loro Funzione
Pannello DEL Collegamenti
Connettori di uscita video principale
Connettori di uscita di monitoraggio video MONITOR, S
Connettore Midi OUT Connettore di uscita di tipo DIN
Connettore di uscita Midi USB
Manopola Headphones Mixing
Manopola di regolazione Headphones Level
Indicatore del livello dei canali
Pulsanti/indicatori CUE della cuffia
Indicatori del livello principale Master L, R
Manopola di controllo Booth Monitor
Pulsante Video EQ ON/OFF, SET UP
Pulsante Video Solo Mode
Collegamenti
Collegamento Degli Ingressi
Lettori DVD DJ/VJ o lettori CD DJ Pioneer
Collegamento di un giradischi
Collegamenti CON LE Uscite
Collegamento DI Microfoni E Cuffie
Collegamento DEL Cavo DI Alimentazione
Microfoni
Cuffie
Portare l’interruttore Power del pannello posteriore su on
Operazioni DI Base
Regolare l’interruttore Headphones Mono SPLIT/STEREO
Scelta Della Curva DI Dissolvenza
Scelta della modalità Stereo o Mono
Ingresso del microfono
USO Delle Funzioni DI Controllo Video
USO Della Dissolvenza Incrociata Video
USO Dellinterruttore DEL Canale Video
Azionare la dissolvenza incrociata video
USO Nella Modalità Video Solo
Scheda Effetti DI Missaggio Videos
Se Fader AV Sync è disattivato
Se Fader AV Sync è attivato
USO Degli Effetti
Monitor principale attivato
Monitor principale disattivato
EDGE/HUE
Impostazione manuale del valore BPM col pulsante TAP
Uso del visualizzatore
Pattern di effetto video
Parametro
USO Degli Effetti Touch
Monitor principale disattivato Monitor principale attivato
USO DI Effetti Testuali Text
Memoria di testo
PER VISUALIZZARE/NASCONDERE IL Monitor Principale
Tastiera USB
Lista Degli Effetti
Effetti Beat *1
Battute Descrizione
BPM
Viene ripetuta Effetto
Effetti Touch *1
Parametro Descrizione delleffetto
Audio *4 Emette un effetto phaser con
Cube Video
Twist
Drop *3
Effetti Text
Carattere
Parametro
USO DI Jpeg Viewer
Prima DI Usare Jpeg Viewer
Impostazione Della Visione DI Immagini Jpeg
Uso di un dispositivo di memoria di massa USB
Uso della modalità Manual Mode
Uso della modalità Auto Mode
Caricamento di file Jpeg nellSVM-1000
Uso di un file Jpeg assegnandolo ad un canale
Uso della modalità Fader Mode
Cancellazione di file Jpeg scaricati in una Jpeg BOX
Toccare il pulsante Fader Mode per scegliere la modalità
Azionare il fader
LA Funzione DI Equalizzazione Video
Impostazione Dellequalizzazione Video
Attivazione E Disattivazione Dellequalizzatore
Toccare Exit
Funzione DI Inizio Della Dissolvenza
Inizio della riproduzione con la dissolvenza incrociata
Inizio della riproduzione con la dissolvenza dei canali
Impostazione Dellutility DI Performance
Impostazioni Midi
Impostazioni Midi
Portare Midi OUT su on nella schermata di impostazione Midi
Lista Codici Midi
Da 0 a
TIME/PARAMETER MSB LSB FLANGER, PHASER, Filter
Area DEL Pannello Centrale
Pulsanti Della GUI
Random BTN
Impostazione DEL Monitor DI Performance Video
Impostazione Della Lingua Della Tastiera
Impostazione del monitor video
Impostazione della lingua della tastiera
Impostazioni Hardware
Impostazioni System
Impostazioni MIC
Iniziare limpostazione hardware
Impostazioni Master OUT
Impostazioni Monitor OUT
Impostazioni LCD
Impostazioni Touch Panel
Ritorno Alle Impostazioni Predefinite
PER Finire Limpostazione Hardware
Diagnostica
Problema Causa possibile Rimedio
LO Schermo LCD
LA Tecnologia DEI Tubo in Miniatura Fluorescenti
Caratteristiche Tecniche
Waarschuwing
Belangrijke Informatie Betreffende DE Ventilatie
Gebruiksomgeving
Waarschuwing Netsnoer
Installatie van de SVM-1000 in een EIA-rek
Benaming EN Functie VAN DE
Opmerking
Controleer DE Waarschuwingen Accessoires M. HET Gebruik
Installatieplek
Kenmerken
Kanaals muziek- en video-synchromix
Verbeterde bediening en ontwerp voor een nieuw club-gevoel
Benaming EN Functie VAN DE Bedieningsorganen
Netstroomingang AC
Midi OUT aansluiting
Midi USB uitgangsaansluiting
USB aansluiting
Fader Start toets/indicator CH-1 tot CH-4
Headphones uitgangsschakelaar Mono SPLIT/STEREO Mono Split
Headphones Mixing regelaar
Headphones Level instelregelaar
Masterniveau-indicators Master L, R
Booth Monitor niveauregelaar
Utility toets Master MONITOR, SET UP
Video EQ toets ON/OFF, SET UP
Aansluitingen
Aansluiten VAN Apparatuur OP DE Ingangen
Pioneer DJ/VJ DVD-spelers of DJ CD-spelers
Aansluiten van een analoge platenspeler
Aansluiten VAN Apparatuur OP DE Uitgangen
Aansluiten VAN Microfoons EN Hoofdtelefoons
Aansluiten VAN HET Netsnoer
Microfoon
Externe video-aansluiting
Basisbediening
Kiezen VAN DE Fadercurve
Kiezen van stereo of mono
Microfoon-invoer
Cabinemonitor-uitvoer
Gebruik VAN DE Videoregelfuncties
Gebruik VAN DE Videokruisfader
Gebruik VAN DE Videokanaalschakelaar
Gebruik in DE Videosolomodus
Tabel VAN DE VIDEOMIX-EFFECTEN
Wanneer Fader AV Sync op on staat
Wanneer Fader AV Sync op OFF staat
Gebruik VAN DE Effectfunctie
Gebruik VAN BEAT-EFFECTEN
Wanneer de mastermonitor is ingeschakeld
Wanneer de mastermonitor is uitgeschakeld
Handmatig invoeren van de BPM met de TAP toets
Gebruik van de visualisatiefunctie
Video-effectpatroon
Gebruik VAN DE TOUCH-EFFECTEN
Patroon
Raak de effectcategorie-toets Touch aan
Kies een effect met de effectkeuzetoetsen
Gebruik VAN TEXT-EFFECTEN
Tekstbank
WEERGEVEN/VERBERGEN VAN DE Mastermonitor
USB-toetsenbord
Raak de Text Edit toets aan
Raak de Size toets aan om de lettergrootte te veranderen
Effectenlijst
Beat effecten *1
Parameter van de beat-toets
Beschrijving
Instellen van de Het naar boven en beneden
Touch effecten *1
Aanraking Beschrijving
Ripple Video
Van het phaser-effect. Raak het Oorspronkelijke geluid
Beeld Horizontaal gerangschikt
Draaiend en roterend efect
Bewegende cirkel in kleur
Text effecten
Karakter
Beschrijving van het effect Parameters van de beat-toets
Zoom Audio
Gebruik VAN DE Jpeg Viewer
Voordat U DE Jpeg Viewer Gebruikt
Instellen VAN DE Jpeg Viewer
Gebruik van een USB-geheugenapparaat
Gebruik van de Manual Mode
Gebruik van de Auto Mode
Laden van JPEG-bestanden in de SVM-1000
Gebruik van de Fader Mode
Raak de Clear toets aan
DE VIDEO-EQUALIZER Functie
Instellen VAN DE Video EQ
IN/UITSCHAKELEN VAN DE Equalizer
Faderstartfunctie
KRUISFADER-START Weergave EN TERUG-NAAR-CUE Weergave
Gebruik van de kruisfader om te starten met afspelen
Gebruik van de kanaalfader om te starten met afspelen
UTILITY-INSTELLINGEN
MIDI-INSTELLINGEN
Midi instellen
Opmerking
Midicodelijst
Categorie Naam van Type MIDI-melding Opmerkingen Schakelaar
Tot
MIDDENPANEEL-GEDEELTE
GUI-TOETSEN
Random BTN
Instellen VAN DE Videomonitor
Instellen VAN DE Toetsenbordtaal
Videomonitor-instelling
Toetsenbordtaal-instelling
APPARATUUR-INSTELLINGEN
Systeeminstellingen
MICROFOON-INSTELLING
Activeren van de apparatuur-instellingenmodus
MASTER-UITGANG Instellingen
LCD-INSTELLINGEN
MONITORUITGANG-INSTELLINGEN
AANRAAKPANEEL-INSTELLINGEN
Terugkeren Naar DE Standaardinstellingen
Verhelpen VAN Storingen
Storing Mogelijke oorzaak Maatregelen
Betreffende HET LCD-SCHERM
Betreffende DE Miniatuur Fluorescentiebuizen
Technische Gegevens
Algemeen
Audiogedeelte
Videogedeelte
Advertencia
Precaución Para LA Ventilación
Entorno de funcionamiento
Instalación de la SVM-1000 en un bastidor EIA
Nomenclatura Y Funciones DE LOS
Empleo DE LAS Funciones DE
Nota
Confirmación DE LOS Accesorios
Características
Mezcla sincronizada de 4 canales de música y vídeo
Nomenclatura Y Funciones DE LOS Controles
Panel DE Conexiones
Panel DE Operación
Control Headphones Mixing
Botón/indicador Fader Start CH-1 a CH-4
Toma de auriculares Phones Selector Video Input del canal
Control Video Trim
41 Botón Video EQ ON/OFF, SET UP
43 Botón Video Solo Mode
Selector de salida principal estéreo/monofónica Mono
Indicador del nivel principal Master L, R
Conexiones
Conexiones DE LAS Entradas
Conexión de un giradiscos analógico
Conexión de otros dispositivos de salida de nivel de línea
Conexión DE LAS Salidas
Conexión DE LOS Micrófonos Y LOS Auriculares
Conexión DEL Cable DE Alimentación
Micrófono
Conectores de vídeo externo
Ponga el selector Power del panel posterior en on
Operaciones Básicas
Ajuste el interruptor Headphones Mono SPLIT/STEREO
Selección DE LA Curva DE Fundido
Selección de estéreo o monofónico
Entrada de micrófono
Empleo DE LAS Funciones DE Control DE Vídeo
Operación DEL Fundido Cruzado DE Vídeo
Operación DEL Selector DE Canal DE Vídeo
Opere el fundido cruzado de vídeo
Operación EN EL Modo Individual DE Vídeo
Gráfica DE Efectos DE Mezcla DE Vídeo
Cuando Fader AV Sync está activado on
Cuando Fader AV Sync está desactivado OFF
Empleo DE LA Función DE Efectos
Empleo DE LOS Efectos DE Compás
Cuando el monitor principal está activado
Cuando el monitor principal está desactivado
Entrada manual de BPM empleando el botón TAP
Empleo del visualizador
Patrón del efecto de vídeo
Parámetro
Empleo DE LOS Efectos DE Toque
Patrón
PATTERN/TEXT Bank
Empleo DE LOS Efectos DE Texto
Banco de texto
Página 1 y la
VISUALIZACIÓN/OCULTAMIENTO DEL Monitor Principal
SAVE/LOAD Guardar/Cargar
Teclado USB
Lista DE Efectos
Efectos Beat *1
Parámetro Descripción del efecto
Descripción
RGB
BPM Roll
Efectos Touch *1
Toca Descripción
Pattern
Emite un efecto semejante a un Caleidoscopio
Spot PATTERN2
Derecha-izquierda sobre el
Efectos Text
Carácter
Configuración DE Jpeg Viewer
Empleo DE Jpeg Viewer
Antes DE Emplear EL Jpeg Viewer
Empleo de un dispositivo de memoria USB
Operación en el modo Manual Mode
Operación en el modo Auto Mode
Carga de archivos Jpeg al SVM-1000
Empleo de un archivo Jpeg asignándolo a un canal
Operación en el modo Fader Mode
Borrado de archivos Jpeg descargados de Jpeg BOX
Configuración DEL Ecualizador DE Vídeo
Función DEL Ecualizador DE Vídeo
ACTIVACIÓN/DESACTIVACIÓN DEL Ecualizador
Función DE Inicio CON Fundido
Empleo del fundido cruzado para iniciar la reproducción
Empleo del fundido de canales para iniciar la reproducción
Efectúe LA Configuración DE Utilidades
Configuración de Midi
Ajuste Midi OUT en on en la configuración de Midi
Ajustes DE Midi
Lista DE Códigos Midi
Fader CF Assign Video Trim Audio Trim CH4 MID
LOW CUE BTN
TIME/PARAMETER MSB LSB PHASER, FILTER, Chorus
Área DEL Panel Central
Parameter 1 Flanger
Botones GUI
Random BTN
Efectúe LA Configuración DEL Monitor DE Vídeo
Configuración DEL Idioma DEL Teclado
Configuración del monitor de vídeo
Configuración del idioma del teclado
Configuración DE Dispositivos
Configuración DEL Sistema
Inicie la configuración de dispositivos
Ajuste DE Micrófono
Ajustes DE LA Salida Principal
Ajustes DEL Visualizador LCD
Ajustes DE LA Salida DEL Monitor
Finalización DE LA Configuración DE Dispositivos
Retorno a LOS Ajustes Predeterminados
Solución DE Problemas
Booth
Síntoma Causa posible Solución
Notas Sobre LA Pantalla LCD
Especificaciones
Otros
Page
Пользование Функциями Управления
Пользование Функцией Наложения
Пользование Обозревателем Jpeg Jpeg
Внимание
Меры
Предосторожности ПРИ Обращении С Устройством
Функциональные Особенности
Элементы Устройства И ИХ Функции
Элементы Устройства И ИХ Функции
Master ATT
Кий
DVD/LINE
Master Level
CH Fader Curve
Подключения
Подключение Входов
DJ/VJ DVD-плееры или DJ CD-плееры производства Pioneer
Подключение проигрывателя виниловых пластинок «вертушки»
Подключение Выходов
Подключение Микрофона И Наушников
Подключение Сетевого Шнура
Микрофон
Наушники
Основные Операции
Выбор Характеристики Фейдера
Выбор стереофонического или монофонического режима
Микрофонный вход
Выходной контрольный сигнал в кабинку ди-джея
Пользование Функциями Управления Видеоизображениями
Операции В Сольном Видеорежиме
Схема Эффектов Видемикширования
Когда для Fader AV Sync задано значение on ВКЛ
Когда для Fader AV Sync задано значение OFF Выкл
Пользование Функцией Наложения Эффектов
Использование РИТМ-ЭФФЕКТОВ
Когда главный монитор выключен
Ввод BPM вручную с помощью кнопки TAP
Пользование визуализатором
Шаблон видеоэффекта
Параметр
Pattern Шаблон
Параметр2
Использование ТЕКСТ-ЭФФЕКТОВ
Text bank Текстовый банк данных
Factory
Текстовое
Окно Text BOX
ОТОБРАЖЕНИЕ/СКРЫТИЕ Главного Монитора
Клавиатура USB
Список Эффектов
Ритм-эффекты Beat *1
Pycc
Параметр Описание эффекта Параметр кнопки темпа
Original
Сенсорные эффекты Touch *1
Параметр Описание эффекта Описание эффекта при
Прикосновении Описание
Pattern
PATTERN3
Выводит изображение с вращательным эффектом скручивания
Drop *3
Текст-эффекты Text
Знак
Пользование Обозревателем Jpeg Jpeg Viewer
Настройка Обозревателя Jpeg
Использование запоминающего устройства USB
Использование карты памяти SD
Операции в ручном режиме Manual Mode
Операции в автоматическом режиме Auto Mode
Загрузка файлов Jpeg в SVM-1000
Использование файла JPEG, назначив его каналу
Операции в режиме фейдера Fader Mode
Удаление файлов JPEG, загруженных в Jpeg BOX
Управляйте фейдером
Прикоснитесь к кнопке Clear
Функция Видеоэквалайзера
Настройка Функции Video EQ
Функция Запуска ПО Фейдеру
Использование кроссфейдера для запуска воспроизведения
Выберите переключателем Cross Fader Assign канал Или B
Выполните Настройку Программы
Настройка MIDI-ИНТЕРФЕЙСА
Настройте Midi
Примечание
Список Кодов Midi
От 0 до
Fader Curve CH Curve Cross Curve
Зона Центральной Панели
Кнопки Графического Пользовательского Интерфейса
MSB LSB Beat Effect BTN
MSB LSB Random BTN
Настройка Языка Клавиатуры
Настройка видеомонитора
Настройка языка клавиатуры
Прикоснитесь к Video Monitor
Настройка Оборудования
Настройка Микрофона MIC
Запустите режим настройки оборудования
Настройки Главного Выхода Master OUT
Настройка ЖКД LCD
Настройки Выхода НА Монитор Monitor OUT
Настройки Сенсорной Панели
Возврат К Настройкам ПО Умолчанию
Устранение Неполадок
Признак неисправности Возможная причина Решение
Audio Input
ЖКД-ЭКРАНЕ
Video Input
Технические Характеристики
Другое
Ñäåëàíî â Maëaéçèè Printed Imprimé au