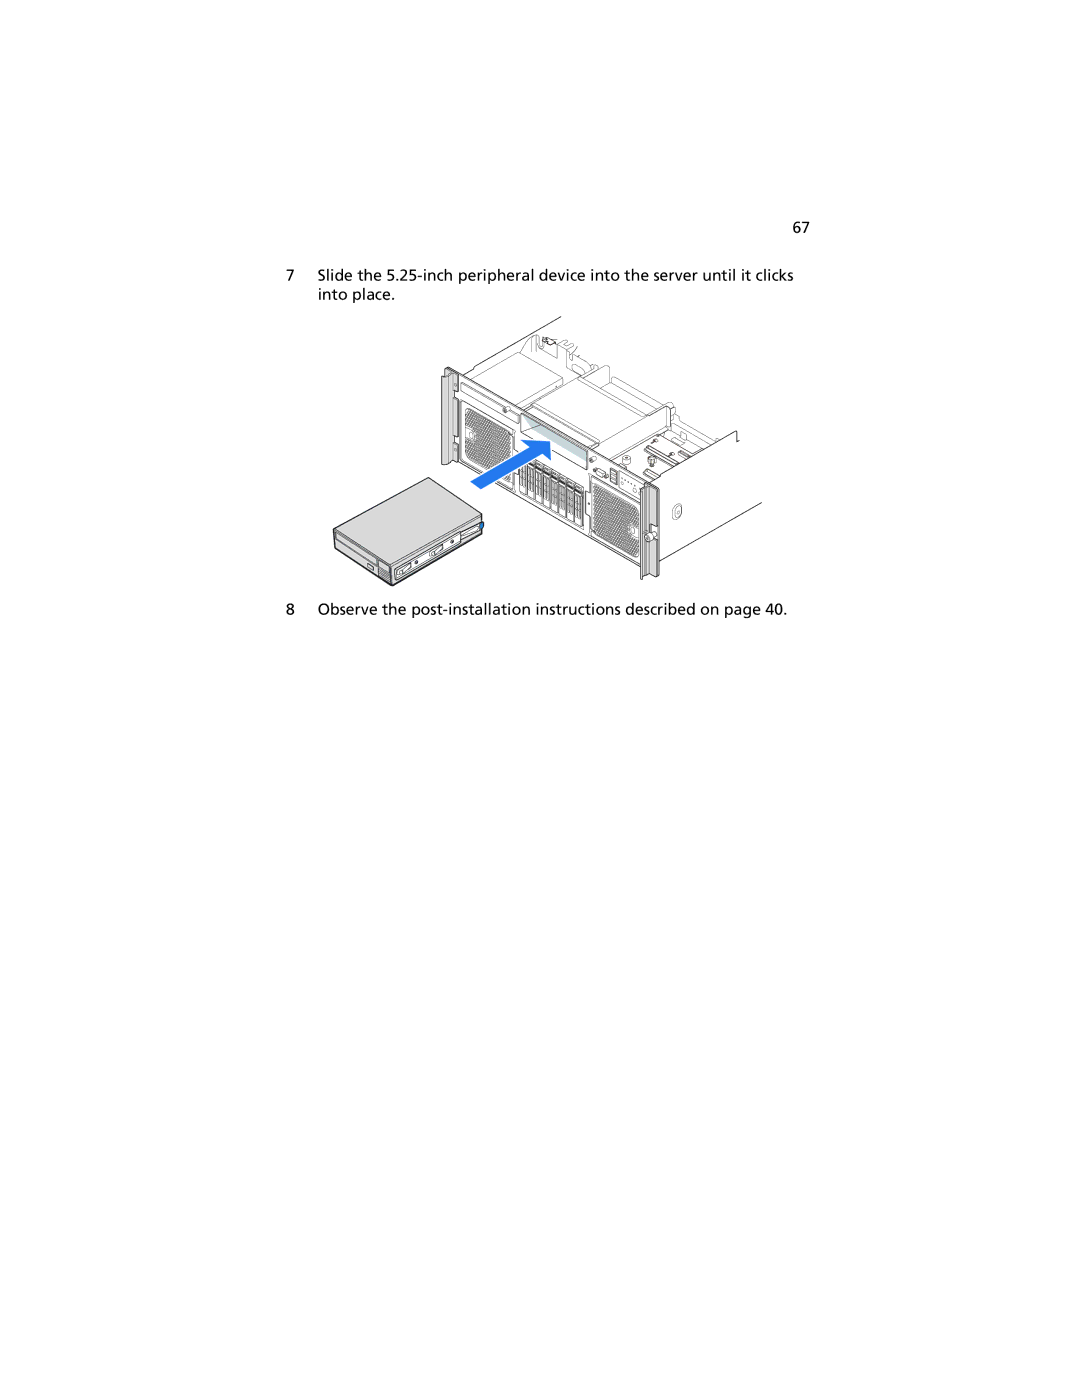
Manuals
/
Brands
/
Computer Equipment
/
Personal Computer
/
Acer
/
Computer Equipment
/
Personal Computer
Acer
R920 Series
- page 85
1
85
206
206
Download
206 pages, 24.15 Mb
67
7
Slide the 5.25-inch peripheral device
into the server until it clicks
into place.
8
Observe the post-installation inst
ructions described on page 40.
Contents
Main
Page
iii
Notices
FCC declaration of conformity
FCC notice
Class A equipment
iv
Notice: Shielded cables
Notice: Peripheral devices
Use conditions
Notice: Canadian users
v
Laser compliance statement
Macrovision copyright protection notice
vi
CE Declaration of conformity
Page
viii
Information for your safety and comfort
Safety instructions
Turning the product off before cleaning
CAUTION for plug as disconnecting device
CAUTION for accessibility
Using electrical power
x
Safe listening
Product servicing
Page
xii
Tips and information for comfortable use
Finding your comfort zone
xiii
Taking care of your vision
xiv
Developing good work habits
Contents
1 System tour 1
2 System setup 29
3 System upgrade 37
4 System BIOS 97
5 System troubleshooting 135
Appendix A: Rack mount configuration 149
Appendix B: Memory configuration 163
Appendix C: SAS and SAS RAID configuration utilities 177
Page
Page
Page
Features summary
Processor
Chipset
Memory subsystem
Media storage
SAS controller
Integrated hardware RAID (optional)
Serial ATA port
Networking
PCI- Express I/O
Graphic interface
Server management
Control panel
I/O ports
Operating system and software
Page
External and internal structure
Front bezel
Front panel
Rear panel
Page
12
System boards
Mainboard
Page
14
Memory board
The memory board connects to the mainboard through x16 PCI Express slots.
Page
Button control panel
LCD control panel (optional)
18
Control panel button function overview
System LED indicators
20
Control panel LED indicators
Page
Hot-plug HDD carrier LED indicators
Hot-swap fan module LED indicators
Hot-plug power supply module LED indicators
25
LAN port LED indicators
Hot-plug PCI Express slot LED indicators
The PCI slots 1 and 2 have a LED indicator to display the PCI hot-plug status.
26
Memory board LED indicators
The LEDs on the memory board indicate the status of the memory board power and DIMM.
System jumpers
Page
Page
Page
Setting up the system
Pre-installation requirements
Selecting a site
Checking the package contents
Page
Turning on the system
Power-on problems
Configuring the system OS
Turning off the system
To turn off the system via software:
To turn off the system via hardware:
Page
Page
Installation precautions
ESD precautions
Pre-installation instructions
Post-installation instructions
Opening the server
Removing and installing the front bezel
To remove the front bezel:
Page
Removing and installing the top cover
To remove the top cover:
To install the top cover:
Removing and installing the processor air baffle
To remove the processor air baffle:
To install the processor air baffle:
Page
Page
Removing and installing a hard disk drive
Determining drive status
To remove an HDD:
To install an HDD:
Page
Removing and installing the system fan
Determining fan status
To remove the front system fan assembly:
To install the front system fan assembly:
Page
Page
Removing and installing a power supply
Determining power supply status
To remove a power supply:
To install a power supply:
Removing and installing a PCI card
Determining PCI slot status
To remove a hot-plug PCI card with OS hot-plug interface:
To remove a hot-plug PCI card with hardware interface:
Page
To install a new hot-plug PCI card:
Configuring cold-pluggable
Removing and installing the DVD drive
To remove the DVD drive:
To install the DVD drive:
Installing a 5.25-inch drive
To install a 5.25-inch drive:
Page
Upgrading the processor
Processor configuration guidelines
To install a new processor:
Page
Page
To re mo ve a pro ce sso r:
Page
Page
Removing and installing a memory board assembly
To remove the memory board assembly:
Page
To install the memory board assembly:
Installing and removing DIMM modules
DIMM module configuration guidelines
DIMM population guidelines
Memory Board
FBDIMM
To install DIMMs in the memory board:
B
A
Page
To remove DIMMs on the memory board:
To reconfigure the system memory:
Removing and installing a non-hot-plug PCI card
To remove a non-hot-plug PCI card:
To install a non-hot-plug PCI card:
Configuring server management
Installing and removing the I/O expansion module
To install the I/O expansion module:
Page
To remove the I/O expansion module:
Installing and removing the ARMC/3 R2 module
To install the ARMC/3 R2 module:
ARMC/3 NIC
ARMC/3
To remove the ARMC/3 R2 module:
Configuring the hardware RAID
Installing and removing the SAS module
To install the SAS module:
Page
To remove the SAS module:
Page
Installing and removing the RAID activation key and RAID cache
To install the RAID activation key and RAID cache:
To remove the RAID activation key and RAID cache:
Installing and removing the RAID BBU
To install the RAID BBU:
To remove the RAID BBU:
Page
Page
BIOS overview
Entering BIOS setup
BIOS setup menus
BIOS setup keyboard commands
Main menu
Page
Page
Processor Configuration
Page
Memory Configuration
Page
Memory RAS and Performance Configuration
Page
Mass Storage Controller Configuration
Serial Port Configuration
USB Configuration
Page
PCI Configuration
Page
LAN Configuration
Page
System Acoustic and Performance Configuration
120
Security menu
Setting a system password
Changing a system password
Removing an administrator password
123
Server Management menu
Page
Console Redirection
Page
Page
Page
129
Boot Options menu
Page
Error Manager menu
Exit menu
Page
Upgrading the BIOS
To record the current BIOS settings:
To download the BIOS image file:
To upgrade the BIOS:
Page
Page
Troubleshooting
Resetting the system
Problems following initial system installation
First steps checklist
Hardware diagnostic testing
Verifying proper operation of key system lights
Confirming loading of the OS
Specific problems and corrective actions
Power indicator does not light.
Server powers on but turns off often with fault light.
Server boot does not complete POST.
Server does not recognize all of the processors installed.
HDD activity indicator does not light.
ODD (Optical disk drive) activity indicator does not light.
ODD tray cannot be ejected.
ODD drive cannot read a disc.
Hard drives are not recognized.
Bootable CD drive is not detected.
New memory modules installed are not detected.
Problems with the network
Network status indicator does not light.
Page
No characters appear on the screen.
Characters are distorted or incorrect.
System cooling fan do not rotate properly.
Page
Page
Page
Page
Rack installation information
Rack installation precautions
Page
Page
Vertical mounting hole pattern
Page
Page
Page
Page
Page
Page
Page
Page
Page
Page
Introduction
Memory board installation order
167
FBDIMM module population order
Single and dual channel population
Population with two memory boards
The tables below list the suggested FBDIMM module population for normal configuration.
Population with one memory board
Appendix B: Memory configuration
169
Memory sparing population
The tables below list the suggested FBDIMM module population for memory sparing configuration.
Population with two memory boards
* DIMM slot 1 in memory boards A and B is configured to sparing mode.
* DIMM slot 1 in memory boards A, B, C, and D is configured to sparing mode.
Memory mirroring population
The table below list the suggested FBDIMM module population for memory mirroring configuration.
Memory configuration
Dual-channel mode
To configure memory to maximum performance mode:
Single-channel mode
To configure memory to single-channel mode:
Memory sparing mode
Spare memory configurations
Dual-ranked memory sparing
To configure memory to memory sparing mode:
Memory mirroring mode
To configure memory to memory mirroring mode:
Page
Page
Page
Page
SAS configuration utility
Starting the SAS configuration utility
Loading the factory default settings
Creating a RAID1 volume with a hot spare disk
Page
SAS RAID configuration utility
Starting the SAS hardware RAID configuration utility
Loading the factory default settings
Creating and initialing a RAID volume
Assigning a hot spare disk
Page
Index
Numerics
A
B
C
L
M
N
O
P
S
T
U