Americas Headquarters
Text Part Number OL-19025-01
Page
Page
Page
N T E N T S
Footstand
Configuring Features, Templates, Services, and Users
Troubleshooting and Maintenance
Network and Access Port Pinouts C-2
OL-19025-01
Overview
Audience
Organization
Chapter Description
Related Documentation
Cisco Unified IP Phone 6900 Series
Document Conventions
Cisco Product Security Overview
Convention Description
Boldface font
Italic screen font
An Overview of the Cisco Unified IP Phone
Understanding the Cisco Unified IP Phone 6921, 6941,
Buttons
2shows the main components of the Cisco Unified IP Phone
OL-19025-01
OL-19025-01
3shows the main components of the Cisco Unified IP Phone
OL-19025-01
Dynamic Host Configuration Protocol chapter
What Networking Protocols are Used?
Networking Protocol Purpose Usage Notes
Communications Manager System Guide
System Guide
Cisco Unified Communications Manager
Related Topics
Feature Overview
Providing Users with Feature Information
Configuring Telephony Features
Related Topic
Feature Description
Access section on
OL-19025-01
Purpose For More Information
Communications Manager Administration Guide
Unified Communications Manager Administration
Task Purpose For More Information
Communications Manager Administration
Chapter in the Cisco Unified Communications Manager
Installing Cisco Unified IP Phones
Refer to Cisco Unified IP Phone 6921, 6941,
Network Setup IPv4 Setup
User Guide for Cisco Unified Communications Manager
User Guide Administration and System Guides
Terminology Differences
A P T E R
Related Topic
Providing Power to the Cisco Unified IP Phone
Understanding the Phone Startup Process, Network Setup Menu,
Power Outage
Power Guidelines
Power Type Guidelines
Understanding Phone Configuration Files
Obtaining Additional Information about Power
Resolving Startup Problems,
Understanding the Phone Startup Process
Purpose Related Topics
Adding Phones to the Cisco Unified
Requesting the Configuration File
Adding Phones with Auto-Registration
Requires MAC Method Address?
Adding Phones with Auto-Registration and Taps
Determining the MAC Address for a Cisco Unified IP Phone
Adding Phones with BAT
Before You Begin
Network Requirements
Network and Access Ports
Cisco Unified Communications Manager Configuration
Network and Access Ports, Handset, Speakerphone, Headset,
Speakerphone
Handset
Headset
Audio Quality
Installing the Cisco Unified IP Phone
See the Network and Access Ports section on
See the Headset section on page 3-3for supported
See the Adding Phones to the Cisco Unified
Cisco Unified IP Phone 6921 and 6941 Cable Connections
Cisco Unified IP Phone 6961 Cable Connections
Reducing Power Consumption on the Phone
Footstand
Cisco Unified IP Phone 6921
Cisco
Higher Viewing Angle
Verifying the Phone Startup Process
Mounting the Phone to the Wall
Lower Viewing Angle
Configuring Startup Network Settings
Hold Mute Speaker
OL-19025-01
Configuration Menus on the Cisco Unified IP Phone
Phone
Procedure
Displaying a Configuration Menu
Select Admin Settings
Unlocking and Locking Options
Editing Values
Option Description To Change
Network Setup Menu
Select
PC Vlan
IPv4 Setup Menu Options
Related Topics
OL-19025-01
Configuring Features, Templates, Services, and Users
Feature Description Configuration Reference
Features and Services Guide, Cisco Call
Features and Services Guide, Call
Administration Guide, Directory
Forward Maximum Hop Count service parameter
Cisco Unified Communications
Communications Features and Services
Communications Manager Features
Codes and Forced Authorization Codes
Extension Mobility chapter in the Cisco
Point Configuration chapter in the Cisco
Button Template for Personal Address Book or
Features and Services Guide
Speed Dials,
Manager Feature and Services Guide
Administration Guide, Hunt Group
Cisco Communications Manager
Features and Services Guide, Malicious
Administration Guide, Message Waiting
Refer to Cisco Unified Communications
Manager System Guide, Cisco Unified
Features and Services Guide Barge
Unified IP Phone 6921, 6941, and 6961 User
Administration Guide, Phone Button
Template Configuration chapter
Features and Services Guide, Quality
Report Tool chapter
Administration Guide, Time Period
Administration Guide, Cisco Voice-Mail
Port Configuration chapter
System Guide, Time-of-Day Routing
Configuring Corporate Directories
Configuring Corporate and Personal Directories
Join and Direct Transfer Policy
Configuring Personal Directory
Modifying Phone Button Templates
Click Save
Configuring Softkey Templates
Supported as a
DND
Setting Up Services
Giving Users Access to the User Options Web Pages
Managing the User Options Web Pages
Enter the appropriate search criteria and click Find
Click Add Selected
Click Save Selected/Changes
Specifying Options that Appear on the User Options Web Pages
Configuring the Phone to Support Call Waiting
Customizing and Modifying Configuration Files
Customizing the Cisco Unified IP Phone
Creating Custom Phone Rings
DistinctiveRingList File Format Requirements
Configuring a Custom Phone Ring
Configuring the Idle Display
PCM File Requirements for Custom Ring Types
Automatically Disabling the Cisco Unified IP Phone Backlight
Field Description
OL-19025-01
Model Information Screen
Model Information Screen, Status Menu,
Status Messages Screen
Status Menu
Select Status Messages
Message Description Possible Explanation and Action
Network Setup Menu section on
Menu section on page 4-4for details
Setup Menu section on page 4-4for details on
Network Statistics Screen
Select Status Network Statistics
Call Statistics Screen
Select Call Statistics
Voice Quality Metrics
OL-19025-01
Monitoring the Cisco Unified IP Phone Remotely
Accessing the Web Page for a Phone
Http//IPaddress
Device Information
Disabling and Enabling Web Page Access
Choose Device Phone
Network Setup
Cisco Unified IP Phone
Description
Description
Network Statistics
Vlan
Device Logs
Streaming Statistics
Configuring Settings on the Cisco Unified IP Phone chapter
Troubleshooting and Maintenance
Resolving Startup Problems
Troubleshooting and Maintenance Resolving Startup Problems
Identifying Error Messages
Verifying DNS Settings
Choose Tools Control Center Feature Services
Symptom Cisco Unified IP Phone Unable to Obtain IP Address
Cisco Unified IP Phone Resets Unexpectedly
Verifying Dhcp Settings
Verifying the Physical Connection
Identifying Intermittent Network Outages
Checking Static IP Address Settings
Verifying the Voice Vlan Configuration
Verifying that the Phones Have Not Been Intentionally Reset
Eliminating DNS or Other Connectivity Errors
Checking Power Connection
General Troubleshooting Tips
Summary Explanation
Halfduxcollisionexceedthreshold
Performing a Basic Reset
Resetting or Restoring the Cisco Unified IP Phone
Operation Performing Explanation
Performing a Factory Reset
Monitoring the Voice Quality of Calls
Troubleshooting Tips
Where to Go for More Troubleshooting Information
Metric Change Condition
Cleaning the Cisco Unified IP Phone
OL-19025-01
Providing Information to Users Via a Website
How Users Access a Voice Messaging System
How Users Configure Personal Directory Entries
Installing the Synchronizer
Configuring the Synchronizer
Supporting International Users
Support for International Call Logging
OL-19025-01
Physical and Operating Environment Specifications
Specification Value or Range
Cable Specifications
Network and Access Port Pinouts
Network Port Connector
Access Port Connector
Pin Number Function
OL-19025-01
Basic Phone Administration Steps
Example User Information for these Procedures
Adding a User to Cisco Unified Communications Manager
Adding a User From an External Ldap Directory
Choose System Ldap Ldap Directory
Click Perform Full Sync Now
Example johndoe
Configuring the Phone
Proceed to the section Configuring the Phone, page D-4
OL-19025-01
OL-19025-01
Choose User Management End User
Click Device Associations
Performing Final End User Configuration Steps
Installing the Wall Mount Kit for
Installing the Bracket
Figure E-2 Mounting the Wall Bracket
Figure E-3 Attaching the Phone Bracket
Figure E-4 Preparing the Handset Hook
Figure E-5 Attaching the Cables
Figure E-6 Attaching the Phone to the Wall Bracket
OL-19025-01
Cisco Unified IP Phone Non-Lockable Wall Mount
ADA Non-Lockable Wall Mount Kit for 6900 Series
Components
Package includes these items
Install Non-Lockable Wall Mount Kit for Phone
Before You Begin
Figure F-4 Mount the Wall Bracket
Figure F-5 Attach Phone Bracket
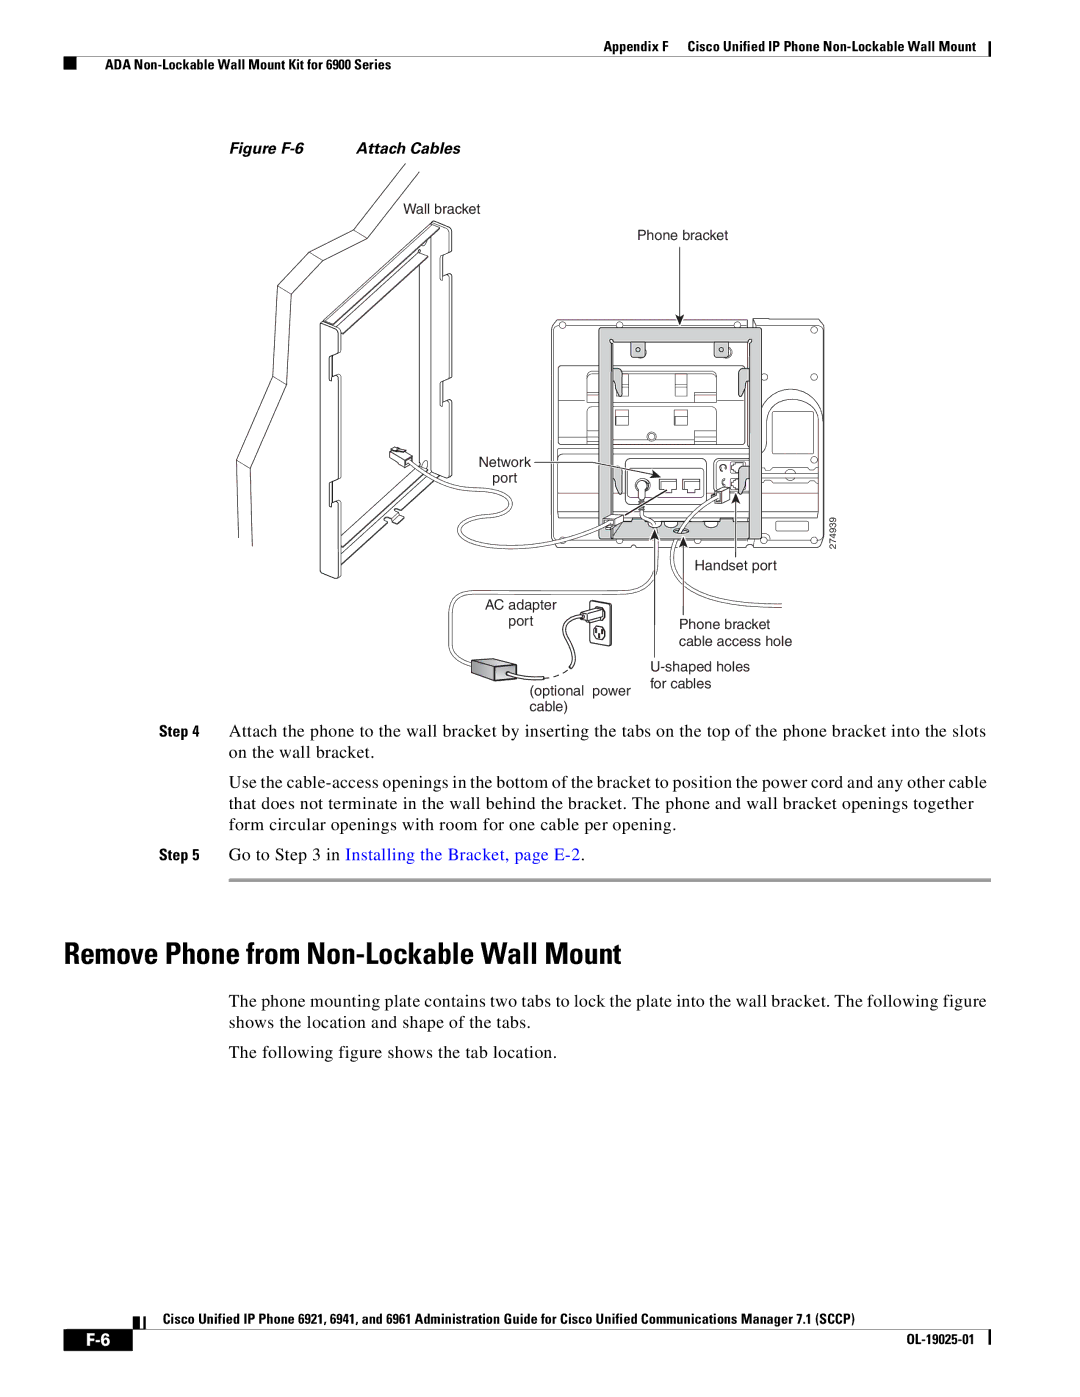
Go to in Installing the Bracket, page E-2
Remove Phone from Non-Lockable Wall Mount
Before You Begin
Figure F-7
Figure F-8
D E
IN-2
IN-3
IN-4
Tftp Server
IN-6
IN-7
IN-8